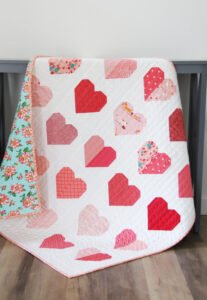
The Simple Hearts Quilt pattern is a heartfelt addition to any quilt collection. With its classic heart shapes, this quilt design makes a wonderful gift or a cozy addition to your home décor.
In this tutorial, we’ll guide you through the process of making a Simple Hearts Quilt, covering everything from fabric selection to precise cuts and the final assembly.
This easy yet beautiful quilt pattern is suitable for both beginners and experienced quilters, so let’s dive into creating this charming quilt block!

Choosing Fabrics for the Simple Hearts Quilt
When selecting fabrics for the Simple Hearts Quilt, it’s important to choose colors and patterns that emphasize the design’s warmth and charm. Reds, pinks, and pastel shades work beautifully to create a classic Valentine’s Day-inspired quilt, while shades of blue, green, or even neutral tones can lend a modern twist to the pattern.
SEE OTHER FACE PATTERNS HERE!
For the hearts themselves, you’ll want fabrics with strong colors or prints to make each heart stand out. Consider using fabric scraps if you’re aiming for a more eclectic, patchwork feel. Floral prints, polka dots, and solids work well for creating hearts that pop against the quilt’s background fabric.
Lastly, choose a contrasting background fabric to make the hearts the focal point of each block. White, cream, or light gray are popular choices for a soft, cohesive look, while darker backgrounds create a striking effect. With your fabric choices made, let’s move on to the specific fabric cuts you’ll need for each block in the Simple Hearts Quilt.
Fabric Cutting Guide for the Simple Hearts Quilt Block
To create the Simple Hearts Quilt, each block needs carefully measured fabric cuts for accuracy and symmetry. For a standard 12-inch finished block, follow the cutting instructions below:
- Heart Fabric: Cut two 5-inch squares for the heart’s upper portion and two 3 x 5-inch rectangles for the lower section.
- Background Fabric: Cut four 5-inch squares and four 3-inch squares for the space around the heart, plus four 1.5 x 5-inch strips to connect the block sections.
Arranging these fabric pieces properly before sewing will help ensure each block is consistent in size and design. Lay out the heart pieces and background squares on your workspace to visualize the shape of the heart within the block. With everything in place, you’re ready to start assembling the pieces for your Simple Hearts Quilt.
Arranging the Layout for the Simple Hearts Quilt Block
The layout of the Simple Hearts Quilt block begins by placing the heart fabric squares and rectangles in the center of the block. Position the two 5-inch squares at the top, angled together to form the rounded top of the heart shape. Below these, place the two 3 x 5-inch rectangles to create the pointed bottom of the heart.
Next, add the 5-inch background squares around the heart shape to frame it. These background pieces will fill in the space, creating a crisp outline that makes the heart stand out. Place two 5-inch background squares on either side of the top of the heart and one on each side of the lower heart point.
Lastly, position the 3-inch background squares at the block’s corners and add the 1.5 x 5-inch background strips between the sections to connect the heart and background elements. Once everything is in place, you’re ready to begin sewing the pieces together for a complete Simple Hearts Quilt block.
Sewing the Simple Hearts Quilt Block
To sew the Simple Hearts Quilt block, begin by piecing together the heart’s upper section. Sew the two 5-inch heart squares together along one side with a 1/4-inch seam allowance, then press the seam open. This step will create the rounded top portion of the heart, setting the foundation for the rest of the block.
Next, attach the two 3 x 5-inch rectangles to form the lower section of the heart. Align them carefully to keep the heart shape symmetrical. Sew along the edges using the same 1/4-inch seam allowance, then press the seams open to reduce bulk and ensure a smooth look.
Finally, assemble the entire block by sewing the background squares and strips to each section of the heart. This process requires careful alignment to keep the heart shape intact and balanced within the block. Press each seam as you go to maintain a neat and polished appearance for your finished block.
Tips for Perfecting Your Simple Hearts Quilt Block
Achieving a polished look in your Simple Hearts Quilt block is all about consistent seam allowances and careful pressing. Using a 1/4-inch seam allowance throughout will help keep each block uniform in size, making it easier to join blocks when creating the full quilt.
Pressing seams in the right direction is another essential technique. Press toward the background fabric whenever possible to reduce bulk and keep the heart shape defined. This step will also help your quilt lay flat, giving it a professional finish.
If you’re using multiple fabrics for a scrappy look, pay attention to color balance and pattern distribution. By alternating colors and prints, you can create a lively, patchwork effect that adds charm and visual interest to the quilt. This approach is a wonderful way to use up fabric scraps and infuse each block with a unique personality.
Creating Multiple Simple Hearts Quilt Blocks for a Full Quilt
Once you’ve mastered the Simple Hearts Quilt block, you can begin making additional blocks to create a full quilt. Arrange the heart blocks in rows, ensuring that the colors and patterns are well-distributed for a balanced design. Adding a contrasting sashing between blocks can enhance each heart’s individuality, especially if you’re using a variety of colors and prints.
When joining the blocks, use the same 1/4-inch seam allowance to keep everything aligned. Press each row as you complete it to minimize bulk and keep the quilt top smooth. This attention to detail will make the final assembly process more manageable and create a visually cohesive quilt.
For an extra-special touch, consider adding a border around the quilt. A wide border can frame the hearts beautifully and add visual weight to the design. By arranging each block carefully and pressing seams consistently, you’ll have a finished quilt that looks polished and ready to display.
🌟 Join our exclusive Quilt broadcast list on Messenger! Receive the best patterns, tips, and updates directly in your inbox. Our team is ready to send you delightful content that will inspire your projects. Don’t miss this opportunity to stay updated and create amazing pieces. Join now and be part of this passionate quilt community! ✨📩
Finishing Touches: Quilting and Binding Your Simple Hearts Quilt
With the quilt top complete, it’s time to add the finishing touches that bring the Simple Hearts Quilt together. Choose a batting that matches the weight and drape you’d like for the quilt; cotton batting is a popular choice for a cozy, medium-weight quilt. Lay the batting between the quilt top and backing fabric, and smooth out any wrinkles for a flat finish.
Quilt the layers together using a quilting pattern that complements the heart design. Outline quilting or straight-line quilting around each heart can highlight the shape, while free-motion quilting can add a playful texture. Try different quilting techniques to find the one that best enhances your quilt’s overall look.
Finish your Simple Hearts Quilt by binding the edges with a coordinating or contrasting fabric. A neat binding not only protects the quilt’s edges but also gives it a polished, finished look. After all your hard work, your Simple Hearts Quilt is ready to be displayed or gifted as a beautiful expression of warmth and love.
This tutorial provides all the details you need to create a charming Simple Hearts Quilt, from fabric selection to final assembly. With careful attention to each step, you’ll be able to craft a quilt that captures the heartfelt appeal of this classic pattern. Enjoy the process, and let your finished quilt bring joy and warmth to anyone who sees it!


