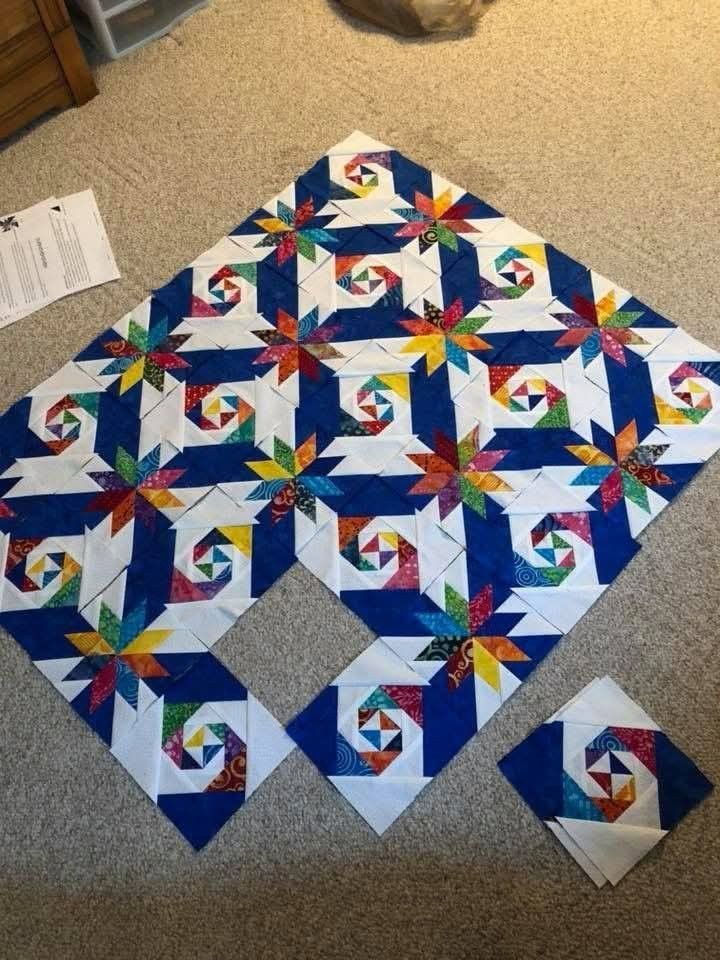
The Starlight Vortex – TUTORIAL is a mesmerizing quilt pattern that combines movement, precision, and dramatic contrast. Designed to create the illusion of spinning stars or a swirling galaxy, this quilt block transforms simple geometric units into a dynamic, eye-catching composition.
If you love star quilts but want something more modern and bold, the Starlight Vortex – TUTORIAL delivers depth and motion without requiring overly complicated techniques. With thoughtful color placement and accurate piecing, you can create a quilt that looks intricate yet remains achievable for confident beginners and experienced quilters alike.
In this guide, you’ll learn how to understand the structure of the block, select impactful fabrics, assemble the design step by step, and finish your quilt with professional results.
1. Understanding the Starlight Vortex Design
At first glance, the Starlight Vortex – TUTORIAL may look complex, but it is typically constructed from basic patchwork units arranged strategically to create a swirling star effect.
DISCOVER MORE FREE PATTERNS HERE!
The pattern often includes:
Half-square triangles (HSTs)
Flying geese units
Square-in-a-square components
High-contrast color placement
The “vortex” effect comes from the rotation of these units. When arranged in a circular or spiral layout, the blocks create the illusion of movement — as if the stars are spinning across the quilt top.
Key characteristics of this pattern:
Strong directional flow
High contrast between light and dark fabrics
Repeated rotational symmetry
Bold center focal point
Precision is important because slight misalignments can disrupt the spinning illusion. Careful cutting and consistent seam allowances will ensure your vortex remains crisp and balanced.
2. Choosing Fabrics for a Dramatic Vortex Effect
Fabric selection is the heart of the Starlight Vortex – TUTORIAL. The swirling motion relies heavily on contrast and value placement.
Here are effective fabric strategies:
High Contrast Combination
Use one very light fabric and one deep dark fabric. This creates a sharp, dramatic spin effect.
Galaxy-Inspired Palette
Choose navy, deep purple, black, and metallic accents to mimic a night sky.
Ombre Gradient
Select fabrics that gradually transition from light to dark to create a softer vortex.
Modern Minimalist
Stick to two bold solids for a clean, contemporary look.
When selecting fabrics, think in terms of value (light vs. dark) rather than print size alone. Lay your fabrics out side by side and take a photo in black and white to check contrast levels.
Helpful tips:
Pre-cut and label units carefully
Starch fabrics lightly for precision
Press seams consistently to reduce bulk
Trim units accurately before final assembly
Thoughtful preparation ensures the swirling design remains sharp and visually striking.
3. Step-by-Step Construction Overview
The Starlight Vortex – TUTORIAL can be broken down into manageable stages.
Step 1: Cut Your Pieces
Using your pattern measurements, cut squares and rectangles for half-square triangles, flying geese, and background units.
Step 2: Create Half-Square Triangles
Sew and trim HSTs carefully. Accurate trimming is crucial to maintaining sharp star points.
Step 3: Assemble Sub-Units
Combine smaller units into larger block sections. Pay attention to directional placement — the orientation creates the spinning illusion.
Step 4: Form the Star Blocks
Join sub-units to complete each star block. Double-check alignment before stitching permanently.
Step 5: Arrange the Vortex Layout
Lay out all blocks on a design wall or floor. Rotate each block carefully to build the vortex pattern. This is the most important step for achieving the swirl effect.
Step 6: Sew Rows Together
Once satisfied with the layout, sew blocks into rows. Press seams in alternating directions for easy nesting.
Step 7: Complete the Quilt Top
Join rows carefully, maintaining alignment at key intersection points.
Take your time during layout. Even one incorrectly rotated block can interrupt the motion of the vortex.
4. Quilting and Finishing Ideas
The quilting stage enhances the movement of the Starlight Vortex – TUTORIAL.
Quilting ideas that complement the design:
Echo quilting around star shapes
Spiral quilting radiating from the center
Diagonal straight-line quilting
Free-motion swirls to enhance motion
Binding Suggestions:
Dark binding to frame the vortex
Metallic or contrasting binding for drama
Scrappy binding for a playful finish
Before quilting, ensure the top is squared and well pressed. Baste carefully to prevent shifting, especially where multiple seams intersect.
This pattern works beautifully for:
Throw quilts
Bed quilts
Wall hangings
Statement art pieces
The bold motion of the design makes it especially striking when displayed prominently.
Frequently Asked Questions (FAQ)
Is the Starlight Vortex suitable for beginners?
Confident beginners who are comfortable making half-square triangles can complete this pattern successfully.
How do I maintain sharp star points?
Trim units precisely and sew with an accurate quarter-inch seam allowance.
Can I use pre-cuts?
Yes. Layer cakes and fat quarters work well, depending on the block size.
How do I enhance the vortex illusion?
Focus on strong light-and-dark contrast and consistent block rotation.
Can I resize the quilt?
Absolutely. Add or subtract blocks to adjust the final dimensions.
Conclusion
The Starlight Vortex – TUTORIAL is a stunning quilt pattern that combines traditional piecing techniques with a modern, dynamic layout. Through careful fabric selection and thoughtful block rotation, you can create a quilt that feels alive with motion and depth.
Whether you choose bold contrasts or subtle gradients, this pattern offers endless creative possibilities. It’s a rewarding project that showcases both precision and artistic vision.
Have you experimented with vortex-style quilt layouts before? Share your ideas and experiences in the comments — your creativity might inspire another quilter to start their own spinning star masterpiece today.

