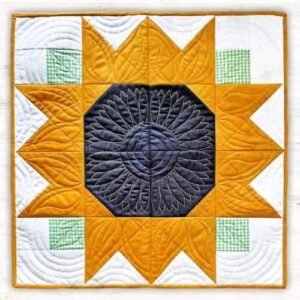
Creating a Sunflower Quilt Block is a perfect way to add a splash of sunshine and warmth to any quilt.
With its intricate design, this block captures the essence of a blooming sunflower, radiating joy and light. Whether you’re a beginner or an experienced quilter, this Sunflower Quilt Block tutorial will guide you through each step with precision.
In this tutorial, we’ll explore the fabric cuts, assembly, and best tips to make your Sunflower Quilt Block stand out. So grab your fabrics, let’s dive into the details!

Materials and Fabric Cuts 🌼
To get started with your Sunflower Quilt Block, you’ll need a few specific fabric colors to create a balanced, vibrant look. The traditional Sunflower Quilt Block typically uses shades of yellow, green, brown, and a light background color to highlight the sunflower petals and leaves.
SEE OTHER FACE PATTERNS HERE!
- Choosing Your Fabrics:
For this quilt pattern, consider selecting three main colors: yellow for the petals, green for the leaves, and brown for the center of the sunflower. Adding a light background color will help the sunflower design stand out against the quilt’s backdrop. - Fabric Cutting Guide:
- Yellow fabric (for petals): Cut 12 squares, each 3.5” x 3.5”.
- Green fabric (for leaves): Cut 4 squares, each 3.5” x 3.5”.
- Brown fabric (for center): Cut 1 square, 6.5” x 6.5”.
- Background fabric: Cut 8 squares, each 3.5” x 3.5”. These pieces will form the outer parts of the block, framing the sunflower.
- Tips for Cutting Accuracy:
Accurate cuts are essential in quilting, especially for intricate patterns like the Sunflower Quilt Block. Use a rotary cutter and a quilting ruler to ensure clean edges. Double-check your measurements as even minor miscuts can affect the final design.
Assembling the Petals and Leaves 🌻
Once your fabrics are cut, it’s time to start assembling the Sunflower Quilt Block, beginning with the petals and leaves. This is where the sunflower design truly starts to come to life.
- Laying Out the Petals:
Arrange your yellow squares in a circular formation around the brown center square. Each petal square should slightly overlap the edges of the brown square, creating a ring that resembles sunflower petals. This layout is essential to achieving the sunflower look in the quilt. - Adding the Leaves:
Place a green square on each corner of the layout. These will serve as the sunflower’s leaves, adding an element of nature to the design. The green corners help frame the block, creating a natural look that complements the flower petals. - Sewing the Petals and Leaves:
Begin sewing each yellow square to its adjacent square, working in a circular pattern around the brown center. Take care to sew each seam straight and press the fabric after each row. Once all petal squares are sewn together, attach the green squares in each corner.
Constructing the Center and Final Assembly 🌞
The center of the Sunflower Quilt Block is a key component in bringing the entire design together. This section requires precision in positioning and stitching to keep the design clean and cohesive.
- Positioning the Center Square:
The 6.5” brown center square forms the middle of the sunflower. Place this square in the exact center of the layout. It should be bordered evenly by the yellow petal squares to maintain symmetry. - Sewing the Rows Together:
Start by sewing each row of squares separately. Begin with the top row, sewing the background fabric squares to the yellow petal squares. Continue with each row, ensuring that each seam aligns with the others. This keeps the block looking neat and aligned when completed. - Combining the Rows for the Finished Block:
With each row sewn, you’re ready to assemble the final block. Begin by attaching the top row to the center, moving sequentially down the block. Use pins to ensure that each seam matches, creating a flawless sunflower appearance. Press the final block well to remove any creases.
Tips for Perfecting Your Sunflower Quilt Block 🪡
Creating a stunning Sunflower Quilt Block goes beyond just sewing the pieces together. A few techniques can help elevate your block, making it a centerpiece in any quilt.
- Pressing the Seams:
Proper seam pressing is essential to keeping the block looking clean. Press each seam to one side as you go, rather than pressing them open, as this adds durability and prevents fraying. Use a low-steam iron for best results. - Using Half-Square Triangles (Optional):
If you’d like to add more detail to the petals or leaves, consider creating half-square triangles. Simply cut squares of yellow and green fabric, place them right sides together, and sew along the diagonal. Cut along the seam to create two half-square triangles for extra design versatility. - Adding Sashing or Borders:
Once your Sunflower Quilt Block is complete, consider adding sashing or a border. Sashing is a strip of fabric that separates the blocks in a quilt, giving each one its own “frame.” For a sunflower theme, consider using a neutral or green sashing color to complement the vibrant flower colors.
🌟 Join our exclusive Quilt broadcast list on Messenger! Receive the best patterns, tips, and updates directly in your inbox. Our team is ready to send you delightful content that will inspire your projects. Don’t miss this opportunity to stay updated and create amazing pieces. Join now and be part of this passionate quilt community! ✨📩
Completing Your Sunflower Quilt 🌼
Creating a Sunflower Quilt with multiple blocks can be a rewarding project. With each additional block, your quilt grows, resulting in a stunning field of sunflowers.
- Planning the Layout:
Decide on the size of your quilt by determining how many Sunflower Quilt Blocks you want. A lap quilt may need around 12 blocks, while a bed quilt could require 20 or more. Plan the layout with even spacing for a balanced look. - Joining the Blocks:
Once all the Sunflower Quilt Blocks are completed, begin sewing them together. Use sashing between each block if desired, and remember to press each seam after sewing. This ensures a professional finish. - Adding Batting and Backing:
To complete your quilt, layer the top quilt (with the sunflower blocks), batting, and backing fabric. Baste or pin the layers together, then quilt through all layers to hold them in place. Finally, bind the edges to secure the quilt and give it a finished look.
Conclusion: Create Your Own Sunflower Quilt Block 🌻
The Sunflower Quilt Block is not only beautiful but also a meaningful addition to any quilt. Its cheerful, timeless design can brighten up any space, making it a popular choice for many quilters. With the right fabric choices, careful assembly, and a few creative touches, your Sunflower Quilt Block will truly shine.
Ready to start your Sunflower Quilt journey? This pattern is suitable for quilters of all levels and adds a touch of summer charm to any quilt. Happy quilting!


