The Sunflower Quilt Pattern is a radiant design that captures the essence of bright, cheerful sunflowers in a beautiful quilt. Perfect for adding a pop of color and charm to your home, this pattern is great for both beginners and seasoned quilters.
In this step-by-step tutorial, we will guide you through the process of creating the Sunflower Quilt, from fabric selection and cutting to piecing the block together.
Throughout this guide, we’ll incorporate important SEO keywords such as “quilt” and “quilt patterns” to help optimize your blog for search engines.
Materials and Fabric Selection for the Sunflower Quilt Pattern
Before starting your Sunflower Quilt Pattern, gathering the right materials is key. The fabric choices will bring out the beauty of the sunflower design, while quality tools ensure precision and ease during construction.
Materials Needed:
- Fabric: Select a combination of yellow, brown, green, and background fabrics. Yellow for the petals, brown for the center, and green for the leaves.
- Thread: Choose a neutral or coordinating thread that matches your fabric.
- Cutting Tools: Use a rotary cutter and a cutting mat for precise cuts.
- Ruler: A quilting ruler is necessary to ensure straight, accurate cuts.
- Sewing Machine: A machine set to a 1/4-inch seam allowance is ideal for piecing quilt blocks together.
For the sunflower motif, you can choose a variety of yellow fabrics, such as solids, batiks, or small prints, to create texture and depth. Opt for a neutral background fabric, such as cream or light blue, to let the sunflower pattern stand out.
Cutting Instructions for the Sunflower Quilt Block
Precision cutting is essential for creating a stunning Sunflower Quilt Block. This section covers the fabric cuts needed to construct the sunflower design, which consists of petals, a center, and a background to frame the flower.
Fabric Cutting Guide:
- Yellow Fabric (Petals): Cut 8 squares, 3” x 3”
- Brown Fabric (Center): Cut 1 square, 4.5” x 4.5”
- Green Fabric (Leaves): Cut 4 rectangles, 2” x 3.5”
- Background Fabric: Cut 8 squares, 2.5” x 2.5”, and 4 rectangles, 2” x 4.5”
Once you have your fabric pieces cut, lay them out in the shape of a sunflower to visualize the pattern. The bright yellow petals will radiate around the brown center, and the green leaves will add a lively touch to your block.
Step 1: Assembling the Sunflower Center
The first step in constructing the Sunflower Quilt Block is assembling the center, which represents the seed head of the sunflower. This focal point will anchor the design and give the quilt block its sunflower appearance.
Instructions for the Center:
- Prepare the Brown Fabric: Start by taking the 4.5” x 4.5” brown fabric square, which will serve as the sunflower’s center.
- Add Background Squares: Attach the 2.5” x 2.5” background squares to each corner of the brown square using the snowball method (sewing diagonally across the corner squares and trimming the excess).
- Press the Seams: Press the seams open or toward the brown fabric, ensuring the center unit stays flat.
The snowball method helps create a circular effect around the sunflower center, mimicking the shape of a real sunflower’s seed head. This step is straightforward but adds a strong visual foundation for the block.
SEE OTHER FACE PATTERNS HERE!
Step 2: Creating the Sunflower Petals
The sunflower petals are the star of this quilt block, and arranging them properly will make your Sunflower Quilt truly shine. In this section, we’ll guide you through the process of making half-square triangles (HSTs) for the petals.
Petal Construction:
- Pair Yellow and Background Squares: Take the 3” x 3” yellow squares and the 3” x 3” background fabric squares. Pair them right sides together.
- Sew Half-Square Triangles (HSTs): Draw a diagonal line across each background square. Sew a 1/4-inch seam on either side of the line. Cut along the line to create two HST units from each pair. You should now have 16 HSTs.
- Press the Seams: Press the seams toward the yellow fabric. Trim each HST to 2.5” x 2.5” for consistency.
Arranging these yellow HSTs around the center block will form the sunflower’s petals. Their triangle shapes create a dynamic, radiant design that embodies the beauty of a sunflower in full bloom.
Step 3: Adding the Leaves and Final Assembly
Now that you’ve assembled the petals and center, it’s time to add the green leaves and finalize the block. The leaves bring the sunflower design to life, adding a touch of nature to your quilt pattern.
Leaf and Block Assembly:
- Prepare the Green Rectangles: Take the 2” x 3.5” green rectangles for the leaves and pair them with the remaining background rectangles.
- Sew the Leaves: Attach the background rectangles to the green leaf rectangles using a 1/4-inch seam. Press the seams toward the green fabric.
- Assembling the Block: Arrange the petals, center, and leaves in the desired layout. Sew the pieces together in rows, and then join the rows with a 1/4-inch seam allowance to complete the block.
Once the block is assembled, give it a final press to make sure all seams are flat and aligned. This will ensure your quilt block looks crisp and professional.
Step 4: Tips for Assembling Multiple Sunflower Quilt Blocks
The Sunflower Quilt Pattern is designed to be used for full quilts, so once you have one block completed, it’s time to think about creating multiple blocks to assemble into a larger quilt top. Here are some helpful tips for constructing multiple blocks efficiently.
Chain Piecing and Pressing:
- Chain Piecing: To save time, you can use the chain piecing method. Instead of sewing one piece at a time, continuously sew pieces of fabric together in a chain before cutting them apart. This method is perfect for making the petals and leaves.
- Press Seams Consistently: Make sure all seams are pressed consistently throughout each block to avoid any puckering or misalignment.
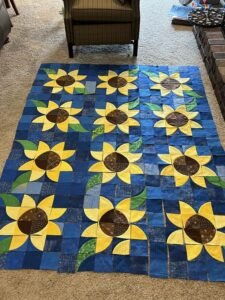
- Block Layout: Once you’ve completed multiple blocks, lay them out in a grid to see how the colors and patterns come together. You may want to experiment with the arrangement before finalizing the layout.
Using these techniques will speed up the process while keeping your blocks uniform and neat, ensuring a cohesive look when you assemble the full quilt.
Step 5: Final Assembly and Quilting the Sunflower Quilt
After completing your sunflower blocks, it’s time to assemble the quilt top and prepare for quilting. This is where all the blocks come together to form a stunning quilt that highlights the sunflower pattern.
🌟 Join our exclusive Quilt broadcast list on Messenger! Receive the best patterns, tips, and updates directly in your inbox. Our team is ready to send you delightful content that will inspire your projects. Don’t miss this opportunity to stay updated and create amazing pieces. Join now and be part of this passionate quilt community! ✨📩
Assembling the Quilt Top:
- Join the Blocks: Arrange your sunflower blocks in rows, paying attention to the overall flow and balance of color. Sew the blocks together with a 1/4-inch seam allowance.
- Add Borders: You can choose to add a border around the entire quilt top to frame the design. A green or contrasting border can add definition to your quilt pattern.
- Quilting the Sunflower Quilt: Once your quilt top is complete, it’s time to quilt. You can either stitch in the ditch along the seams or use free-motion quilting to add texture. Use thread colors that complement the sunflower motif.
The quilting stage is your opportunity to enhance the overall look of the quilt. Experiment with different quilting designs to bring out the texture of the sunflower petals and leaves.
Conclusion
The Sunflower Quilt Pattern is a bright and cheerful design that brings warmth and beauty to any quilting project. By following this step-by-step tutorial, you’ve learned how to cut, sew, and assemble the pieces needed to create a stunning sunflower quilt block.
From choosing the right fabrics to piecing together the petals and leaves, this guide offers a comprehensive approach to making the Sunflower Quilt. Incorporating SEO-friendly keywords like “quilt” and “quilt patterns” ensures that this blog post reaches the right audience, making it both informative and discoverable.
Happy quilting! 🌻