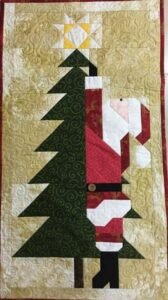
The Night Before Christmas quilt is the perfect project to capture the magic of the holiday season.
This festive quilt pattern is filled with beautiful blocks, holiday-inspired colors, and intricate details that bring the warmth and charm of Christmas to your home.
Whether you’re crafting this as a gift or decorating your own space, this tutorial will guide you through the steps to create this stunning quilt. With the right materials, a bit of patience, and some creativity, you’ll have a finished piece that celebrates the spirit of Christmas.

Materials and Fabric Cuts for The Night Before Christmas Quilt
Before starting, it’s important to gather the right materials for your quilt. For this project, you’ll need fabrics in festive holiday colors like reds, greens, whites, and golds. You’ll also need a mix of patterned fabrics for added texture and interest. Be sure to choose fabrics that reflect the holiday season, like snowflake patterns, Christmas trees, or even reindeer prints to bring out the theme of the quilt.
Here are the fabric cuts you’ll need:
- Main quilt blocks: Cut 20 squares measuring 12.5” x 12.5” from your main Christmas-themed fabrics. These will serve as the focal points of the quilt.
- Sashing strips: Cut 15 strips measuring 2.5” x 12.5” from a contrasting color (white or cream works well for a winter look) to separate the blocks.
- Cornerstones: Cut 6 squares measuring 2.5” x 2.5” from a festive accent fabric (such as gold).
- Borders: Cut 4 strips measuring 5” x the length of the quilt for the outer borders. Once you’ve prepared your fabric cuts, organize them by block type to make the assembly process easier.
Creating the Main Quilt Blocks
The Night Before Christmas quilt focuses on large, detailed blocks that feature Christmas-themed fabrics. Start by working on the 12.5” x 12.5” main blocks. These squares are simple yet impactful because the fabric itself tells a story. Choose fabrics with bold, festive prints such as Christmas trees, snowflakes, or holiday scenes to give each block a unique look.
To assemble the blocks, sew each 12.5” x 12.5” square with the sashing strips. Take one of your sashing strips (2.5” x 12.5”) and sew it to the right side of the block using a 1/4” seam allowance. Press the seams toward the sashing to ensure it lays flat. Repeat this process with each block until you’ve added sashing to all the right sides.
Once the sashing is attached, begin to sew the blocks together in rows. You can alternate fabric patterns to create visual interest, making sure that the blocks and sashing strips line up evenly. The quilt’s simplicity in the blocks allows the Christmas prints to shine, creating a festive atmosphere.
Assembling the Sashing and Cornerstones
The sashing and cornerstones play an important role in framing the main quilt blocks and adding structure to the overall design. Once your blocks are sewn together with their side sashing, it’s time to add the horizontal sashing and cornerstones. The cornerstones will give a polished and festive touch to the quilt, breaking up the long sashing strips and adding a pop of color.
To start, sew a 2.5” x 12.5” sashing strip between each block row. After adding the sashing strips horizontally, place a cornerstone square (2.5” x 2.5”) at each intersection between the vertical and horizontal sashing strips. This step not only adds structure but also enhances the holiday theme of your quilt.
Press the seams toward the sashing after sewing to keep the quilt top flat and smooth. This ensures that the quilt top remains even and free from puckers when you move on to the next step. At this point, the main body of your Night Before Christmas quilt is complete, and it’s time to move on to the borders.3

Adding the Borders for a Festive Finish
Borders are a key element of the Night Before Christmas quilt, framing the blocks and giving the quilt a finished, professional look. For this project, the borders will also add extra length and width, making the quilt a bit larger and cozier for those cold winter nights.
To begin, take your 5” border strips and sew them to the sides of the quilt top. Start with the left and right borders. Align the border strip with the edge of the quilt top and sew using a 1/4” seam allowance. Press the seams toward the borders to keep them flat. Repeat this process for the top and bottom borders.
SEE OTHER FACE PATTERNS HERE!
The borders can be made from solid-colored fabric, or you can choose a Christmas-themed print that complements the main blocks. You might want to use a deep green or red to match the holiday theme or even a metallic fabric like gold or silver for an extra festive sparkle.
Once the borders are attached and pressed, your quilt top is finished! Now you can move on to quilting and binding to complete the project.
Quilting and Binding The Night Before Christmas Quilt
With the quilt top complete, the next step is the quilting itself. Quilting adds texture and depth to your project, making it not only beautiful but durable as well. You can choose from several quilting methods, depending on your skill level and available tools. Simple straight-line quilting works well for this project, as it allows the fabric patterns to shine through.
Start by layering your quilt top with batting and backing fabric. Secure the layers together with safety pins or basting spray. Then, use a sewing machine to quilt through all three layers. You can create a grid pattern by quilting along the seams of the sashing strips or free-motion quilt with swirls, stars, or other holiday motifs to add a whimsical touch.
Once the quilting is complete, trim any excess batting and backing fabric. To finish the quilt, add the binding. Cut binding strips 2.5” wide from a coordinating fabric and sew them to the edge of the quilt using a 1/4” seam allowance. Fold the binding over to the back and hand-stitch it down for a clean finish.
🌟 Join our exclusive Quilt broadcast list on Messenger! Receive the best patterns, tips, and updates directly in your inbox. Our team is ready to send you delightful content that will inspire your projects. Don’t miss this opportunity to stay updated and create amazing pieces. Join now and be part of this passionate quilt community! ✨📩
Final Touches for The Night Before Christmas Quilt
Now that your Night Before Christmas quilt is quilted and bound, it’s time to add any final touches that will make this project truly special. Consider adding embellishments like embroidered holiday sayings, buttons shaped like snowflakes or Christmas trees, or even small applique shapes for added detail.
One fun addition could be personalized labels to document the date you made the quilt and who it was made for. This adds a personal touch that makes the quilt even more meaningful, especially if you’re giving it as a gift. Another idea is to attach small bells or ribbons to the edges of the quilt for a playful holiday look.
The final step is to wash and dry your quilt to give it that soft, crinkled look. This also ensures that the quilt is ready to use right away—whether for cuddling up by the fire or as a stunning holiday decor piece.
Conclusion
The Night Before Christmas quilt is a charming and festive project that captures the magic of the holiday season. With its beautiful blocks, holiday-inspired fabrics, and intricate details, this quilt is sure to become a treasured part of your Christmas traditions.
By following this step-by-step tutorial, you now have all the tools you need to create your own Night Before Christmas quilt and bring the warmth of the holidays into your home.
Whether you’re a seasoned quilter or just starting, this quilt pattern offers the perfect mix of creativity and precision to showcase your skills. So gather your festive fabrics, fire up your sewing machine, and start crafting this beautiful quilt in time for the holidays! Happy quilting!


