Starting your creative journey with the Tree Farm – Tutorial is a wonderful way to bring charm, texture, and personality into your quilting projects. This pattern is loved by beginners and experienced quilters because it combines traditional patchwork techniques with playful holiday-inspired design. Throughout this article, we will explore the essential steps, tools, and tips you need to confidently create your own quilt using the iconic Tree Farm – Tutorial. Whether you’re crafting a festive gift or adding seasonal cheer to your home décor, this guide will help you achieve a polished and beautiful result.
Using the Tree Farm – Tutorial is also an excellent opportunity to practice precision cutting, block alignment, and color value contrast. The simple structure of the pattern allows you to express your creativity with different fabrics while following accessible and enjoyable steps. Many crafters appreciate how this project helps them improve their technique without feeling overwhelmed, making it a perfect fit for quilters at all levels.
In addition, the Tree Farm – Tutorial celebrates the charm of nature and the nostalgic atmosphere of holidays. Its tree-inspired shapes offer limitless possibilities for customization, from modern minimalist interpretations to classic vintage-style versions. By the end of this article, you will feel prepared and inspired to create a quilt that reflects your personal style and brings warmth to your home.
1. Understanding the Tree Farm – Tutorial Pattern
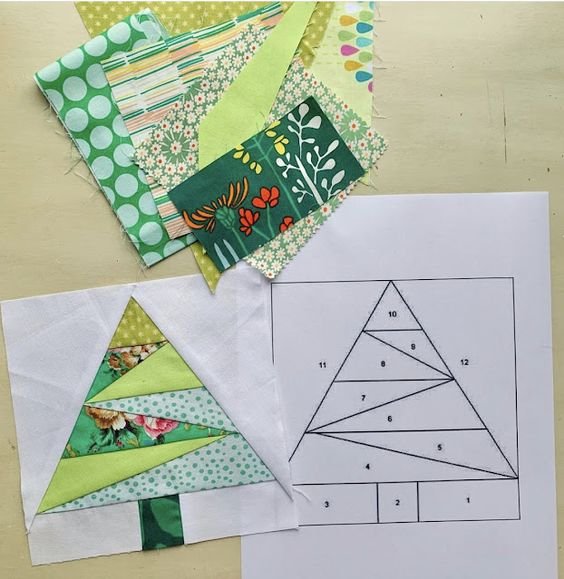
The Tree Farm – Tutorial is based on clean geometric lines that come together to form stylized tree shapes. This block format allows quilters to create a cohesive quilt layout or mix the blocks with others to create more dynamic designs. The structure is beginner-friendly, but its visual impact is truly impressive, making it an ideal project for gift-making or festive décor.
SEE OTHER FACE PATTERNS HERE!
One of the key advantages of using this pattern is its adaptability. You can scale the blocks larger or smaller depending on your desired final quilt size. Beginners often start with medium-sized blocks to practice accurate piecing, but experienced quilters enjoy working with smaller pieces for a more intricate final look.
Another benefit is the opportunity to play with different fabric values. The contrast between light, medium, and dark fabrics highlights the tree shapes, making them stand out beautifully. Using holiday-themed fabrics can also enhance the seasonal character of the Tree Farm – Tutorial.
This pattern also helps build confidence in essential quilting techniques. From aligning points to pressing seams, each step allows you to grow your skills. The simplicity of the design ensures that you can focus on improving precision without becoming overwhelmed.
Many quilters use fabric scraps to create each tree block, which makes this pattern both economical and environmentally friendly. You may find that the Tree Farm – Tutorial becomes one of your go-to projects for using fabric leftovers creatively and beautifully.
Most importantly, this pattern gives you freedom to express your artistic vision. Whether you choose modern fabrics, traditional holiday prints, or monochromatic tones, the finished quilt will reflect your unique style.
2. Materials and Preparation for the Tree Farm – Tutorial
To begin the Tree Farm – Tutorial, gather high-quality quilting cotton in various shades to create contrast within the block. You will need fabric for the trees, background, and optional accent details. Fat quarters, charm squares, or fabric scraps all work well for this versatile project.
A rotary cutter, cutting mat, and acrylic ruler are essential for achieving clean and accurate cuts. These tools help you maintain consistency across all blocks, which is especially important when assembling a quilt made from repeated shapes.
Before cutting, press all fabrics thoroughly to remove wrinkles. This ensures that your measurements remain accurate and prevents distortion during piecing. Smooth fabric is easier to handle and allows your blocks to come together neatly.
Using a neutral-colored thread helps your stitches blend seamlessly with most fabrics. Choose a high-quality cotton thread for durability and smooth sewing. A sharp needle is equally important to prevent snagging and achieve even stitching.
If you are new to quilting, take time to familiarize yourself with your sewing machine’s quarter-inch seam guide. Consistent seam allowances are essential for aligning tree sections and ensuring the blocks fit together correctly in the Tree Farm – Tutorial.
Pre-cutting all your pieces before sewing helps streamline your workflow. Organizing fabric pieces by block keeps your project efficient and enjoyable, especially when working on multiple blocks at once.
3. Step-by-Step Instructions for the Tree Farm – Tutorial
Begin by sewing the tree sections, which typically include a triangle or angled shape that forms the tree silhouette. Align your pieces carefully and press each seam toward the darker fabric to enhance contrast and maintain a tidy finish.
Next, assemble the tree trunk using small rectangular pieces. This detail adds charm and authenticity to the Tree Farm – Tutorial, giving each tree block character. Be sure to check alignment before stitching to avoid crooked trunks.
Once the main sections are ready, join them to form your complete tree block. Take your time with this step, as block accuracy contributes significantly to the professional appearance of your final quilt.
After completing each block, double-check the block size using your ruler. Trimming to a consistent size ensures smooth assembly when joining multiple blocks into rows or columns.
When you have enough finished blocks, begin arranging them on a flat surface. Experiment with layout variations to find the most visually appealing arrangement. You may choose a symmetrical pattern or a scattered forest effect.
Finally, sew the blocks together, add your borders, and prepare your quilt for layering and quilting. The simplicity and clarity of the Tree Farm – Tutorial make this process approachable even for beginners.
4. Finishing and Customizing Your Tree Farm – Tutorial Quilt
Finishing your quilt involves layering the quilt top, batting, and backing. Smooth out all layers carefully to avoid wrinkles, as these can affect the final quilting stitches. Basting with safety pins or spray adhesive keeps everything in place.
Quilting can be as simple or elaborate as you like. Straight-line quilting enhances the clean geometric design of the trees, while free-motion quilting adds texture and flair. Choose a style that complements your version of the Tree Farm – Tutorial.
For binding, select a fabric that frames your quilt nicely. A contrasting binding adds boldness, while a coordinating binding creates a softer finish. Attach the binding with precision to give your quilt a polished and professional look.
Adding embellishments is optional but can bring extra charm to your quilt. Buttons, embroidery, or stitched details can help personalize the piece and make it truly one-of-a-kind.
If you are gifting your quilt, consider attaching a label on the back. Include your name, the date, and the pattern name Tree Farm – Tutorial to mark the quilt’s story and significance.
After completing your quilt, remember to photograph your work. Sharing your creations online or with loved ones can inspire others and showcase your growing quilting skills.
FAQ – Tree Farm – Tutorial
What skill level is required to make the Tree Farm quilt?
The Tree Farm – Tutorial is suitable for beginners and enjoyable for experienced quilters. The steps are simple to follow, making it an excellent project for anyone.
What fabrics work best for this pattern?
Quilting cotton is recommended. You can use scraps, fat quarters, or themed prints to create unique tree designs.
Can I make the quilt larger or smaller?
Yes, the block size is flexible. Adjusting the size allows you to create small wall hangings or full-size quilts.
Is special equipment required?
Basic quilting tools like a rotary cutter, cutting mat, acrylic ruler, and sewing machine are essential.
How long does the project take to finish?
Time varies based on experience, but most quilters complete it within a few days to a week.
Can I customize the layout?
Absolutely! The pattern encourages creativity, allowing you to arrange blocks in endless ways.
Conclusion
The Tree Farm – Tutorial is a delightful pattern that brings together creativity, charm, and beginner-friendly quilting techniques. Throughout this article, you learned how to gather materials, cut and assemble blocks, customize your layout, and finish your quilt with confidence.
This pattern offers endless opportunities to express your personal style while building essential quilting skills. I hope you feel inspired to create your own version, and I would love to hear your honest opinion and suggestions about this guide.

