Creating a quilt is a wonderful way to express your creativity while crafting something warm and cozy.
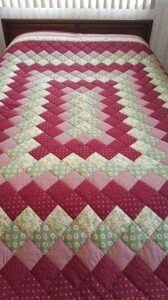
One of the most beloved quilt patterns is the “Trip Around The World.” This beautiful design features a mesmerizing arrangement of squares that creates a sense of depth and movement.
In this tutorial, we’ll walk you through the process of making your own Trip Around The World quilt, including fabric requirements, cutting instructions, and step-by-step assembly. Whether you’re a seasoned quilter or just starting, this project is sure to inspire you!
Understanding the Trip Around The World Quilt Design
The Trip Around The World quilt pattern is both visually stunning and deceptively simple. It consists of a series of squares arranged in a way that creates the illusion of traveling through different colors and fabrics. This pattern is ideal for showcasing a variety of fabrics, allowing for endless creative possibilities.
The beauty of this design lies in its ability to create a sense of movement. As your eyes travel across the quilt, you will notice how the colors blend and transition, drawing you into the pattern. This quilt is perfect for using up fabric scraps or featuring a curated collection of fabrics that complement each other beautifully.
In addition to its aesthetic appeal, the Trip Around The World quilt can be customized in size, making it suitable for a variety of uses, from lap quilts to bedspreads. Now, let’s gather the materials needed to get started on this delightful quilt!
Materials Needed for the Trip Around The World Quilt
Before you begin, ensure you have all the necessary materials at hand:
- Fabric: For a vibrant and eye-catching quilt, select a mix of colors and patterns. You will need:
- 16 squares of assorted fabrics: Each measuring 5 inches. Choose a variety of colors to create the desired effect.
- Background fabric: 1 yard of a solid color or neutral fabric (e.g., white, beige, or gray) to frame the colorful squares.
- Cutting Tools: You will need a rotary cutter, cutting mat, and quilting ruler to ensure precise cuts. Accurate cutting is crucial for achieving a professional finish.
- Sewing Machine: A reliable sewing machine will make the assembly process smoother. Make sure it’s equipped with a standard sewing foot.
- Thread: Use a thread that matches your main fabric colors. Cotton thread works best for quilting.
- Iron and Ironing Board: Pressing your fabric and seams is essential for a neat and polished look.
Now that you have your materials ready, let’s move on to cutting your fabric pieces!
Cutting Your Fabric Pieces
Accurate cutting is the foundation of a successful quilt. Follow these steps to prepare your fabric pieces for the Trip Around The World quilt.
- Cutting the Squares: Begin by cutting your assorted fabrics into 5-inch squares. You will need a total of 16 squares. For a balanced design, try to mix light and dark fabrics, as well as different patterns and textures.
- Cutting the Background Fabric: Next, cut your background fabric into strips:
- 4 strips measuring 2.5 inches by the width of the fabric (WOF). These will be used to frame the quilt and provide structure.
- Organizing Your Pieces: Lay out all your cut squares and strips on a flat surface. This helps you visualize the arrangement and ensure you have all the pieces before you start sewing.
With your fabric pieces cut and organized, you’re ready to start assembling the Trip Around The World quilt!
Assembling the Quilt Top
Now that your fabric is prepared, it’s time to assemble the quilt top. This process involves sewing the squares together to create the iconic Trip Around The World pattern.
- Creating the First Row: Begin by selecting 4 squares for your first row. Arrange them in a line, experimenting with the placement until you achieve a pleasing color balance. Once satisfied, sew the squares together using a 1/4-inch seam allowance. Press the seams open.
- Continuing with Additional Rows: Repeat the process to create additional rows, using a different combination of squares for each one. Aim for a total of 4 rows to complete the top of your quilt. This will give you a square quilt top that measures approximately 20 inches by 20 inches.
- Joining the Rows: Once all rows are completed, join them together by sewing the rows with 1/4-inch seam allowances. Press the seams in the same direction for a smooth finish. Your quilt top is now taking shape!
Adding the Background Fabric
To give your quilt a finished look, it’s time to add the background fabric. This step helps frame your colorful squares and adds dimension to the overall design.
- Attaching the Background Strips: Take your background fabric strips and sew them to the top and bottom of the quilt top. Use 1/4-inch seam allowances to attach the strips. This adds width and height to the quilt, making it more substantial.
- Sewing the Side Strips: Next, sew the remaining background fabric strips to the left and right sides of the quilt top. Again, use a 1/4-inch seam allowance and press the seams towards the background fabric for a clean finish.
- Final Pressing: After attaching the background fabric, give your quilt top a final press with the iron to ensure all seams are flat and smooth. This will prepare your quilt for the next steps.
With the background fabric added, your Trip Around The World quilt top is almost complete!
Preparing for Quilting
Before you start quilting your Trip Around The World quilt, you need to prepare the layers. This step involves adding batting and a backing fabric.
- Choosing the Batting: Select a batting material that suits your quilt’s intended use. Cotton batting is a popular choice for its warmth and breathability, while polyester batting provides a more lightweight option.
- Cutting the Batting: Cut the batting to the same size as your quilt top, which should now measure approximately 25 inches by 25 inches (considering the added background fabric). This allows for some overlap to secure the layers.
- Preparing the Backing Fabric: Choose a backing fabric that complements your quilt design. Cut it to the same size as the quilt top and batting. Lay the backing fabric right side down, followed by the batting, and finally the quilt top right side up. Your layers should be arranged as follows: backing, batting, and quilt top.
Basting the Quilt Layers
Basting the layers together is crucial for preventing shifting during quilting. Follow these steps to secure your quilt layers.
- Using Safety Pins: Start at one corner of your quilt and use safety pins to secure the layers together. Place pins approximately 6-8 inches apart throughout the quilt, ensuring the layers are held firmly in place. This method is easy and effective.
- Alternative Basting Method: If you prefer, you can use basting spray instead of pins. Lay your backing fabric down, lightly spray it with basting adhesive, then layer the batting and quilt top as described before. This method can save time and reduce the risk of pinholes.
- Final Check: Once basted, check the quilt layers for any wrinkles or bubbles. Smooth out any imperfections before proceeding to the quilting stage.
Your quilt layers are now secured and ready for quilting!
🌟 Join our exclusive Quilt broadcast list on Messenger! Receive the best patterns, tips, and updates directly in your inbox. Our team is ready to send you delightful content that will inspire your projects. Don’t miss this opportunity to stay updated and create amazing pieces. Join now and be part of this passionate quilt community! ✨📩
Quilting the Trip Around The World Quilt
Now comes the fun part: quilting your Trip Around The World quilt! This step adds texture and durability to your finished project.
- Choosing a Quilting Design: Select a quilting design that complements your quilt top. Straight-line quilting, free-motion quilting, or a simple echo stitch around the squares are all excellent choices.
- Starting the Quilting Process: Begin quilting from the center of the quilt and work your way outwards. This technique helps to evenly distribute the layers and prevent puckering. Use a walking foot for straight-line quilting or a free-motion foot for more intricate designs.
- Finishing the Quilting: Continue quilting until you have covered the entire quilt top. Once finished, trim any excess batting and backing fabric, leaving about 1/4 inch around the edges of the quilt top.
Binding the Quilt
Binding is the final touch that completes your Trip Around The World quilt. This step involves finishing the edges for a polished look.
- Preparing the Binding Strips: Cut strips of fabric for the binding. You’ll need 4 strips measuring 2.5 inches wide by the length of each side of the quilt. For a quilt of this size, you may need about 1/2 yard of fabric.
- Sewing the Binding: Join the strips together to create one continuous strip. Fold the strip in half lengthwise and press. Align the raw edges of the binding with the edges of the quilt, and sew it in place using a 1/4-inch seam allowance.
- Finishing the Binding: Once sewn, fold the binding over to the back of the quilt and hand-stitch it down. This will create a neat finish.
Your Trip Around The World quilt is now complete!
Conclusion
Creating a Trip Around The World quilt is a fulfilling project that combines creativity, technique, and warmth. By following this tutorial, you’ve learned the essential steps to craft this beautiful quilt, from gathering materials to finishing touches.
Quilting is a wonderful way to express yourself and share your love through handmade creations. We encourage you to explore different fabric combinations and designs as you grow more confident in your quilting skills. Enjoy the journey, and happy quilting! Your Trip Around The World quilt is sure to be a cherished piece for years to come.

