How to make TULIP FLOWER POT HOLDER is a delightful quilting and sewing project that blends beauty, practicality, and creativity into a charming handmade kitchen accessory. Inspired by the elegant shape of tulip flowers, the TULIP FLOWER POT HOLDER transforms simple fabric pieces into a decorative and functional item that brightens any kitchen space. This project is perfect for crafters who enjoy combining traditional quilting techniques with floral-inspired designs.
Handmade pot holders are essential kitchen tools, protecting hands from heat while adding personality to cooking spaces. The TULIP FLOWER POT HOLDER stands out because it brings a touch of nature into the home through its floral design. With soft curves and vibrant fabric combinations, this pot holder resembles a blooming tulip while maintaining the practical function needed for everyday cooking.
In this article, you will learn how to make TULIP FLOWER POT HOLDER, including the inspiration behind the design, the materials required, the step-by-step construction process, and the finishing techniques that make this pattern so appealing. Whether you are a beginner learning quilting basics or an experienced quilter searching for a quick decorative project, the TULIP FLOWER POT HOLDER offers a fun and rewarding crafting experience.
1. The Inspiration Behind the TULIP FLOWER POT HOLDER
The TULIP FLOWER POT HOLDER is inspired by the graceful beauty of tulip flowers, which symbolize renewal, warmth, and natural elegance. Tulips have long been popular motifs in quilting and textile crafts because their simple yet recognizable shape translates beautifully into fabric designs.
DISCOVER MORE FREE PATTERNS HERE!
In quilting traditions, floral patterns are commonly used to create decorative home items. The TULIP FLOWER POT HOLDER follows this tradition by turning a functional kitchen item into a small piece of textile art.
The tulip design also allows quilters to experiment with color combinations. Bright reds, soft pinks, sunny yellows, and fresh greens are often used to mimic real tulip flowers and bring cheerful energy into the kitchen.
Another appealing aspect of the TULIP FLOWER POT HOLDER is its balance between simplicity and creativity. The pattern is usually made with basic quilting techniques, yet the finished shape looks detailed and artistic.
This project is also popular for seasonal décor. Tulip designs are commonly associated with spring, making this pot holder an excellent addition to seasonal kitchen decorations.
By understanding the inspiration behind the TULIP FLOWER POT HOLDER, crafters can see how nature-inspired quilting patterns bring warmth and personality into everyday household items.
2. Materials and Tools Needed for the Project
Before beginning how to make TULIP FLOWER POT HOLDER, gathering the correct materials ensures a smoother and more enjoyable quilting experience. Because this is a functional kitchen item, choosing durable and heat-resistant materials is essential.
Cotton fabric is the most recommended choice for this project. Cotton is heat resistant, easy to sew, and available in countless colors and floral prints that complement the tulip design.
You will also need cotton batting or insulated batting for the interior layer. This layer helps protect your hands from heat when handling hot pots or pans.
Basic quilting tools are necessary for constructing the TULIP FLOWER POT HOLDER. These include fabric scissors, pins or clips, a rotary cutter, a quilting ruler, and a sewing machine.
Thread that matches or contrasts with your fabric colors can also enhance the visual appeal of the project. Strong cotton thread works best for durability.
Many crafters also add a small fabric loop to the pot holder so it can be hung on a kitchen hook or rack.
By preparing these materials in advance, you will be ready to start sewing the TULIP FLOWER POT HOLDER with confidence and creativity.
3. Sewing the TULIP FLOWER POT HOLDER Step by Step
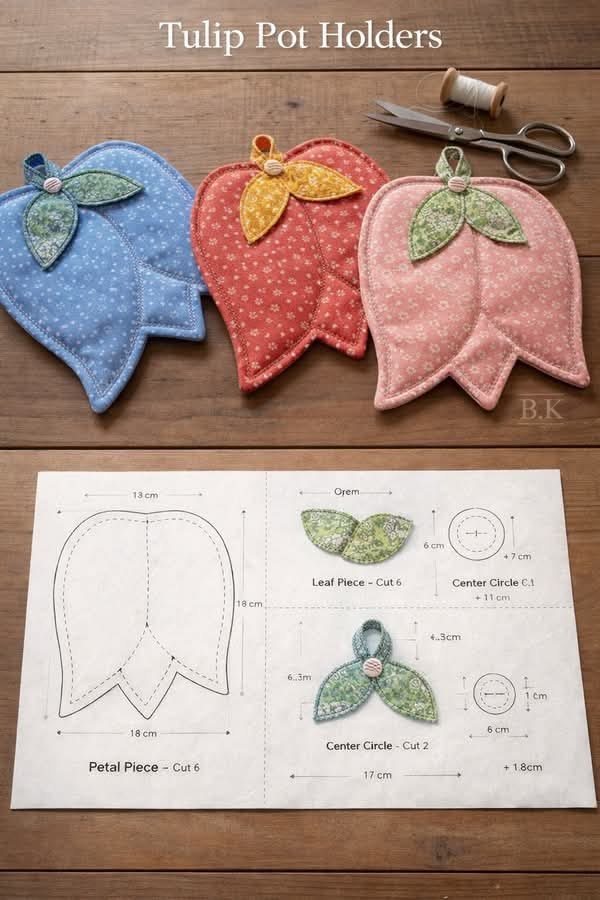
The construction of the TULIP FLOWER POT HOLDER begins with cutting the fabric pieces that form the tulip shape. These pieces typically include petal sections, leaf shapes, and a base layer that forms the body of the pot holder.
The first step involves arranging the tulip petals on the base fabric. This arrangement helps determine how the finished flower will look and allows you to experiment with different fabric combinations.
Once the design is arranged, the petal pieces are sewn onto the base using appliqué techniques. Appliqué allows the tulip shape to stand out clearly against the background fabric.
After the tulip design is secured, batting or insulated batting is added between the front and back fabric layers. This creates the protective padding necessary for a pot holder.
The layers are then quilted together using straight lines, decorative stitches, or simple grid quilting. Quilting helps stabilize the layers and adds extra visual texture.
Finally, the edges of the TULIP FLOWER POT HOLDER are finished with binding. Binding not only strengthens the edges but also provides a polished, professional look.
By following these steps carefully, the process of how to make TULIP FLOWER POT HOLDER becomes simple, enjoyable, and very rewarding.
4. Finishing Touches and Creative Customization
The final stage of how to make TULIP FLOWER POT HOLDER focuses on decorative details and personalization. These finishing touches allow crafters to add their own creative style to the project.
One popular option is decorative quilting. Using contrasting thread colors can highlight the tulip shape and create beautiful stitched patterns.
Fabric choices also play an important role in customization. Floral prints, polka dots, and solid fabrics can be combined to create unique tulip designs.
Some quilters like to add embroidered details to the petals or leaves. Simple embroidery stitches can enhance the flower design and add extra dimension.
Another creative idea is making sets of TULIP FLOWER POT HOLDER pieces in matching colors. Coordinated sets make wonderful handmade gifts for friends and family.
You can also experiment with different tulip sizes or layered petal shapes to create a more textured design.
These finishing touches turn the TULIP FLOWER POT HOLDER into more than just a kitchen tool—it becomes a decorative handmade piece that reflects your creativity.
FAQ – TULIP FLOWER POT HOLDER
Is the TULIP FLOWER POT HOLDER suitable for beginners?
Yes, this project is beginner-friendly because it uses simple sewing and basic appliqué techniques.
What fabric works best for a pot holder?
Cotton fabric combined with cotton or insulated batting works best because it is heat resistant and durable.
Can the pot holder be washed in a machine?
Yes, most cotton pot holders can be machine washed on a gentle cycle and air dried.
Do I need special batting for heat protection?
Insulated batting is recommended for better heat protection, although regular cotton batting can also work.
Can I make different flower colors?
Absolutely. The TULIP FLOWER POT HOLDER can be made with any color combination to match your kitchen décor.
Is this project good for handmade gifts?
Yes, handmade pot holders are practical gifts and are especially appreciated by people who enjoy cooking or baking.
Conclusion
Learning how to make TULIP FLOWER POT HOLDER is a wonderful way to combine creativity with practicality. This charming quilting project transforms simple fabric pieces into a beautiful tulip-inspired kitchen accessory that adds warmth and personality to any home.
Throughout this article, we explored the inspiration behind the tulip design, the materials needed for the project, the step-by-step sewing process, and the finishing touches that make each piece unique.
Creating a TULIP FLOWER POT HOLDER is not only an enjoyable crafting experience but also a great opportunity to decorate your kitchen with handmade items that reflect your personal style.
Now we would love to hear from you. Did you enjoy learning how to make TULIP FLOWER POT HOLDER? Do you have creative ideas or color combinations you would like to try?
PATTERN HERE:
Leave your honest opinion and share your suggestions. Your feedback helps inspire new quilting projects and keeps the crafting community growing.

