Turtle-shaped bag – TUTORIAL is a delightful quilt-inspired pattern that blends creativity, practicality, and a touch of whimsy. This charming project transforms quilting techniques into a three-dimensional, turtle-shaped bag that feels both playful and meaningful. From its rounded shell to its carefully shaped details, the Turtle-shaped bag – TUTORIAL invites you to slow down, enjoy the process, and create something truly special with your hands.
Working on a Turtle-shaped bag – TUTORIAL is more than following steps; it’s about storytelling through fabric. The turtle shape naturally symbolizes patience, protection, and longevity, which makes this quilt pattern especially comforting to sew. Each quilted section contributes to the personality of the bag, turning fabric pieces into a friendly companion rather than just an accessory.
In this article, you will explore the quilt pattern behind the Turtle-shaped bag – TUTORIAL, learning how its structure works, how the pieces come together, and how to make it your own. The focus stays entirely on the pattern itself, explained in a warm and human way, so you can enjoy every moment of creating a turtle-shaped quilted bag.
1. Understanding the Turtle-shaped Bag – TUTORIAL Quilt Pattern
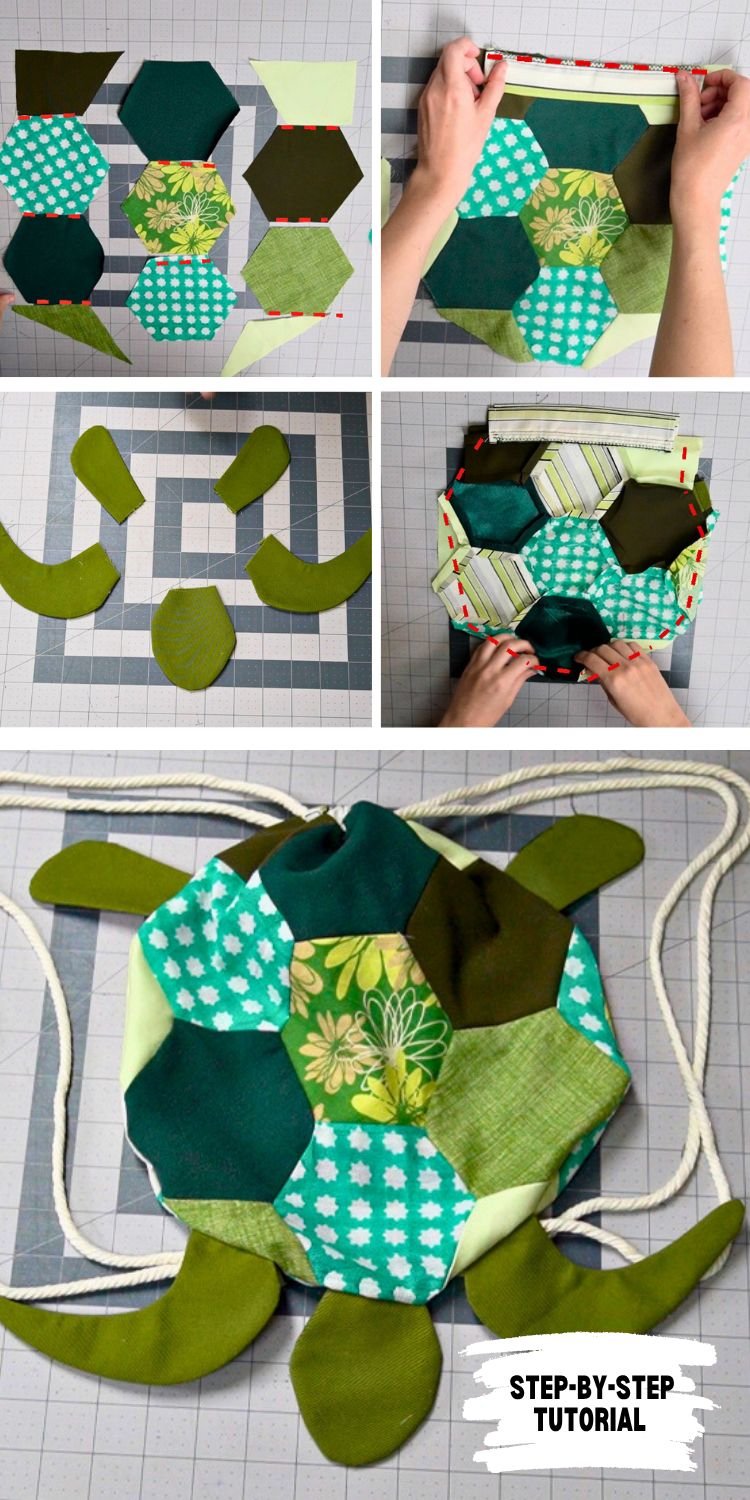
The Turtle-shaped bag – TUTORIAL quilt pattern is built around the idea of shaping flat quilted pieces into a soft, rounded form. Unlike traditional quilt blocks, this pattern is designed to create volume, giving the bag its recognizable turtle silhouette.
DISCOVER MORE FREE PATTERNS HERE!
At the heart of the pattern is the turtle shell, which is usually made from quilted panels arranged in a circular or segmented layout. These panels mimic the natural look of a turtle’s shell while providing strength and structure to the bag.
The pattern also includes smaller quilted components that form the head, legs, and tail. These elements are simple in construction but add a lot of charm to the finished piece. Their placement is what brings the turtle shape to life.
What makes the Turtle-shaped bag – TUTORIAL so enjoyable is its balance between guidance and freedom. While the pattern provides a clear structure, it allows plenty of room for creativity in fabric choice and quilting style.
This quilt pattern is suitable for adventurous beginners and experienced quilters alike. If you are comfortable with basic quilting and sewing curves, you will find the process engaging rather than overwhelming.
Overall, the pattern encourages a playful mindset. It reminds you that quilting doesn’t always have to be serious or traditional; it can also be fun, expressive, and full of character.
2. Choosing Fabrics and Preparing Quilted Pieces
Fabric selection plays a huge role in the success of the Turtle-shaped bag – TUTORIAL quilt pattern. Because the design is inspired by nature, many quilters enjoy choosing colors and textures that feel organic and warm.
Cotton fabrics work beautifully for this pattern, as they are easy to quilt and shape. Solid colors, small prints, or even subtle batiks can all enhance the turtle shell design without overpowering it.
Before assembling the bag, each main section is typically quilted individually. This includes the shell panels and, in some cases, the body pieces. Quilting first allows for better control and a cleaner final shape.
Batting choice matters as well. A lightweight to medium batting provides enough structure to hold the turtle form while keeping the bag soft and pleasant to handle.
Pressing is an important step during preparation. Well-pressed quilted pieces make alignment easier and help the turtle shape come together smoothly in the Turtle-shaped bag – TUTORIAL.
Taking time at this stage builds confidence and sets the tone for the rest of the project. Prepared pieces make the assembly process far more enjoyable and satisfying.
3. Assembling the Turtle-shaped Bag Step by Step
Assembly is where the Turtle-shaped bag – TUTORIAL truly becomes magical. Flat quilted sections slowly transform into a friendly, three-dimensional turtle-shaped bag.
The process often begins by joining the quilted shell panels. These seams require patience, especially if the pattern includes curved edges. Sewing slowly and evenly helps maintain the shell’s rounded shape.
Once the shell is complete, the body pieces are attached. This step defines the turtle’s form and gives the bag its recognizable silhouette. Watching the shape emerge is one of the most rewarding moments of the project.
The opening of the bag is usually integrated into the shell design. This clever detail keeps the turtle shape intact while allowing easy access to the inside of the bag.
Straps or handles are added next, depending on the pattern style. In the Turtle-shaped bag – TUTORIAL, these are often designed to blend seamlessly with the turtle’s body, maintaining the playful aesthetic.
Finally, the lining is sewn in, giving the bag a clean and polished interior. This step completes the structure and ensures the bag is as functional as it is charming.
4. Personal Touches and Enjoying the Finished Turtle Bag
One of the most joyful parts of the Turtle-shaped bag – TUTORIAL quilt pattern is adding personal touches. These small details turn a well-made bag into a truly unique creation.
Embroidery can be used to add facial features or shell details, giving the turtle a friendly expression. Even simple stitches can make a big difference.
Fabric texture also adds personality. Mixing smooth cotton with lightly textured fabrics can enhance the turtle’s visual appeal without complicating the pattern.
Some quilters choose to add small pockets inside the bag. This keeps the design practical while staying true to the quilted structure of the pattern.
Color choices can completely change the mood of the bag. Soft greens and browns feel natural, while bright colors create a playful, childlike look within the Turtle-shaped bag – TUTORIAL.
Once finished, the bag becomes more than a project. It becomes a companion, a gift, or a cherished handmade item that reflects patience, creativity, and care.
FAQ
Is the Turtle-shaped bag – TUTORIAL suitable for beginners?
It works best for beginners who already understand basic quilting and are ready to try a three-dimensional project.
Do I need special tools for this quilt pattern?
No special tools are required beyond standard quilting and sewing supplies.
Can I change the size of the turtle-shaped bag?
Yes, adjusting the size of the quilted panels will scale the bag up or down while keeping the same structure.
Is quilting required for every piece?
Quilting is recommended for the shell pieces, as it adds structure and visual interest to the design.
Can this bag be washed?
Yes, if made with washable fabrics and batting, gentle washing is usually safe.
How long does it take to complete the Turtle-shaped bag – TUTORIAL?
Most quilters complete it over several relaxed sessions, depending on experience and detail level.
Conclusion
The Turtle-shaped bag – TUTORIAL quilt pattern is a beautiful reminder that quilting can be playful, expressive, and full of heart. By combining thoughtful construction with charming design, this pattern transforms simple quilted pieces into a functional and joyful turtle-shaped bag.
Throughout this article, you explored how the pattern works, how to prepare and assemble the pieces, and how to add personal details that make the project your own. Each step celebrates creativity and patience, much like the turtle itself.
If you decide to try the Turtle-shaped bag – TUTORIAL, feel free to share your honest opinion, experiences, and suggestions. Your insights may inspire others to explore this delightful quilt pattern and enjoy the journey just as much as the result.