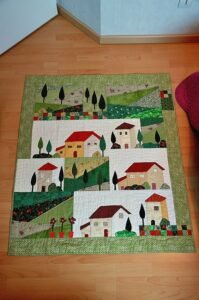
If you’re looking for a charming, whimsical design to add to your quilting projects, the Village Quilt Pattern is perfect for you.
This delightful pattern, which features rows of houses, trees, and paths, creates a quaint village scene across your quilt top. Whether you’re a beginner or an experienced quilter, this project is not only fun but also a great way to showcase different fabric colors and prints.
In this tutorial, we’ll guide you through the process of making your own Village Quilt, with all the fabric cuts and measurements included. Using the keywords [quilt] and [quilt patterns], we’ll also provide tips for enhancing your SEO for blogging success.
Materials and Tools for Your Village Quilt
Before you begin piecing your Village Quilt, it’s essential to gather the necessary materials and tools. High-quality cotton fabric is recommended for this project, as it is durable and easy to work with. Depending on the size of the quilt you wish to make, you’ll need a variety of fabrics for the houses, roofs, and backgrounds.
For the quilt top, choose a mix of prints and solids. You’ll need at least three main fabric groups: one for the background (sky), one for the houses, and one for the roofs. Additionally, you can select smaller fabric scraps to create unique door and window details, giving each house its own personality. You’ll also need batting, backing fabric, and binding fabric to finish the quilt.
In terms of tools, make sure you have a rotary cutter, cutting mat, quilting ruler, and a sewing machine with a ¼-inch foot for precise piecing. A hot iron and ironing board will help you press your seams neatly, which is crucial for any [quilt patterns] project.
Cutting the Fabric for the Village Quilt
The Village Quilt consists of various simple shapes that come together to form houses and rooftops. To create a uniform village, precision in cutting your fabric is key. For this tutorial, we will make a quilt block featuring one house and roof, and you can repeat this block as many times as needed to create your full quilt.
- Background Fabric (sky): Cut two 4 ½-inch squares for each block. This fabric will create the backdrop for the houses.
- House Fabric: Cut one 5-inch by 6 ½-inch rectangle. This will form the body of the house. Choose a print or color that stands out against the background to make the house the focal point.
- Roof Fabric: Cut one 6 ½-inch by 3 ½-inch rectangle. This forms the roof. For added detail, you can select a contrasting fabric or even use scraps to make different roofs for each block.
- Door Fabric (optional): Cut one small 1-inch by 2-inch rectangle for the door. This is an optional piece, but it adds personality to the block.
Make sure you label and organize your fabric pieces for each block. As you cut, keep your lines straight and your edges crisp using a rotary cutter and ruler. Cutting with precision ensures that your pieces will fit together smoothly when you start sewing.
Assembling the Village Quilt Block
Now that you have all of your fabric pieces ready, it’s time to start assembling your Village Quilt block. Each block represents one house with a roof, and by sewing multiple blocks together, you can create an entire village scene across your quilt top.
To start, take your house fabric and roof fabric. Align the 6 ½-inch sides of both fabrics and sew them together with a ¼-inch seam allowance. Press the seam toward the roof fabric with an iron. This will create a neat, flat seam that helps when piecing together other blocks later.
Next, sew your two 4 ½-inch background squares to either side of the house-roof combination. These pieces will form the “sky” around the house, framing it neatly. Again, use a ¼-inch seam allowance and press the seams open or toward the background fabric.
Finally, if you have chosen to add a door to your house, sew the small door rectangle to the bottom center of the house piece. This small detail adds a playful touch to the block, making each house look unique. Repeat these steps to create as many blocks as you need for your quilt.
SEE OTHER FACE PATTERNS HERE!
Creating Rows for Your Village Scene
Once you’ve assembled enough house blocks, the next step is to sew them together into rows to create the full village. Depending on the size of your quilt, you can make anywhere from two to six rows of houses. The number of blocks per row will also depend on your desired quilt size.
To create each row, lay out the house blocks side by side, making sure that the roofs and houses align perfectly. Begin sewing the blocks together, again using a ¼-inch seam allowance. Press the seams between each block to ensure that the row stays flat and uniform.
After completing all the rows, you’ll sew the rows together to create the full quilt top. Before sewing, lay out the rows to make sure that the village looks balanced, with varied roof and house colors. Once you’re happy with the layout, begin piecing the rows together, pressing seams between each row. This method keeps the quilt top smooth and prevents any bunching or misalignment.
🌟 Join our exclusive Quilt broadcast list on Messenger! Receive the best patterns, tips, and updates directly in your inbox. Our team is ready to send you delightful content that will inspire your projects. Don’t miss this opportunity to stay updated and create amazing pieces. Join now and be part of this passionate quilt community! ✨📩
Quilting and Finishing the Village Quilt
Once the quilt top is complete, it’s time to layer the quilt with batting and backing fabric. Choose a soft cotton batting for warmth and comfort. For the backing fabric, consider using a solid or subtle print that complements the colors in the quilt top.
Layer the quilt top, batting, and backing fabric together, then baste them with safety pins or basting spray. Quilting can be done by hand or with a sewing machine, depending on your skill level and preference. For this Village Quilt, simple straight-line quilting works beautifully, following the rows of houses to enhance the block layout. If you’re feeling more adventurous, you can use free-motion quilting to create swirling designs in the sky or outline the houses for added detail.
After quilting, trim the edges of your quilt to remove excess fabric and batting. Finish the quilt by adding binding to the edges, either by machine or by hand, for a neat and professional finish. Your Village Quilt is now complete and ready to be displayed!
Customizing Your Village Quilt
One of the joys of working with the Village Quilt pattern is how easy it is to customize. You can add personal touches to each house block to make the quilt truly unique. Consider using a variety of fabric scraps for the roofs and doors to create a diverse, colorful village scene.
You can also add embellishments such as hand-embroidered details or appliqué to the houses. Try embroidering flowers in front of the houses, stitching windows, or adding a fence for an extra layer of charm. These small details will make your quilt stand out and give it a handcrafted, personalized feel.
If you’re making this quilt for a special occasion, consider incorporating themed fabrics or specific color schemes. For example, you can use pastel fabrics for a baby quilt or rich, earthy tones for a fall-themed quilt. The possibilities are endless with this versatile [quilt] pattern.
Conclusion
The Village Quilt pattern is a delightful and rewarding project that allows you to create a whimsical village scene with fabric and thread. By following this step-by-step tutorial, you’ll be able to construct your own quilt blocks, sew them together into rows, and complete a beautiful quilt top that is sure to be cherished for years to come.
Whether you’re new to quilting or looking to expand your [quilt patterns] collection, the Village Quilt is a fun and creative way to explore different fabrics and techniques. With its simple assembly and endless customization options, this quilt pattern is perfect for any quilter who wants to create something truly special. Happy quilting!

