The Wendy Block quilt pattern is a versatile, eye-catching design perfect for quilters of all levels. This tutorial provides a detailed, step-by-step guide to creating your own Wendy Block quilt, complete with precise fabric measurements and cutting instructions.
Using this unique quilt pattern, you can bring a touch of elegance and personal style to any room.
Whether you’re a seasoned quilter or just starting, this guide will help you confidently create this beautiful quilt block.

What is the Wendy Block Quilt Pattern?
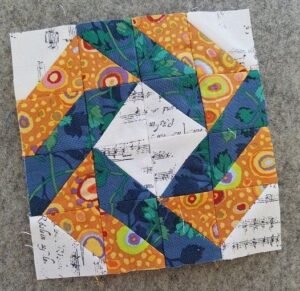
The Wendy Block is a striking quilt pattern that incorporates both traditional and modern quilting elements. Its unique design features a series of geometric shapes arranged in a balanced, symmetrical pattern. This block is ideal for creating quilts that are visually appealing, making it a favorite choice among quilt enthusiasts.
SEE OTHER FACE PATTERNS HERE!
This quilt pattern can be customized with a range of colors and fabric types. Its adaptability makes it suitable for various quilt styles, from bold, vibrant designs to subtle, muted tones. The Wendy Block quilt pattern allows quilters to explore their creativity, offering endless possibilities for customization and design.
With its straightforward construction, the Wendy Block is accessible to quilters of all skill levels. This tutorial will guide you through each step of the process, ensuring that you have all the tools and instructions needed to create a stunning quilt.
Materials Needed for the Wendy Block Quilt
To start with the Wendy Block quilt, gather the necessary materials and tools. This will ensure that you have everything ready before you begin cutting and sewing, streamlining the process for an efficient quilting experience.
- Fabric: Choose three different colors or patterns to add dimension to the Wendy Block. You’ll need a light, medium, and dark shade of fabric for a balanced design.
- Rotary Cutter and Ruler: Precision is key when cutting quilt pieces. A rotary cutter, quilting ruler, and cutting mat will help you achieve accurate cuts.
- Sewing Machine and Thread: Use a sewing machine for the main stitching work and high-quality thread that matches your fabric colors for a seamless look.
Having the right materials on hand will simplify the process, allowing you to focus on creating a beautifully crafted Wendy Block quilt.
Step 1: Cutting the Fabric Pieces
The Wendy Block pattern requires specific fabric cuts to create its signature look. Below are the measurements for each piece. Follow these carefully to ensure a perfect fit when assembling the block.
- Light Fabric: Cut one square measuring 4.5″ x 4.5″ and two rectangles measuring 2.5″ x 4.5″. These pieces will form the center and edges of the block.
- Medium Fabric: Cut two squares measuring 4.5″ x 4.5″ and two rectangles measuring 2.5″ x 8.5″. These pieces provide contrast and add depth to the pattern.
- Dark Fabric: Cut four squares measuring 2.5″ x 2.5″ and two rectangles measuring 2.5″ x 12.5″. These pieces will frame the block, creating a balanced border.
Once all fabric pieces are cut to size, you’re ready to begin assembling the Wendy Block. Accurate cutting will ensure that your pieces fit together seamlessly, resulting in a professional-looking quilt block.
Step 2: Assembling the Center of the Block
The center of the Wendy Block quilt is made by joining the light and medium fabric pieces. This area is essential, as it serves as the foundation for the entire quilt block.
- Joining the Pieces: Take the light 4.5″ x 4.5″ square and sew it between the two 2.5″ x 4.5″ light fabric rectangles. This creates a central unit that anchors the design.
- Adding Medium Squares: Sew a medium 4.5″ x 4.5″ square to each side of the central unit. This adds symmetry and provides the first level of contrast.
- Pressing the Seams: Press each seam flat to avoid bulk and to ensure that your block remains smooth. This will also make the next steps easier to assemble.
These steps establish the central part of the Wendy Block, setting up the pattern’s distinctive structure. Ensure each seam is properly aligned for a polished look.
Step 3: Attaching the First Frame
With the center complete, it’s time to add the first frame. This frame surrounds the center block, giving it structure and highlighting the design’s symmetry.
- Attaching Rectangles: Sew a medium 2.5″ x 8.5″ rectangle to the top and bottom of the center unit. These pieces expand the block, making it more visually striking.
- Adding Corner Squares: Sew a dark 2.5″ x 2.5″ square to each end of the remaining two medium 2.5″ x 8.5″ rectangles. This adds interest and brings out the block’s layered look.
- Completing the Frame: Attach these new units to the left and right sides of the block, creating the first frame around the center.
This first frame adds depth to the block and enhances the overall pattern, setting the stage for the final border.
Step 4: Adding the Final Border
The last step in constructing the Wendy Block is adding the outer border. This frame completes the design, giving the block its finished look.
- Sewing Long Rectangles: Sew a dark 2.5″ x 12.5″ rectangle to the top and bottom of the block. This creates a balanced edge and provides a strong outline for the block.
- Adding Corner Accents: Attach a dark 2.5″ x 2.5″ square to each end of two light 2.5″ x 12.5″ rectangles. These corner accents add symmetry and balance.
- Final Assembly: Sew the completed units to the left and right sides of the block, forming the final border and completing the Wendy Block.
This final step frames the entire block, bringing together all the elements of the Wendy Block quilt pattern. The result is a cohesive, stylish quilt block ready to be incorporated into a quilt.
🌟Join our exclusive Quilt broadcast list on Messenger! Receive the best patterns, tips, and updates directly in your inbox. Our team is ready to send you delightful content that will inspire your projects. Don’t miss this opportunity to stay updated and create amazing pieces. Join now and be part of this passionate quilt community!✨📩
Tips for Sewing and Pressing
Creating a clean, professional Wendy Block requires attention to detail. Here are some sewing and pressing tips to enhance the quality of your quilt block.
- Seam Allowance: Use a consistent 1/4-inch seam allowance for all pieces. This is standard for quilting and ensures your pieces fit together as designed.
- Pressing Technique: Always press seams toward the darker fabric to avoid visible seam lines. This technique also helps prevent bulky seams.
- Square Up the Block: After completing the block, use a quilting ruler to check that it measures the correct size. Trim any excess if needed for a uniform look.
Following these tips will give your Wendy Block a polished, professional appearance. Proper sewing and pressing techniques are key to creating a high-quality quilt block.
Choosing Colors and Fabrics for the Wendy Block
The Wendy Block quilt pattern shines with the right color combinations. Selecting complementary colors will enhance the visual appeal and depth of your quilt.
- Contrast is Key: Choose fabrics with contrasting light, medium, and dark shades. This creates a layered effect, making the pattern’s geometric shapes stand out.
- Patterned vs. Solid Fabric: Combining patterned and solid fabrics can add dimension. For example, use a patterned fabric for the dark frame and solid colors for the inner pieces.
- Seasonal Themes: Consider seasonal color schemes for a unique twist. For instance, bright pastels work well for spring, while deep reds and greens are perfect for a holiday-themed quilt.
Selecting the right fabrics will ensure that your Wendy Block quilt pattern looks vibrant and stylish. Play around with color options to make your quilt truly unique.
Completing Your Wendy Block Quilt
Once you’ve created multiple Wendy Blocks, you’re ready to assemble them into a complete quilt. This final step brings all the blocks together, forming a cohesive and beautiful quilt design.
- Arranging the Blocks: Lay out your completed blocks on a large surface. Experiment with different arrangements to find the layout that best highlights the pattern.
- Sewing the Quilt Top: Join the blocks row by row, carefully aligning seams for a uniform appearance. Press each seam to keep your quilt top smooth and flat.
- Adding Borders: Consider adding a border to the entire quilt for a polished finish. This border can be a solid color or patterned fabric that complements your Wendy Blocks.
Finishing the Wendy Block quilt gives you a unique, handmade piece perfect for cozying up or gifting to loved ones. This timeless pattern adds a personal touch to any space.
The Wendy Block quilt pattern is a wonderful addition to any quilter’s repertoire. This guide provides everything you need to create a stunning quilt from start to finish. With its distinctive design and endless customization options, the Wendy Block allows you to showcase your creativity and quilting skills.


