Creating the “Winner and the Block” quilt pattern is an exciting and rewarding project for quilting enthusiasts at any level.
This quilt block combines precision, creativity, and a timeless design that will stand out in any quilt project. In this tutorial, we’ll walk you through each step, covering everything from fabric selection and measurements to assembly tips and sewing techniques.
So, let’s dive into this unique quilt pattern and explore how to make your very own Winner and the Block quilt.

What is the Winner and the Block Quilt Pattern?
The “Winner and the Block” quilt pattern is known for its versatile and eye-catching design. With symmetrical blocks and a combination of contrasting colors, this pattern is perfect for adding a structured yet dynamic look to your quilts. It works well with both bold and muted color palettes, allowing you to tailor it to suit your style.
SEE OTHER FACE PATTERNS HERE!
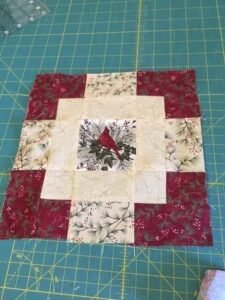
This quilt pattern consists of a central block surrounded by various geometric shapes, which create a visually appealing layout. Quilters love this pattern because it offers a balance of complexity and simplicity, making it an ideal choice for both experienced and beginner quilters alike. Whether you’re aiming to make a full-size quilt or just a few blocks for a smaller project, the Winner and the Block pattern is a fantastic choice.
To get started, we’ll go over the essential tools and materials you’ll need, followed by a detailed step-by-step tutorial. Let’s set up your sewing space, choose your fabrics, and get ready to bring this quilt pattern to life.
Materials Needed for the Winner and the Block Quilt Pattern
Before diving into the construction process, make sure you have all the necessary materials on hand. Here’s a list to ensure you’re fully prepared:
- Fabric Selection: Choose two to three different fabrics that complement each other well. You’ll need a mix of light and dark shades to create the pattern’s contrast.
- Rotary Cutter and Ruler: For precision cutting, a rotary cutter and a clear quilting ruler are essential.
- Cutting Mat: Protect your surfaces and keep your fabric in place with a non-slip cutting mat.
- Sewing Machine and Thread: Ensure your machine is in good working order, and select a thread color that coordinates with your fabric choices.
- Iron and Ironing Board: Pressing your seams as you sew helps maintain accuracy and gives your quilt a polished look.
By gathering these materials before you begin, you’ll have everything you need to create the quilt blocks smoothly. Proper preparation is key to an enjoyable quilting experience.
Step 1: Cutting the Fabric for the Winner and the Block Quilt
Cutting is a crucial part of the quilting process. For this quilt pattern, precision in your measurements is essential to achieve a neat and aligned design. Here’s what you’ll need to cut:
- Cut Four 5-inch Squares: Use a darker fabric for these squares. These pieces will form the main focal points in your quilt block.
- Cut Eight 2.5-inch x 5-inch Rectangles: These rectangles will surround the central squares, so choose a fabric that contrasts nicely with the squares.
- Cut Four 5-inch x 5-inch Squares in a Lighter Shade: These lighter squares will balance the darker squares, creating the contrast that gives this pattern its name.
- Optional: Cut Four 2.5-inch x 2.5-inch Accent Squares: If you’d like to add an extra layer of detail, use an accent color for these smaller squares.
Take your time while cutting, and use a ruler to ensure that each piece is cut accurately. Accurate cutting will save you time and frustration during assembly, as it reduces the likelihood of misaligned seams.
Step 2: Assembling the Center of the Block
The center of the Winner and the Block pattern is composed of four 5-inch squares arranged in a 2×2 formation. Follow these steps to start assembling the center:
- Arrange the Squares: Lay out the four dark squares to form a 2×2 square. Make sure the colors and patterns are oriented as you desire before sewing.
- Sew the Squares Together: Take the first two squares and sew them along one edge with a ¼-inch seam allowance. Repeat with the other two squares.
- Press the Seams: After sewing each pair, press the seams open or to the side, depending on your preference. This will help the squares lay flat.
By focusing on accuracy during these steps, you’ll set the stage for the rest of the block assembly. Taking the time to press seams as you go will also make the final assembly much easier.
Step 3: Adding the Border Rectangles
With the center assembled, it’s time to add the surrounding rectangles. This step will give the block its distinctive framed look. Here’s how to add the border rectangles:
- Attach the Rectangles to the Center: Begin by sewing a 2.5-inch x 5-inch rectangle to each side of the 2×2 center square block.
- Sewing the Opposite Sides: Attach the remaining two rectangles to the top and bottom of the center block.
- Press and Check Alignment: Once you’ve sewn on all four rectangles, press the seams and check to ensure the borders are straight and aligned with the center.
This border creates a cohesive look and helps frame the block, making it a perfect addition for a structured quilt layout.
Step 4: Adding the Outer Corners
The final step in creating your Winner and the Block quilt pattern is to add the lighter outer squares. These squares will balance the darker center, creating the contrast that defines this quilt pattern.
- Attach Each Corner Square: Sew a 5-inch square onto each corner of the block, one at a time, with a ¼-inch seam allowance.
- Press Seams to Set the Shape: After attaching each corner, press the seams flat to ensure a smooth finish.
- Trim if Necessary: If any edges extend past the outer boundaries, trim them slightly for a clean, finished look.
These outer squares add dimension and complete the block, making it ready to join with others to form your quilt.
Joining Multiple Winner and the Block Blocks
To create a full quilt, you’ll need to make multiple blocks following the same steps. Lay out the blocks in a grid pattern, alternating the orientation if desired for a more dynamic look. Joining these blocks requires careful alignment to ensure that the corners and borders match up seamlessly.
Sew each block together with a ¼-inch seam allowance, row by row, then press the entire quilt top when finished. With the Winner and the Block pattern, you can create a beautiful quilt that combines simplicity and sophistication, perfect for any occasion or setting.
🌟 Join our exclusive Quilt broadcast list on Messenger! Receive the best patterns, tips, and updates directly in your inbox. Our team is ready to send you delightful content that will inspire your projects. Don’t miss this opportunity to stay updated and create amazing pieces. Join now and be part of this passionate quilt community! ✨📩
Tips for Success with the Winner and the Block Quilt Pattern
- Choose Quality Fabrics: Since this quilt relies on color contrast, selecting high-quality fabrics with distinct shades will make your quilt more vibrant.
- Take Your Time: Precise cutting and sewing are essential. Rushing through the steps can lead to misaligned blocks, so go slowly and carefully.
- Experiment with Colors: This pattern is versatile! Try using complementary or monochromatic color schemes to make the design unique.
By following these tips and the step-by-step instructions, you’ll be able to create a beautiful quilt with the Winner and the Block pattern that stands out as a true work of art.
This comprehensive tutorial aims to guide you through every stage of creating a stunning Winner and the Block quilt. Whether it’s your first time tackling a quilt or you’re adding another piece to your collection, this quilt pattern is both rewarding and visually captivating. Dive into the world of quilting with this classic pattern and see your creative vision come to life.


