The Tumbling Blocks Quilt – Pattern is a striking and timeless design that has captured the hearts of quilters for generations. Known for its eye-catching geometric shapes and three-dimensional appearance, this pattern creates a sense of motion and depth that can elevate any quilting project. Whether you’re a beginner or an experienced quilter, the Tumbling Blocks Quilt Pattern offers endless opportunities for creativity and customization.
This pattern is traditionally composed of diamond-shaped blocks arranged in a way that creates the illusion of a “tumbling” effect, where the blocks seem to move across the quilt surface. This dynamic design uses careful placement of fabric pieces to create a visual depth that draws the eye in, making it a favorite for both traditional and modern quilt designs. In this article, we will explore the basics of the Tumbling Blocks Quilt – Pattern, how to make it, and how you can customize it to suit your personal style.
The Tumbling Blocks Quilt Pattern has a fascinating history and remains a popular choice among quilters today. Its versatility means it can be used in a variety of quilt sizes, from small wall hangings to large bed quilts. This pattern can be as simple or intricate as you desire, making it suitable for quilters of all skill levels.
1. What Is the Tumbling Blocks Quilt – Pattern?
The Tumbling Blocks Quilt – Pattern is a geometric design that uses hexagonal and parallelogram-shaped fabric pieces to create a visual illusion of three-dimensional cubes. These blocks are arranged in a way that gives the appearance of cubes “tumbling” across the surface of the quilt. The pattern is known for its striking and intricate design, which draws attention with its depth and movement.
SEE OTHER FACE PATTERNS HERE!
While the Tumbling Blocks Quilt Pattern may look complex, it is based on simple shapes. The key to achieving the three-dimensional effect lies in the strategic placement of light, medium, and dark fabrics. By using a combination of colors that highlight the edges of the blocks, quilters can create the illusion that the blocks are three-dimensional, making it look as if they are floating above the quilt.
The Tumbling Blocks Quilt can be made in various sizes, from small projects like table runners to larger bed-sized quilts. The design is versatile and can be adapted to suit different styles and preferences. Whether you are creating a bold, colorful statement quilt or a more subtle, muted design, the Tumbling Blocks Quilt – Pattern can be tailored to match your vision.
2. How to Make the Tumbling Blocks Quilt – Pattern
Creating the Tumbling Blocks Quilt – Pattern requires precision and attention to detail, but it is a rewarding project that produces stunning results. Here’s a step-by-step guide to help you get started:
1. Gather Your Materials
To begin making the Tumbling Blocks Quilt, you will need the following materials:
- Fabric in a variety of colors (at least three different shades: light, medium, and dark)
- Rotary cutter, ruler, and mat for accurate cutting
- Template or pre-cut hexagonal blocks
- Sewing machine
- Thread to match your fabric
- Iron and ironing board for pressing seams
Choose fabrics that complement each other, as the Tumbling Blocks pattern relies on contrasting colors to create the 3D effect. Use solid fabrics or prints, depending on your desired style. The combination of light and dark fabrics will create depth, making the blocks appear to pop.
2. Cut the Fabric Pieces
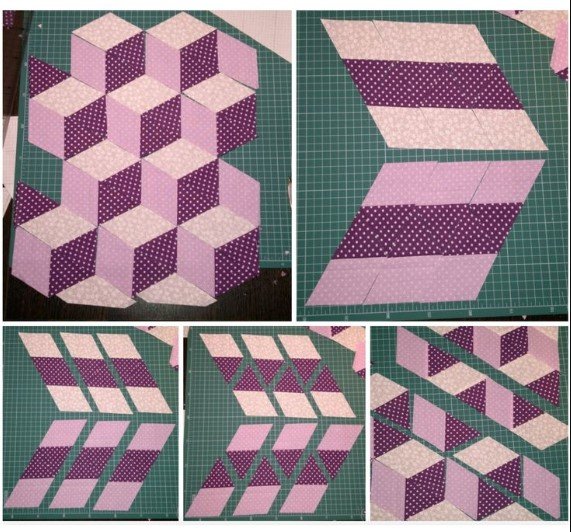
The first step in creating your Tumbling Blocks Quilt is to cut the fabric into the necessary shapes. This pattern typically requires hexagonal and parallelogram pieces. Using a template or rotary cutter, cut your fabric into these shapes. Make sure the pieces are consistent in size to ensure that the quilt blocks fit together properly.
3. Assemble the Blocks
Once you have all your fabric pieces cut, it’s time to assemble the blocks. Begin by sewing the parallelogram pieces together to form a hexagonal shape. Pay close attention to the angles to ensure the pieces align properly. Carefully sew each piece together, pressing the seams flat as you go. The arrangement of light, medium, and dark fabrics will begin to take shape and create the 3D effect.
4. Arrange the Blocks
Once you’ve assembled a few blocks, lay them out on a flat surface or design wall. The Tumbling Blocks pattern requires careful arrangement to achieve the desired effect. The blocks should be arranged in rows, with alternating angles to create the tumbling appearance. Experiment with different layouts until you find one that suits your aesthetic.
5. Sew the Blocks Together
Once you’re happy with the layout, start sewing the blocks together. Begin by joining the blocks in rows, and then sew the rows together. As you sew, press the seams to ensure that the blocks stay flat and aligned.
6. Finish the Quilt
Once your quilt top is complete, it’s time to add the backing and batting. Lay the quilt top, batting, and backing on a flat surface and pin or baste them together. Quilt the layers to secure them, either by hand or using a sewing machine. Finally, add the quilt binding to the edges to complete the quilt.
3. Customizing the Tumbling Blocks Quilt – Pattern
One of the best aspects of the Tumbling Blocks Quilt – Pattern is its versatility. There are many ways to customize the design to make it your own. Here are a few ideas to help you personalize your Tumbling Blocks Quilt:
1. Play with Color Combinations
While the traditional Tumbling Blocks pattern uses light, medium, and dark fabrics, you can experiment with different color schemes. Try using complementary colors, monochromatic shades, or even bold, contrasting hues to create a unique quilt. You could also incorporate patterned fabrics for added visual interest.
2. Vary the Size of the Blocks
The size of the blocks in your Tumbling Blocks Quilt can be adjusted to suit your preferences. You can make larger blocks for a quicker project or smaller blocks for a more intricate design. Changing the block size can also affect the overall feel of the quilt, making it either bold and modern or more delicate and detailed.
3. Try Different Layouts
The classic Tumbling Blocks layout arranges the blocks in a diagonal pattern, but you can explore other layouts. You could arrange the blocks in a straight grid for a more orderly look, or you might alternate the orientations of the blocks to create a more dynamic design. The layout can drastically change the overall appearance of the quilt, so feel free to experiment with different placements.
4. Add Borders
To give your Tumbling Blocks Quilt a finished look, consider adding borders around the quilt. The borders can frame the quilt and help balance the design. Use coordinating fabrics to add a border that complements the colors and style of the quilt, or go for a contrasting border to create a bold statement.
5. Incorporate Appliqué or Embellishments
For an added touch of creativity, you can incorporate appliqué or other embellishments into your Tumbling Blocks Quilt. Adding embroidered details, decorative stitching, or fabric appliqué designs can make your quilt even more unique. These touches can be especially beautiful if you’re creating a quilt as a gift or for a special occasion.
6. Experiment with Fabric Types
The Tumbling Blocks Quilt pattern can be made with a variety of fabric types. While cotton is the most common choice, you can experiment with other fabrics like flannel, linen, or even silk. Different fabrics can affect the texture and feel of the quilt, so don’t be afraid to try something new.
4. Common Challenges and How to Overcome Them
While the Tumbling Blocks Quilt – Pattern is a beautiful design, it can present some challenges, especially for beginners. Here are some common issues quilters face and how to overcome them:
1. Difficulty with Angles
The angles of the parallelogram pieces can be tricky to sew, especially for beginners. To ensure that the angles align correctly, take your time when cutting and sewing. Use a ruler or template to guide your cuts and check the alignment as you sew.
2. Matching Fabric Pieces
It can be challenging to match the fabric pieces precisely, especially if you’re using a variety of colors and prints. To avoid mismatched pieces, lay everything out on a design wall or flat surface before sewing. This allows you to see the arrangement and make any necessary adjustments before stitching the pieces together.
3. Inconsistent Seams
Inconsistent seam allowances can affect the fit of the blocks. Make sure your seam allowance is consistent throughout the quilt, as even small discrepancies can cause the blocks to misalign. A quarter-inch seam allowance is standard, but adjust it if necessary for your specific project.
4. The Quilt Becoming Too Busy
The Tumbling Blocks Quilt can become visually overwhelming if there are too many colors or patterns. If you feel like the quilt is too busy, try simplifying the color scheme or reducing the number of fabrics used. Stick to one or two colors in different shades to create a more cohesive look.
5. Pressing Seams Incorrectly
Properly pressing your seams is crucial to achieving a neat and professional-looking quilt. Make sure to press the seams as you go to avoid puckering or uneven edges. Using an iron with steam can help set the seams and give your quilt a smooth finish.
6. Not Planning the Layout in Advance
The layout of the Tumbling Blocks Quilt is essential for creating the 3D effect. If you don’t plan the layout in advance, the blocks may not align correctly, and the tumbling effect may be lost. Take the time to experiment with different layouts before sewing the blocks together to ensure the design looks cohesive.
FAQ
1. What is a Tumbling Blocks Quilt – Pattern?
The Tumbling Blocks Quilt – Pattern is a geometric quilt design featuring interlocking hexagonal and parallelogram blocks that create the illusion of three-dimensional cubes. This gives the quilt a dynamic and visually intriguing look.
🌟Join our exclusive Quilt broadcast list on Messenger! Receive the best patterns, tips, and updates directly in your inbox. Our team is ready to send you delightful content that will inspire your projects. Don’t miss this opportunity to stay updated and create amazing pieces. Join now and be part of this passionate quilt community!✨📩
2. How do I achieve the 3D effect with the Tumbling Blocks Quilt?
The three-dimensional effect is created by carefully placing light, medium, and dark fabrics in the quilt blocks. The contrast between the fabrics helps create the illusion of depth, making the blocks appear to “pop” off the surface.
3. Can I use different fabric types for the Tumbling Blocks Quilt?
Yes! While cotton is the most common choice, you can use a variety of fabric types for the Tumbling Blocks Quilt. Fabrics like flannel, linen, and silk can all be used to create different textures and effects.
4. What size should the blocks be for a Tumbling Blocks Quilt?
The size of the blocks can be adjusted to suit your preference. Larger blocks will create a quicker, bolder design, while smaller blocks will make for a more intricate and detailed quilt.
5. How can I avoid making mistakes with the angles and seams?
Take your time when cutting and sewing to ensure the angles align correctly. Use a template or ruler to guide your cuts, and make sure your seam allowance is consistent throughout the project.
The Tumbling Blocks Quilt – Pattern is a timeless and versatile design that can be tailored to suit any style. With careful planning, the right materials, and attention to detail, you can create a stunning quilt that showcases the beauty of this geometric pattern. Whether you’re a beginner or an experienced quilter, this project offers endless opportunities for creativity and personalization. Let us know your thoughts or share your quilting experience in the comments below! Happy quilting!


