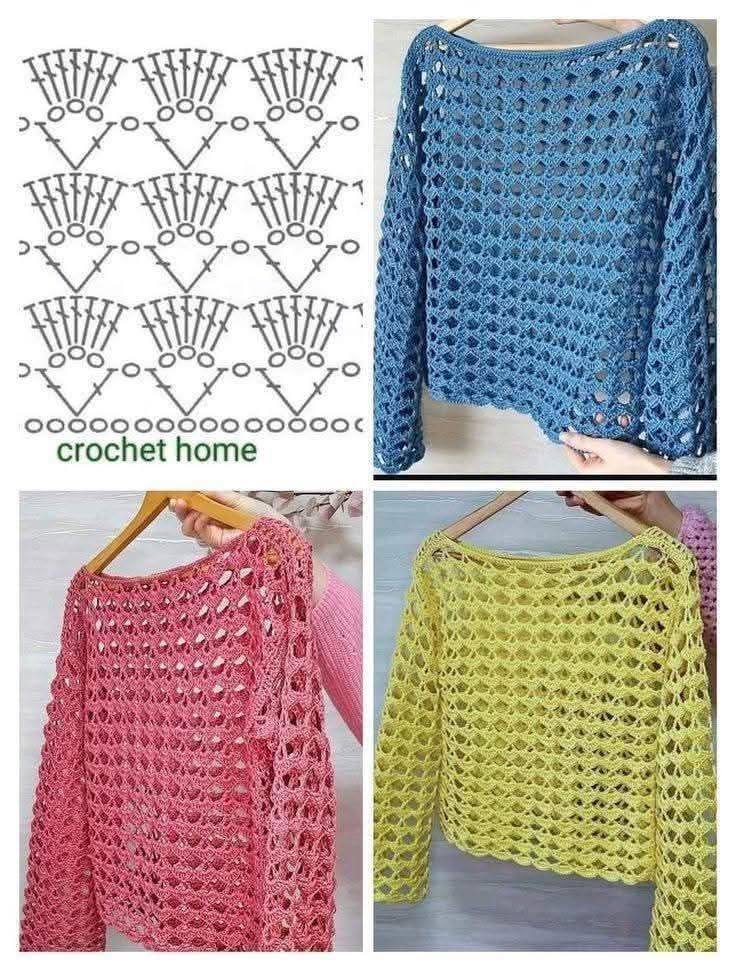
If you’ve been dreaming of creating a cozy yet stylish handmade garment, the Crochet Sweater Top – Step by Step tutorial is your perfect starting point. This project combines comfort, beauty, and customization, allowing you to crochet a fashionable sweater that fits your personal style and skill level.
Unlike large and intimidating clothing projects, a crochet sweater top can be surprisingly simple, even for beginners. With basic stitches and clear instructions, you’ll be amazed at how quickly you can transform yarn into a wearable piece.
This guide will take you through the step-by-step process of creating your own crochet sweater top, including how to choose materials, shape the body and sleeves, and add those final creative touches that make your garment unique.
1. Materials and Preparation
Starting your Crochet Sweater Top – Step by Step project begins with choosing the right materials. Selecting the correct yarn and hook is key to achieving the desired texture, fit, and look.
DISCOVER MORE FREE PATTERNS HERE!
Opt for medium-weight yarns like worsted or DK (double knitting) for a good balance of warmth and flexibility. Acrylic blends, cotton, or bamboo yarns are popular choices for sweater tops depending on the season and intended use.
Use a crochet hook that complements your yarn weight. Common hook sizes for sweater tops range between 4mm to 6mm. Always check your yarn label for recommended sizes and test your gauge before starting.
You’ll also need essential tools like stitch markers, tape measure, scissors, and a yarn needle for seaming and finishing. These ensure accuracy and make assembly easier.
Before beginning, decide whether you want your sweater to be fitted or loose, cropped or long. Take your measurements and note your bust, waist, and hip sizes for reference.
Choose a well-lit, organized workspace with enough room to lay out your pieces and work comfortably. Keep your pattern or this step-by-step tutorial nearby as a guide.
2. Starting the Body Panel
The base of your Crochet Sweater Top – Step by Step tutorial starts with the body panel, which can be constructed in one or two parts depending on the design.
Begin by chaining a length that matches the width of your front or back panel. This is often based on your bust size, plus a few centimeters for ease. Use stitch markers to identify every 10 stitches to help keep track.
Most beginner sweater tops are made using simple stitches like double crochet (dc) or half double crochet (hdc). These stitches work up quickly and offer a nice balance between stretch and coverage.
Work in rows if you’re creating a front and back panel separately. Count your stitches at the end of each row to avoid accidental increases or decreases that could affect sizing.
Continue crocheting rows until the body reaches your desired length. For a cropped look, stop at the waist. For a longer fit, continue down to the hips or below.
Make sure both the front and back panels (if working separately) are the same size and shape. Lay them flat together to check symmetry before moving on.
3. Adding Sleeves and Seaming
This is where your Crochet Sweater Top – Step by Step project begins to take real shape. Sleeves can be customized in length and width to suit the look you’re aiming for.
To make sleeves, you can either crochet them directly onto the armholes or create them separately and sew them in later. The former is great for beginners; the latter allows more flexibility in design.
Start with a foundation chain that matches the circumference of your upper arm. Increase or decrease stitch count as you go to shape tapered sleeves or bell sleeves depending on your preference.
Work in the round or flat rows to create the sleeves. Keep track of your stitch count and measure as you go to ensure the sleeves match in length and width.
Once both sleeves are complete, it’s time to seam the pieces together. Use a yarn needle and whip stitch or mattress stitch to join the shoulders, sides, and sleeves. Take care to align the edges neatly.
Try on the sweater as you seam to ensure it fits well. Making adjustments at this stage is much easier than after everything is secured.
Finally, weave in all yarn ends neatly and block your sweater if needed. Blocking helps smooth and shape the fabric for a more professional finish.
4. Customization and Finishing Touches
Now that your Crochet Sweater Top – Step by Step project is assembled, it’s time for the fun part—customizing your sweater to make it truly yours.
Start by adding ribbing around the neckline, cuffs, and hem using front post and back post stitches. This not only improves the fit but adds texture and polish to the garment.
Consider color blocking or adding stripes for visual interest. Switching yarn colors mid-row or using gradient yarns can produce eye-catching designs with minimal effort.
You might also want to add crochet appliqués, such as flowers, hearts, or stars, for a playful and personal touch. Make sure they are securely attached, especially if gifting the sweater to a child.
Turn your sweater into a hoodie or cowl-neck version by continuing to crochet upward from the neckline. This adds warmth and a stylish twist.
Another fun option is to use openwork stitches (like mesh or shells) in sections of your sweater for a breezier feel, perfect for spring or summer wear.
Don’t forget to label your handmade sweater if it’s a gift or for sale. A small tag or handwritten note adds a heartfelt finishing touch that makes your project stand out.
Frequently Asked Questions (FAQ)
Is the Crochet Sweater Top – Step by Step tutorial suitable for beginners?
Yes! This tutorial is beginner-friendly and focuses on simple construction methods and basic stitches. Even if this is your first wearable project, you’ll find it manageable and enjoyable.
How long does it take to complete a crochet sweater top?
Depending on your skill level and the complexity of the design, it typically takes anywhere from a few evenings to a full week. Simple designs with worsted yarn work up faster.
What yarn is best for sweater tops?
Worsted weight, cotton, bamboo, or soft acrylic yarns are ideal. They provide the right mix of warmth, stretch, and drape for comfortable daily wear.
Can I make this sweater in different sizes?
Absolutely! You can adjust the foundation chain and row count to create different sizes. Taking accurate body measurements is essential for a perfect fit.
Do I need to block my finished sweater?
While not always necessary, blocking can help even out stitches, improve drape, and give your sweater a more polished appearance—especially if you used natural fibers.
Can I sell sweaters made from this tutorial?
Yes, you can! Selling handmade items is a great way to earn from your crochet skills. Just ensure the pattern you’re using is free to sell from or has proper licensing.
Conclusion
Making your own Crochet Sweater Top – Step by Step is a creative and fulfilling experience. You’ve learned how to select the right materials, construct panels, shape sleeves, and add stylish customizations to your handmade garment.
Not only is it a great addition to your wardrobe or gift list, but it’s also a wonderful way to practice and improve your crochet skills. With this step-by-step guide, anyone can crochet a cozy, fashionable, and functional sweater top.
PATTERN VIDEO:
We’d love to hear your thoughts! Share your feedback, ask questions, or show us your finished sweater tops. Your comments inspire others and help grow our crochet community!