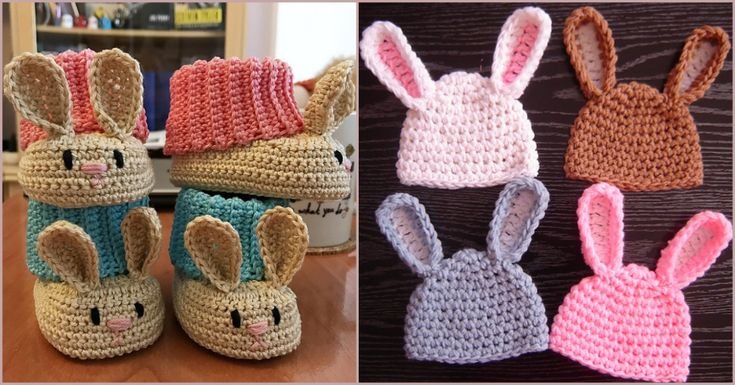
The Bunny Hat & Booties crochet set is one of the most charming and heart-melting projects you can create for a newborn or infant. Whether you’re crafting for your own little one, preparing a handmade baby shower gift, or building inventory for your crochet business, this pattern delivers cuteness, comfort, and joy in every stitch.
Designed with soft yarn and simple techniques, the Bunny Hat & Booties set is beginner-friendly while still allowing room for creative customization. With long floppy ears, delicate pink linings, and cozy booties to match, this set transforms any baby into an adorable bunny in just a few hours of crafting.
In this tutorial, you’ll learn exactly how to crochet the Bunny Hat & Booties set step by step — from selecting yarn and tools to finishing your project with picture-perfect results. Let’s hop into it!
1. Materials and Yarn for the Perfect Bunny Look
To create the ideal Bunny Hat & Booties set, choosing the right yarn and tools is essential for softness, safety, and cuteness.
DISCOVER MORE FREE PATTERNS HERE!
Start with worsted weight baby yarn that’s gentle on sensitive skin. Look for hypoallergenic, machine-washable blends, especially those labeled as baby-safe or OEKO-TEX certified. Soft acrylic or bamboo yarns work well, and cotton blends are also a great choice for warmer climates.
For the hook, a size 4.0 mm (G-6) or 4.5 mm (7) crochet hook typically gives the right tension for hats and booties using worsted weight yarn. Always check your gauge and adjust your hook size as needed.
You’ll also need a yarn needle for sewing ears and weaving ends, a stitch marker to track rounds, and scissors. A bit of polyfill stuffing may be needed if you’re making puffed ears.
To add detail, have a second color yarn—typically a soft pink—for the inner ears and bootie accents. Safety eyes or embroidered eyes and a tiny pink nose can give your bunny hat added personality.
Make sure to prep everything ahead of time so your crochet session goes smoothly from start to finish.
2. Step-by-Step: Crocheting the Bunny Hat
Let’s begin with the Bunny Hat, which is made in the round from the crown down. This ensures a snug and soft fit on a baby’s head.
Start with a magic ring and work double crochet (dc) or half double crochet (hdc) stitches in increasing rounds until you reach the desired crown size. Use a stitch marker to help track your round starts.
Once you’ve reached the right diameter, stop increasing and continue working even rounds to build the sides of the hat. This creates the dome shape that fits snugly on a baby’s head.
For the bunny ears, crochet two outer ear shapes in white and two smaller inner ears in pink. Use simple oval or pointed ear patterns, and sew the pink pieces onto the white ones. You can lightly stuff the ears or leave them floppy.
Attach the ears evenly to the top of the hat. Make sure they’re symmetrically placed and well-stitched to handle gentle tugs and play.
You can add optional details like a pom-pom tail on the back of the hat or little bows on the ears for a more personalized look.
If desired, finish the hat with a single crochet edging around the brim for a neat, polished look.
3. Creating the Matching Bunny Booties
Now let’s move on to the booties, which are made from the sole upward and designed to stay on tiny feet without slipping off.
Start by crocheting an oval sole using single crochet (sc) and increasing stitches to match the size of the baby’s foot. Most newborn sizes use about 3–3.5 inches in length.
Build the bootie sides by working single or half double crochet stitches in the round. You’ll begin shaping the top of the foot by reducing stitches (decreasing) at the toe area.
Once you’ve shaped the body of the bootie, you can add a cuff or ankle strap to help keep the bootie secure. Ribbed cuffs with front post/back post stitches offer both function and style.
For bunny details, add tiny ears to the front of each bootie using the same technique as the hat. You can sew them flat or let them perk up a little for extra charm.
A small pom-pom or puff tail can be attached to the back heel of each bootie for a true bunny look. Secure the pom-poms tightly so they’re baby-safe.
Finish by weaving in all ends and double-checking the seams to ensure everything is snug and secure.
4. Personalizing, Gifting, and Selling Bunny Sets
One of the best parts of the Bunny Hat & Booties crochet set is how easy it is to customize for different recipients and occasions.
Change the color palette based on gender, theme, or season. Try light gray with blush, cream and mint green, or even blue with white for a winter bunny.
Add embellishments like small flowers, ribbons, or embroidered initials to personalize the set for baby showers, Easter, or newborn photography sessions.
These sets make amazing handmade gifts that parents cherish. Pair the bunny hat and booties with a matching bunny-themed blanket or onesie for a full gift set.
If you’re selling your work, this pattern is ideal for Etsy shops, craft fairs, and baby boutiques. Handmade baby sets always attract attention, especially around spring holidays and the winter baby boom.
Make sure to take bright, clear photos of your finished sets styled with props or plush animals to attract potential buyers online.
Finally, don’t forget to package your items with care. A little tissue paper, a custom tag, or a ribbon goes a long way in making your handmade gift feel professional and full of love.
Frequently Asked Questions (FAQ)
Is the Bunny Hat & Booties set suitable for beginners?
Yes, this pattern is beginner-friendly! If you’re comfortable with basic stitches like single and double crochet, you’ll be able to make this set easily.
What size should I make the hat and booties?
Newborn sizes are most common, but you can easily adjust your stitch counts or use a size chart to make larger sets for 3–6 or 6–12 months.
Can I use cotton yarn for the Bunny Hat & Booties?
Yes, cotton blends are breathable and perfect for warmer weather. Just ensure the yarn is soft and not too stiff for baby skin.
How do I make the ears stand up?
Use slightly tighter tension, stuff them lightly with polyfill, and sew the ears with a slight curve inward to help them perk up.
Are these safe for babies?
Avoid using small plastic parts unless they’re securely attached. For younger babies, embroidered features are safest.
Can I sell items made from this pattern?
Yes, handmade Bunny Hat & Booties sets are very popular! Just be sure to credit the pattern designer if required.
Conclusion
The Bunny Hat & Booties – CROCHET TUTORIAL is a heartwarming and fun project that brings smiles to everyone who sees it. From its floppy ears to the tiny pom-pom tails, this set is full of character and love — perfect for gifts, photo props, or your own little one.
With easy-to-follow steps, soft yarns, and room for personalization, even beginners can create a high-quality, adorable crochet set in just a few hours.
We’d love to hear from you! Share your experience, leave your honest feedback, and tell us how your Bunny Hat & Booties turned out. Your input helps us keep creating patterns that inspire creativity and warmth in every stitch.