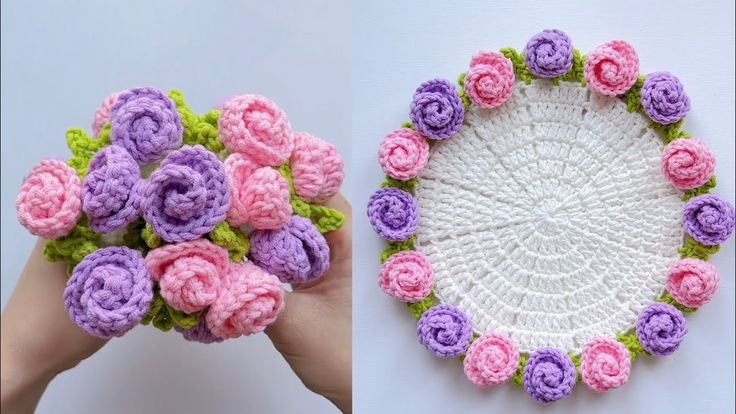
If you’re looking for a delightful and functional crochet project that brings both elegance and charm to your table decor, the Crochet Rose Coaster is a perfect choice. This project blends the beauty of a blooming rose with the practicality of a coaster, making it ideal for gifting, selling, or decorating your own home.
A Crochet Rose Coaster combines basic stitches with floral layering techniques to mimic the look of a real rose. Whether you’re a beginner who wants to try your hand at creating something beautiful or an advanced crocheter seeking a quick and satisfying pattern, this tutorial will guide you every step of the way.
In this article, you’ll learn how to create a Crochet Rose Coaster from scratch. We’ll go over the materials, walk you through the pattern, explore ways to customize your rose coasters, and show you how to use them creatively around your home or as part of thoughtful handmade gifts.
1. Materials Needed to Make a Crochet Rose Coaster
To begin your Crochet Rose Coaster, gather the materials below. You don’t need anything fancy—just some colorful yarn and a few basic tools.
DISCOVER MORE FREE PATTERNS HERE!
-
Yarn: Choose 100% cotton yarn for best absorption and heat resistance. Worsted weight or DK yarn works perfectly.
-
Crochet hook: Usually size 3.5 mm (E) or 4.0 mm (G), depending on your yarn.
-
Scissors: A small sharp pair for trimming.
-
Yarn needle: For weaving in ends.
-
Optional: Blocking pins and a mat to shape your coaster after finishing.
Pick yarn colors that resemble real rose shades: classic red, soft pink, lavender, yellow, or even white. For the base or leaf, green is traditional and offers nice contrast.
Cotton is preferred over acrylic for its durability and because it doesn’t melt under warm mugs. It also provides a nice texture for your flower layers to hold their shape well.
Before starting, ensure your hands are clean and workspace clear of dust, so your coaster stays pristine and presentable—especially if you plan to give it as a gift.
2. Step-by-Step Crochet Rose Coaster Pattern
The process of making a Crochet Rose Coaster involves crocheting a flower in layers, beginning with a center spiral and adding petal rounds.
Step 1: Start with a magic ring
Begin by creating a magic circle and working several single crochets (usually 6) into the ring. Pull tight to close. This forms the rose’s center.
Step 2: Create the first petal round
Chain and double crochet combinations are worked into each stitch around to build the first layer of petals. You might do something like: (ch 3, 2 dc, ch 3, sl st in next st) to create each petal.
Step 3: Build petal layers
Subsequent layers are built behind the previous round using back loops or chain spaces. Each layer grows in size and number of stitches per petal, giving the rose a dimensional look.
Step 4: Add a leaf round (optional)
Many patterns include a final round of green to simulate leaves beneath the rose. This adds a nice finishing touch and helps your coaster lie flat.
Step 5: Fasten off and weave ends
Secure your final stitch, then use a yarn needle to weave in loose ends neatly on the back.
Step 6: Block your coaster
To ensure your coaster lies flat and has a uniform shape, lightly block it with pins and a damp cloth. Let it dry completely.
This pattern is flexible—you can adjust petal shapes or stitch counts to make fuller or simpler roses, depending on your preference.
3. Customizing Your Crochet Rose Coaster
One of the best things about the Crochet Rose Coaster is how easily it can be personalized. With just a few variations, you can create a set of coasters that are truly one-of-a-kind.
Color combinations
Try making multi-tone roses by using a lighter shade in the center and darker shades in the outer petals. Ombre yarns can create stunning gradient effects as well.
Petal shapes
Modify your stitches to make pointed petals for a more stylized look, or ruffled edges for a more romantic rose. A few puff or popcorn stitches can also add texture.
Leaf embellishments
Add one or two separate crocheted leaves underneath the rose and sew them on for an elegant garden-inspired touch.
Add a border
Finish the coaster with a scalloped or picot edge to give it a more defined and decorative perimeter.
Personal touches
Attach a small tag with initials or stitch a tiny heart into the center of the rose for gifts. This adds a handmade, thoughtful element.
Mix and match sets
Create a whole set with different colors and petal styles. Great for themed decor or seasonal gifts like Mother’s Day, bridal showers, or birthdays.
These ideas can elevate your Crochet Rose Coaster from simple project to standout artisan piece.
4. Creative Uses and Gift Ideas
While the Crochet Rose Coaster is designed to protect surfaces, its beauty and versatility make it suitable for much more than just coasters.
Home decor
Use them as table centerpieces by arranging several coasters in a circle around a vase or candle. They’re also lovely under potted plants or decorative bowls.
Wall art
Frame a few rose coasters in shadow boxes to create 3D floral wall art. It’s an affordable and artistic way to bring handmade charm to your home.
Party favors
Crochet rose coasters make beautiful bridal shower, baby shower, or wedding favors. Wrap them in a small bag with a ribbon and a tag that says “Handmade with Love.”
Mother’s Day or Valentine’s gifts
Pair the coaster with a mug, tea bags, or a small bouquet for a thoughtful and heartfelt gift.
Craft fairs and Etsy shops
These coasters are ideal for selling online or at markets. They’re lightweight, cost-effective to make, and appeal to a wide audience.
Table settings
Place one under each guest’s cup or plate during tea parties or special dinners. They instantly elevate your table’s appearance.
With so many ways to use them, your Crochet Rose Coaster will be appreciated far beyond the craft room.
FAQ – Frequently Asked Questions
Can beginners make a Crochet Rose Coaster?
Yes! This project is beginner-friendly, especially if you’re familiar with basic stitches like single crochet, double crochet, and slip stitch.
What yarn is best for rose coasters?
Cotton yarn is ideal because it’s durable, washable, and holds its shape well. Avoid yarns that melt under heat, like acrylic, for safety.
How long does it take to make one coaster?
Depending on your skill level, it can take anywhere from 30 minutes to 1 hour. More intricate designs may take a little longer.
Can I wash these coasters?
Yes, but hand-washing is recommended to maintain their shape. Use mild soap and lay flat to dry.
Do I need to block my coasters?
Blocking is optional but helps your coasters lie flat and look more polished, especially if selling or gifting them.
Can I use these coasters for hot items?
Yes, as long as you use cotton yarn. They’re great for mugs, teapots, and even under small serving dishes.
Conclusion
The Crochet Rose Coaster is a lovely project that combines floral beauty with handmade practicality. Whether you’re crafting them for your own home, to give as heartfelt gifts, or to sell at a local market, they offer endless creative possibilities and personal expression.
By following this step-by-step guide, you’ve learned how to crochet your own rose coaster, how to customize it, and how to creatively use it in everyday life. The satisfaction of creating something both beautiful and useful is what makes crochet such a beloved craft.
Have you made a Crochet Rose Coaster? We’d love to hear your thoughts, ideas, or favorite color combinations. Feel free to leave your honest feedback and suggestions in the comments below!