How to Make Crochet Granny Square Socks brings a cozy, colorful twist to classic footwear with this fun and creative crochet project. This how to make crochet granny square socks tutorial guides you through transforming traditional granny squares into wearable, comfortable socks or bed slippers that showcase vibrant patchwork while keeping your feet warm. Ideal for using up scrap yarn, these socks combine the timeless charm of granny squares with practical everyday wear.
Crochet socks made from granny squares offer unbeatable customization, allowing you to play with colors, create unique patterns, and achieve a handmade look that feels both vintage and modern. Whether you’re crafting ankle socks, bed slippers, or even longer styles, the modular approach makes sizing straightforward and the result delightfully squishy underfoot.
In this step-by-step how to make crochet granny square socks guide, you’ll discover how to crochet perfect granny squares, join them seamlessly to form the sock shape, add a comfortable footbed and cuff, and finish with sturdy details for long-lasting wear. Using basic stitches and affordable yarn, this project suits beginners advancing their skills and experienced crocheters seeking a quick, satisfying make. Let’s hook up your own pair of crochet granny square socks today!
1. Gathering Your Materials for Granny Square Socks
Worsted-weight or DK yarn in multiple colors creates the signature patchwork of crochet granny square socks, with cotton blends or acrylics offering softness and durability for foot comfort. Scraps work perfectly, turning leftovers into vibrant, one-of-a-kind designs.
DISCOVER MORE FREE PATTERNS HERE!
A 4mm to 5mm crochet hook produces firm yet flexible granny squares that hold shape without stiffness in your granny square socks. This size balances drape for wearability and structure for the modular construction.
Scissors, yarn needle, stitch markers, and measuring tape keep your work precise and organized. Markers help track corners during square rounds, ensuring even joins later in the how to make crochet granny square socks process.
Optional non-slip sole fabric or puff paint adds grip if turning your socks into house slippers. This practical touch prevents sliding on smooth floors while enjoying your handmade crochet socks.
Gather a tapestry needle for sewing seams and joining squares invisibly. Strong joins create seamless transitions between granny motifs for comfortable, professional-looking granny square socks.
Finally, prepare a flat surface or blocking mats to shape squares before assembly. Blocking ensures flat, crisp edges that align perfectly when forming the sock in your crochet granny square socks tutorial.
2. Crocheting the Classic Granny Squares
Start each square with a magic ring and chain stitches to build the center ring securely. Work clusters of double crochets separated by chain spaces for the traditional open granny pattern in your crochet granny square socks.
Increase rounds by placing 3 double crochets, chain 2, and 3 double crochets in each corner chain-2 space. This method grows the square evenly while maintaining the iconic granny stitch look for every motif.
Change colors at the end of rounds for multi-colored squares, carrying unused yarn or cutting and weaving ends. Color changes add personality and make your granny square socks uniquely yours.
Make enough squares for the design—typically 4 to 8 per sock depending on size and style. Smaller squares (about 4-5 inches) suit ankle socks, while larger ones work for cozy bed slippers in the how to make crochet granny square socks guide.
Finish each square with a final round of single crochets or slip stitches if a solid edge is preferred. This optional border helps with joining and gives a neater finish to your crochet granny square socks.
Block all completed squares lightly with water or steam to set the shape and open up stitches. Proper blocking prevents puckering and ensures smooth assembly in your granny square socks project.
3. Joining Squares to Form the Sock Shape
Arrange squares in the desired layout—for basic ankle socks, position them to cover the top of the foot and sides, leaving space for the sole and heel. Many crochet granny square socks use 2-3 squares per side joined strategically.
Join squares using slip stitch, single crochet, or invisible mattress stitch along edges for a flat seam. Invisible joins create the smoothest look on the inside of your granny square socks for comfort against skin.
Fold and seam to create the tube shape for the foot, leaving an opening for the heel and toe areas. This modular joining allows easy customization of length and fit throughout the how to make crochet granny square socks process.
Add a heel by crocheting a small granny square or working rows of single crochet decreases directly onto the joined squares. Shaping the heel ensures a snug, comfortable fit in your finished crochet socks.
Work the toe section by picking up stitches around the front opening and decreasing gradually in rounds. Simple decrease rounds close the toe neatly without bulky seams in your granny square socks.
Weave in all joining ends securely as you go to prevent snags during wear. Tidy work here keeps the inside smooth and professional-looking for your completed crochet granny square socks.
4. Adding Cuff, Sole, and Finishing Touches
Crochet a ribbed or granny-stitch cuff by picking up stitches around the top opening and working several rounds. Ribbing with front/back post stitches adds stretch and keeps socks snug on ankles or calves.
For sole reinforcement, crochet a matching granny square or solid single crochet base and sew it underneath. This extra layer adds cushioning and durability to your crochet granny square socks.
Optionally apply non-slip dots or sew on fabric soles for house slippers. Practical additions make your handmade socks safer and more functional for everyday use.
Block the finished socks gently to even out stitches and set the shape. Blocking helps the granny squares relax into a comfortable, wearable form in your how to make crochet granny square socks creation.
Embellish with pom-poms, buttons, or embroidery if desired for extra charm. Personal touches turn basic granny square socks into special gifts or wardrobe favorites.
Wear and enjoy your cozy new socks, or gift them to spread handmade joy. Sharing your finished pair inspires others to try this fun crochet granny square socks project.
FAQ
What yarn works best for crochet granny square socks? Worsted or DK weight yarn with some stretch, like cotton-acrylic blends, provides comfort and durability. Avoid pure wool if socks will be worn barefoot to prevent itchiness in your granny square socks.
How many granny squares do I need for one pair of socks? Typically 6-12 squares total (3-6 per sock) depending on size and style. Ankle socks use fewer, while longer or slipper styles may need more in the how to make crochet granny square socks tutorial.
Are these socks suitable for beginners? Yes, if you know basic granny squares and simple seaming. Joining and shaping require practice, but the modular design makes it forgiving for learning in your crochet granny square socks project.
How do I make the socks fit my foot size? Measure your foot and adjust square size or add extra rounds/rows for length and width. Test fit as you join for a custom feel in every pair of granny square socks.
Can I make these socks without a sole reinforcement? Absolutely—for bed socks or light wear, the granny squares alone provide enough cushion. Add reinforcement only if using as house slippers in your crochet granny square socks.
What stitch is used to join the granny squares? Invisible mattress stitch or slip stitch join creates flat, comfortable seams. Single crochet join works for a textured look in your how to make crochet granny square socks creation.
How long does it take to complete a pair? With practice, 8-15 hours total, spread over sessions. Crocheting squares goes quickly, while joining and finishing take more time for a polished granny square socks result.
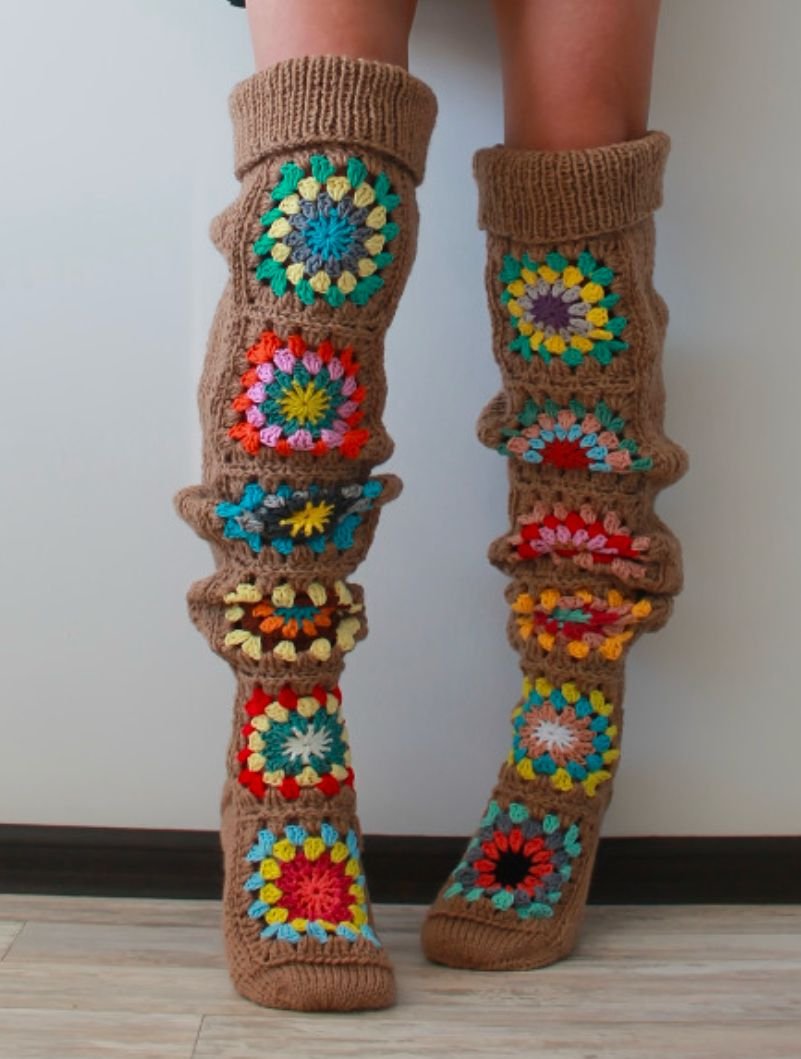
Can I make thigh-high or knee-high versions? Yes! Add more joined squares or granny rounds upward for leg coverage. Adjust cuff rounds accordingly for cozy, stylish longer crochet granny square socks.
In this how to make crochet granny square socks tutorial, we covered gathering colorful yarns and tools, crocheting classic granny squares, joining them thoughtfully to shape the sock, and adding cuffs, soles, and final details for comfort and style. You now have everything needed to create warm, whimsical socks that showcase your creativity and love for crochet.
PATTERN VIDEO:
https://www.youtube.com/watch?v=vtIkvfV08-E
Try making a pair and share your honest thoughts in the comments below. Did the joining method work smoothly? What colors or variations would you suggest? Your feedback helps other crocheters and keeps this guide evolving. Happy hooking and enjoy your fabulous crochet granny square socks!