
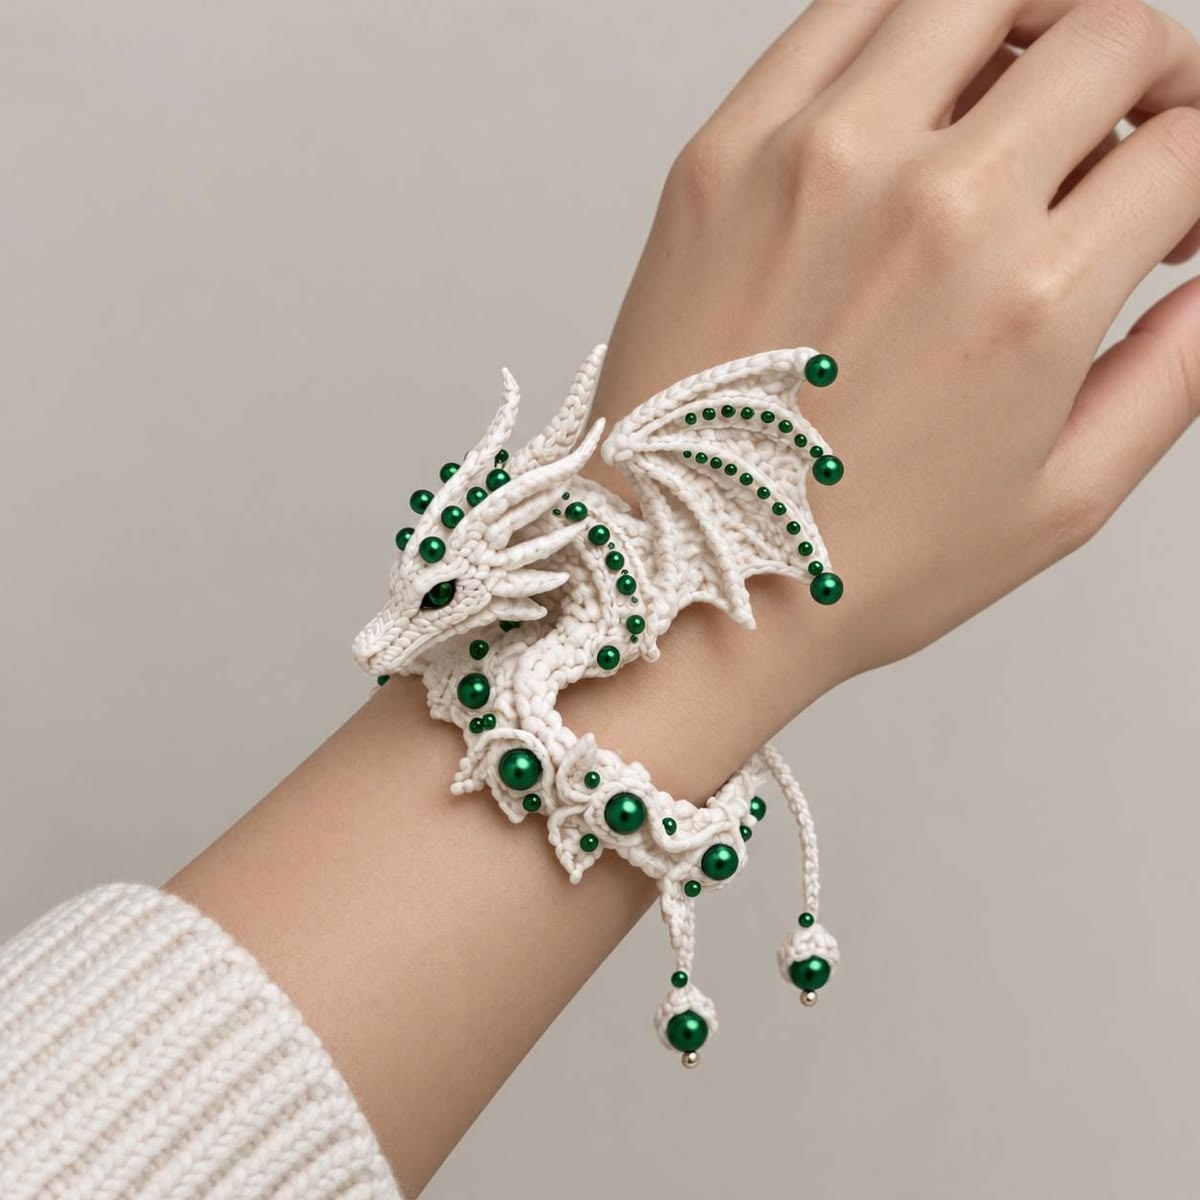
The Dragon Bracelet Pattern is a fascinating crochet project that combines fantasy-inspired design, delicate craftsmanship, and creative wearable art. Inspired by the elegant white dragon bracelet shown in the reference image, this handmade accessory features a sculpted dragon head, textured body, decorative horns, dramatic wings, and beautiful emerald-green accents. Unlike traditional crochet bracelets, this design transforms a simple wrist accessory into a miniature three-dimensional dragon that appears to wrap gracefully around the arm. The combination of ivory yarn and green decorative details creates an enchanting appearance, making this crochet dragon bracelet an excellent project for anyone who enjoys fantasy jewelry, intricate crochet accessories, and unique handmade creations.
One of the most remarkable characteristics of this Dragon Bracelet Pattern is the level of detail achieved through small crochet stitches and carefully constructed components. The dragon’s head features an elongated snout, raised brow ridges, small horns, and pointed facial details that give the creature its distinctive expression. Its body curves around the wrist, creating the illusion of a tiny dragon resting on the wearer’s arm. The wings extend upward from the back, displaying delicate openwork sections supported by raised crochet outlines. Decorative green beads enhance the dragon’s fantasy appearance, while the bracelet’s flexible construction allows it to function as an adjustable accessory. Although the finished project looks elaborate, it can be approached systematically by dividing the dragon into smaller sections and assembling them carefully.
Creating a handmade crochet dragon bracelet is also an opportunity to practice several useful crochet techniques, including working in continuous rounds, shaping with increases and decreases, creating dimensional appliqués, forming decorative cords, and joining individual components. This tutorial provides an original, practical interpretation of the design shown in the photograph, rather than an exact reconstruction of an unavailable original pattern. The instructions explain how to create a wearable dragon-inspired bracelet with a sculpted head, flexible body, decorative wings, pointed horns, and adjustable fastening. With patience, attention to detail, and a few basic crochet supplies, you can create a beautiful fantasy accessory that reflects your personal style.
Materials, Measurements, and Crochet Techniques for the Dragon Bracelet Pattern
1. Choosing the Best Yarn for a Crochet Dragon Bracelet
DISCOVER MORE FREE PATTERNS HERE!
The yarn used for your Dragon Bracelet Pattern plays an important role in the finished appearance. Because this project includes small sculptural details, a smooth cotton yarn is generally preferable to a fuzzy or highly elastic yarn. Mercerized cotton provides excellent stitch definition, allowing the dragon’s scales, facial features, and wing outlines to remain clearly visible. For a delicate bracelet similar to the reference image, choose size 3 crochet thread or a fine cotton yarn suitable for miniature crochet work. Ivory, cream, or soft white creates an elegant dragon, while darker colors such as black, emerald green, burgundy, or deep purple can produce a more dramatic fantasy-inspired accessory.
2. Materials and Supplies Needed
To make this crochet dragon bracelet, gather the following supplies:
-
Approximately 40–60 yards (37–55 meters) of fine cotton yarn or crochet thread.
-
A 1.75–2.25 mm crochet hook, depending on yarn thickness.
-
Small amount of polyester fiberfill for the dragon’s head.
-
Tapestry needle for assembling the components.
-
Small scissors.
-
Stitch markers.
-
Measuring tape.
-
Sewing needle and strong matching thread.
-
Optional emerald-green decorative beads.
-
Optional small jewelry clasp or adjustable crochet fastening.
-
Optional thin, flexible craft wire for decorative wing shaping.
Beads and wire should be securely enclosed or attached. This project is intended as decorative jewelry for adults, not as a toy or an accessory for young children.
3. Recommended Bracelet Measurements
The dimensions below are approximate guidelines for an adult-sized bracelet. Adjust the length to suit your wrist.
| Component | Approximate measurement |
|---|---|
| Bracelet circumference | 16–19 cm (6.3–7.5 in) |
| Dragon head length | 4–5 cm (1.6–2 in) |
| Dragon body length | 13–17 cm (5.1–6.7 in) |
| Wing height | 4–6 cm (1.6–2.4 in) |
| Wing width | 5–7 cm (2–2.8 in) |
| Horn length | 1.5–2.5 cm (0.6–1 in) |
| Adjustable fastening tails | 5–7 cm (2–2.8 in) |
The measurements will vary according to yarn thickness, hook size, and individual crochet tension. The dragon should rest comfortably on the wrist without restricting movement.
4. Understanding Crochet Gauge
Gauge is especially important when creating miniature accessories such as a Dragon Bracelet Pattern. With fine cotton yarn and a 2 mm hook, a reasonable starting gauge is approximately 10–12 single crochet stitches per inch (2.5 cm), although the exact result depends on your yarn. Work a small swatch before beginning. The stitches should be firm enough to maintain the dragon’s sculpted shape while remaining flexible enough for the bracelet to curve around the wrist. If your stitches appear loose, use a smaller hook. If the fabric becomes stiff and difficult to work, try a slightly larger hook.
5. Essential Crochet Abbreviations
This tutorial uses U.S. crochet terminology.
| Abbreviation | Meaning |
|---|---|
| MR | Magic ring |
| CH | Chain |
| SC | Single crochet |
| HDC | Half double crochet |
| DC | Double crochet |
| TR | Treble crochet |
| SL ST | Slip stitch |
| INC | Increase: 2 SC in one stitch |
| DEC | Invisible single crochet decrease |
| BLO | Back loop only |
| FLO | Front loop only |
| ST(S) | Stitch(es) |
| FO | Fasten off |
Numbers in parentheses indicate the total stitch count at the end of a round. Instructions between asterisks are repeated as directed.
6. Understanding the Dragon Bracelet Construction
The bracelet is assembled from several crocheted components. The head is worked in small rounds to create an elongated snout and rounded skull. The body is constructed as a narrow, flexible tube that wraps around the wrist. The wings are crocheted separately using a combination of chain spaces and taller stitches to create an openwork appearance. Horns, spikes, and facial ridges are added afterward to give the dragon its distinctive character. Finally, all the components are securely sewn together, and an adjustable closure is attached. Working in separate sections makes the crochet dragon jewelry pattern easier to understand and allows you to customize the finished design.
Step-by-Step Crochet Instructions for the Dragon Head and Body
Step 1: Crochet the Dragon’s Snout
Begin with your ivory cotton yarn and a 2 mm crochet hook. The snout forms the narrow front section of the dragon’s head.
Round 1: Make a magic ring and work 6 SC into the ring. (6)
Round 2: SC in next stitch, INC in next stitch. Repeat three times. (9)
Round 3: SC in each stitch around. (9)
Round 4: SC in next 2 stitches, INC. Repeat three times. (12)
Rounds 5–6: SC in each stitch around. (12)
These rounds create a gently widening snout. Keep your stitches tight to prevent gaps. You may lightly stuff the snout as you work, using only enough fiberfill to maintain its shape.
Step 2: Shape the Dragon’s Head
Continue working from the snout to form the broader head.
Round 7: SC in next stitch, INC. Repeat six times. (18)
Round 8: SC in each stitch around. (18)
Round 9: SC in next 2 stitches, INC. Repeat six times. (24)
Rounds 10–12: SC in each stitch around. (24)
Round 13: SC in next 2 stitches, DEC. Repeat six times. (18)
Round 14: SC in next stitch, DEC. Repeat six times. (12)
Add a small amount of stuffing to shape the head. Finish with six decreases to close the opening, then fasten off. The completed piece should have a narrow muzzle and a slightly wider rear section.
Step 3: Create the Dragon’s Eyes and Facial Details
The eyes give your Dragon Bracelet Pattern its personality. For a design inspired by the reference image, use small emerald-green beads or embroidered green eyes. Position the eyes on opposite sides of the head, slightly behind the snout. Secure them with strong thread and multiple passes through the crochet fabric. Add tiny embroidered nostrils near the front of the muzzle. To create raised brow ridges, attach yarn above each eye and work a short row of slip stitches or surface crochet. These small details help produce the fierce yet elegant appearance associated with fantasy dragons.
Step 4: Crochet the Dragon’s Body
The body should be long and flexible enough to curve around the wrist.
Round 1: MR, 6 SC. (6)
Round 2: INC in each stitch around. (12)
Round 3: SC in next 3 stitches, INC. Repeat three times. (15)
Rounds 4–36: SC in each stitch around. (15)
Continue beyond Round 36 if additional length is required. Measure the body against your wrist as you work. The finished tube should curve naturally without excessive tension. Lightly stuff only the section directly behind the head if extra structure is needed; leave most of the body unstuffed so it remains comfortable and flexible.
Step 5: Shape the Dragon’s Tail
After completing the main body, begin decreasing gradually to create a pointed tail.
Round 37: SC in next 3 stitches, DEC. Repeat three times. (12)
Rounds 38–40: SC in each stitch around. (12)
Round 41: SC in next 2 stitches, DEC. Repeat three times. (9)
Rounds 42–44: SC in each stitch around. (9)
Round 45: SC in next stitch, DEC. Repeat three times. (6)
Continue working SC around for another two or three rounds, then fasten off and close the tip. The tail should taper gently, allowing it to follow the natural curve of the bracelet.
Step 6: Join the Head and Body
Position the completed dragon head at one end of the body, slightly angled forward. Use a tapestry needle and matching yarn to sew the pieces together securely. Work several small stitches around the joining area, making sure the head remains stable. The connection should be strong enough to withstand normal movement when the bracelet is worn. Before weaving in the yarn ends, check the dragon’s profile and adjust the angle if necessary. A slightly lowered head creates the graceful, resting pose visible in the reference image.
How to Crochet the Dragon Wings, Horns, and Decorative Details
Step 7: Crochet the First Dragon Wing
The wings are among the most eye-catching elements of this Dragon Bracelet Pattern. To create a small openwork wing, begin with a foundation chain.
Row 1: CH 13. SC in the second chain from the hook and in each remaining chain. (12)
Row 2: CH 3, turn. DC in the first stitch, CH 1, skip 1 stitch, DC in next stitch, CH 1, skip 1 stitch across. Work a final DC in the last stitch.
Row 3: CH 4, turn. Work 2 DC into each available chain space, separating groups with CH 1. Finish with a DC in the turning chain.
Row 4: CH 1, turn. Work SC evenly across the wing edge, placing 3 SC at the outer corner to create a pointed tip.
Fasten off, leaving a long tail for sewing. The wing should resemble a small triangular fan with decorative open spaces.
Step 8: Create the Wing Ribs and Curved Edges
To achieve a more dramatic dragon-wing appearance, add raised crochet lines along the surface of the wing. Attach yarn at the inner corner and work slip stitches toward the outer points, following the openwork sections. Repeat to create three or four visible wing ribs. Along the upper edge, use a combination of SC, HDC, and DC stitches to produce a slightly curved outline. You can create additional pointed sections by working short chains and slip stitching back toward the wing. These decorative ridges give the wings a sculpted appearance and help them resemble the delicate, ribbed wings shown in the photograph.
Step 9: Crochet the Second Wing
Repeat the wing instructions to create a second matching piece. For a symmetrical appearance, reverse the direction of the decorative edging or turn the second wing over before attaching it. Compare both wings carefully, checking their height, width, and outer points. If necessary, gently shape the wings with your fingers. For additional structure, use a slightly smaller crochet hook when working the final edging. Avoid excessive stiffness because the bracelet should remain comfortable when worn.
Step 10: Crochet the Dragon’s Horns
The pointed horns are essential for creating the dragon’s fantasy-inspired appearance. Make two main horns using the following instructions:
Round 1: MR, 3 SC. (3)
Round 2: SC in each stitch around. (3)
Round 3: INC, SC in next 2 stitches. (4)
Round 4: SC in each stitch around. (4)
Round 5: INC, SC in next 3 stitches. (5)
Rounds 6–7: SC in each stitch around. (5)
Fasten off, leaving a sewing tail. Create additional smaller horns or spikes using fewer rounds. Sew the main horns near the back of the dragon’s head and position the smaller spikes along the forehead or neck. Slightly curved placement creates a more natural appearance.
Step 11: Add Decorative Scales and Emerald Accents
The reference image features beautiful green embellishments that highlight the dragon’s head, wings, and body. To recreate this effect, use small decorative beads or embroidered accents. Attach larger beads along the upper body and smaller beads along the wing ribs. For a bead-free alternative, create tiny raised crochet bumps using popcorn stitches or French-knot embroidery. Place the decorations in a balanced arrangement, following the dragon’s natural curves. Avoid overcrowding the surface because the white crochet texture should remain visible. Every bead must be firmly attached, and any loose embellishment should be repaired before wearing the bracelet.
Step 12: Attach the Wings to the Dragon’s Back
Position the two completed wings behind the dragon’s head, with the wider edges facing outward. Use stitch markers or temporary pins to hold them in place while checking their symmetry. Sew each wing along its inner edge using matching yarn. Reinforce the attachment with several passes of the needle, especially near the base of the wings. The outer sections should remain free to create the illusion of spread wings. If you use flexible craft wire to shape the wings, make sure it is completely enclosed and cannot protrude through the crochet fabric. For a softer bracelet, omit the wire and rely on firm stitches and careful shaping.
Finishing the Dragon Bracelet and Creating a Comfortable Adjustable Fit
1. Creating the Bracelet Fastening
A comfortable fastening is essential for turning the crocheted dragon into wearable jewelry. One simple option is an adjustable sliding knot closure made from two crocheted cords. To create each cord, chain approximately 25–35 stitches, depending on the desired length, and slip stitch back along the chain for additional strength. Attach the cords securely to opposite ends of the bracelet. Tie adjustable sliding knots so the bracelet can be tightened or loosened around the wrist. Alternatively, use a small jewelry clasp suitable for handmade accessories. Whichever method you choose, test the fastening carefully to ensure it remains secure during normal wear.
2. Shaping the Dragon Around the Wrist
Once the dragon’s components are assembled, place the bracelet gently around your wrist to evaluate its fit. The body should curve naturally without twisting or pulling. The dragon’s head can rest on the upper side of the wrist, while the tail wraps around toward the underside. Adjust the position of the wings so they do not interfere with hand movement. If the bracelet feels too tight, lengthen the fastening cords or add a small crocheted extension. If it feels too loose, shorten the adjustable section. The finished crochet dragon bracelet should be decorative, secure, and comfortable.
3. Achieving a Professional Finish
A professional-looking Dragon Bracelet Pattern depends on careful finishing. Use a tapestry needle to weave in all yarn ends securely, passing through several stitches before trimming the excess. Check each seam to ensure the head, wings, horns, and decorative elements are firmly attached. If the wings appear uneven, gently reshape them by hand. For cotton yarn, light steam blocking may help improve the shape, but avoid direct contact between a hot iron and the crochet fabric. Take your time during this stage because small finishing adjustments can significantly improve the final appearance.
4. Choosing Beautiful Dragon Color Combinations
Although the reference image features an elegant white dragon with emerald-green details, there are many other attractive color combinations for this fantasy crochet bracelet. Black yarn with gold accents creates a dramatic dragon, while lavender with silver details produces a magical, delicate appearance. Forest green with bronze accents gives the design a woodland-inspired character. Deep burgundy with black wings creates a bold fantasy look, while ivory with pale blue decorations offers a softer, winter-inspired variation. Experimenting with colors allows you to create unique dragons that reflect different themes and personal preferences.
5. Common Mistakes to Avoid
One of the most common mistakes when crocheting miniature dragon accessories is using loose stitches. Loose tension can cause the head to lose its shape and make small details appear uneven. Another problem is attaching the wings too close together, which can prevent them from spreading naturally. Always check the placement before sewing. Avoid using excessive stuffing because the bracelet needs to remain flexible. When adding beads, ensure they are firmly secured and do not create uncomfortable pressure points against the skin. Finally, measure the bracelet before completing the fastening to avoid an incorrect fit.
6. Caring for Your Handmade Crochet Dragon Bracelet
Because this handmade dragon bracelet includes delicate crochet details, gentle care is recommended. If the design contains beads or decorative wire, avoid machine washing. Instead, clean the bracelet carefully with a slightly damp cloth and mild soap when necessary. Allow it to air dry completely before storing. Keep the wings flat and avoid placing heavy objects on top of the accessory. Store the bracelet in a small fabric pouch or jewelry box to protect the horns, wings, and decorative details. With proper care, your crochet dragon can remain a beautiful handmade accessory for a long time.
Frequently Asked Questions About the Dragon Bracelet Pattern
Is the Dragon Bracelet Pattern suitable for beginners?
This project is best suited for intermediate crocheters because it involves small stitches, shaping, multiple components, and detailed assembly. Beginners who are comfortable with amigurumi techniques can also attempt it with patience.
What is the best yarn for a crochet dragon bracelet?
Fine mercerized cotton yarn or crochet thread is an excellent choice because it provides clear stitch definition and helps maintain the shape of the dragon’s small features.
What crochet hook size should I use?
A 1.75–2.25 mm crochet hook is recommended for fine cotton yarn. Adjust the hook size according to your yarn and desired stitch tension.
How long does it take to crochet a dragon bracelet?
Depending on your experience and the level of detail, the project may take approximately 6–12 hours to complete.
Can I make the dragon bracelet without beads?
Yes. Replace the beads with embroidered dots, small crochet bobbles, or surface crochet decorations for a fully yarn-based design.
How can I make the dragon wings stand upright?
Use firm crochet stitches, additional edging, and careful shaping. Optional enclosed flexible wire can provide more structure, although it is not necessary for a softer bracelet.
Can I make the dragon bracelet larger?
Yes. Increase the length of the body and adjust the fastening to match your wrist circumference. You can also use thicker yarn and a larger hook for a more substantial dragon.
How do I keep the dragon’s head from becoming floppy?
Use tight stitches, a small amount of stuffing, and secure attachment stitches. Avoid overstuffing because the head should remain lightweight.
Can I use acrylic yarn instead of cotton?
Yes, although cotton generally provides better stitch definition for small decorative details. Smooth acrylic yarn can also work if the stitches are sufficiently firm.
What is the best way to attach the wings?
Sew the inner edges securely to the dragon’s back using matching yarn and a tapestry needle. Reinforce the attachment points with several stitches.
Can I make a dragon bracelet in different fantasy styles?
Absolutely. Change the yarn colors, horn shapes, wing sizes, and decorative details to create woodland dragons, ice dragons, fire dragons, or elegant fantasy-inspired designs.
Is this bracelet suitable for children?
The design is intended for adults. Small beads, pointed wire, and detachable decorations may present hazards for young children.
Can I sell finished dragon bracelets made from this tutorial?
Handmade items created from these techniques may generally be sold, subject to applicable laws, product safety requirements, and any relevant intellectual property rights.
How do I prevent the bracelet from stretching?
Use firm crochet tension, choose yarn with good shape retention, and avoid pulling excessively on the body or fastening cords.
Can I make matching dragon earrings or necklaces?
Yes. Smaller versions of the dragon head or wings can be adapted into decorative jewelry components, provided they are securely attached to appropriate jewelry findings.
Conclusion
The Dragon Bracelet Pattern is a beautiful example of how crochet can transform simple yarn into imaginative wearable art. With its sculpted dragon head, delicate wings, pointed horns, flexible body, and decorative accents, this fantasy-inspired accessory offers a creative challenge for anyone who enjoys detailed handmade projects.
By following this step-by-step crochet dragon bracelet tutorial, you can practice important crochet techniques while learning how to construct and assemble small three-dimensional components. Each stage, from shaping the snout to attaching the wings and creating the adjustable fastening, contributes to the finished dragon’s distinctive appearance.
One of the greatest advantages of this project is the freedom to personalize it. Whether you choose elegant ivory and emerald green, dramatic black and gold, or a colorful fantasy-inspired palette, the basic construction can be adapted to reflect your individual style.
With patience, careful stitching, and attention to detail, your handmade crochet dragon bracelet can become a distinctive piece of jewelry, a thoughtful handmade gift, or a treasured addition to your collection of fantasy crochet creations. The finished accessory demonstrates that crochet is not limited to traditional clothing and home décor—it can also bring imaginative creatures and artistic designs to life.