
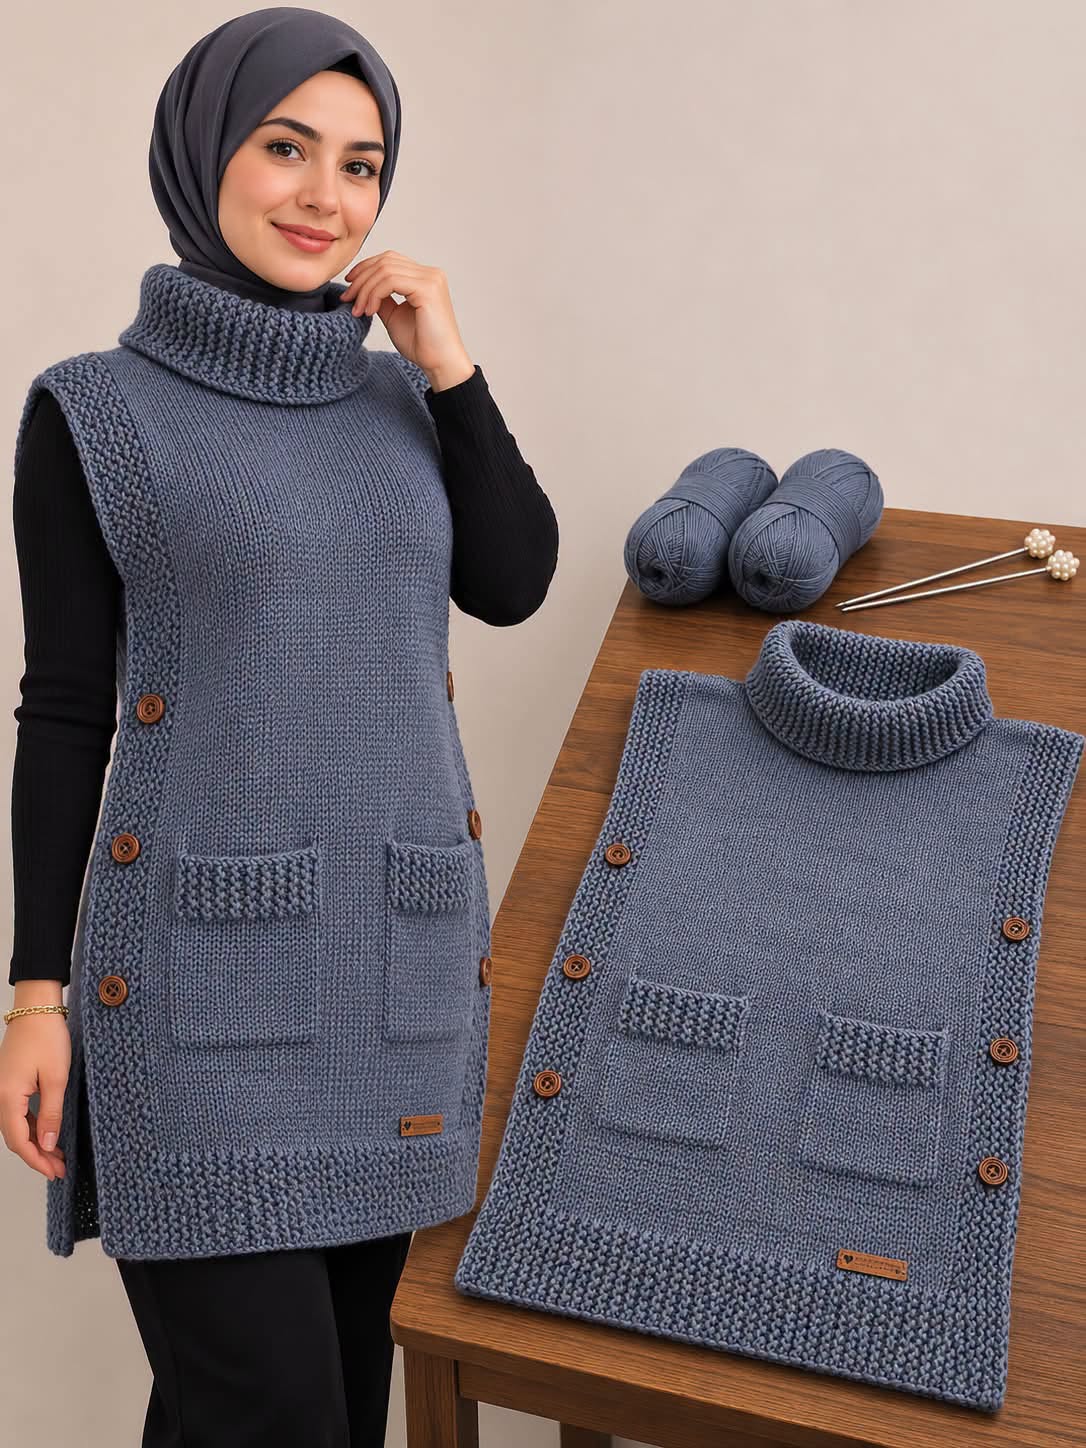
One of the most appealing features of this Crochet Turtleneck Tunic Vest Pattern is the combination of smooth central fabric and richly textured edges. The inspiration image displays a beautiful slate-blue tunic with a softly structured body, thick ribbed collar, contrasting textured borders, and two generously sized patch pockets.
Decorative wooden buttons add a charming rustic touch along the sides, while the sleeveless construction allows comfortable movement and easy layering. Although the pictured fabric has a knit-like appearance, a similar style can be recreated using crochet stitches that produce a smooth, flexible surface and raised textured details.
Creating your own handmade crochet tunic vest is also an opportunity to customize a fashionable garment according to your preferred measurements, colors, and personal style. The design can be adapted for different body shapes, making it suitable for a wide range of sizes. From classic charcoal gray and rich navy blue to elegant cream, emerald green, burgundy, and soft beige, the possibilities for color combinations are almost endless.
This detailed tutorial explains how to select the right yarn, calculate measurements, crochet the main panels, construct the turtleneck collar, add decorative pockets, and assemble a beautiful sleeveless tunic that can become a favorite handmade wardrobe piece.
1. Materials, Yarn Selection, and Measurements for the Crochet Turtleneck Tunic Vest
Before beginning the Crochet Turtleneck Tunic Vest, it is important to select appropriate yarn and prepare accurate measurements. Because the garment features a long body, structured collar, and decorative borders, the yarn should provide a balance of softness, flexibility, and stitch definition. Medium-weight yarn works particularly well for this type of project, especially when combined with crochet stitches that create a smooth, knitted appearance.
DISCOVER MORE FREE PATTERNS HERE!
For a comfortable garment, choose a soft worsted-weight yarn (Category 4) or a suitable lightweight aran yarn. Acrylic and wool blends are popular choices because they provide warmth while remaining relatively easy to care for. Cotton blends can also be used for a lighter version, although they may produce a heavier drape. Avoid excessively stiff yarn because the finished vest should fall naturally over the body without becoming bulky around the hips.
The image features a muted slate-blue shade that creates an elegant and understated appearance. This color is particularly attractive when paired with black, white, cream, or gray clothing. If you prefer brighter colors, consider sapphire blue, deep emerald green, or rich burgundy. Neutral shades such as oatmeal, taupe, and charcoal also make excellent choices for a classic crochet tunic vest.
Materials needed:
-
Approximately 900–1,500 meters (985–1,640 yards) of Category 4 yarn, depending on size, stitch density, and desired length.
-
5.0 mm (H/8) crochet hook, or the size needed to obtain the desired gauge.
-
4.5 mm crochet hook for tighter borders and finishing details, if needed.
-
6–8 decorative wooden buttons, approximately 2–2.5 cm in diameter.
-
Yarn needle for sewing and weaving in ends.
-
Stitch markers.
-
Measuring tape.
-
Fabric scissors.
-
Blocking pins and a suitable blocking surface.
-
Notebook for recording measurements and stitch counts.
For this tutorial, we will use a customizable women’s medium size as our example. The suggested finished bust circumference is approximately 104 cm (41 in), with a garment length of 78 cm (30¾ in). This provides comfortable ease for layering over a fitted shirt. The finished measurements can be adjusted to suit different sizes and personal preferences.
| Measurement | Example size |
|---|---|
| Finished bust circumference | 104 cm (41 in) |
| Total garment length | 78 cm (30¾ in) |
| Front panel width | 52 cm (20½ in) |
| Back panel width | 52 cm (20½ in) |
| Armhole depth | 23 cm (9 in) |
| Folded turtleneck height | 10–12 cm (4–4¾ in) |
| Pocket size | 14 × 16 cm (5½ × 6¼ in) |
| Side opening length | 20 cm (8 in) |
These measurements are a starting point rather than a fixed commercial pattern. The finished width should include approximately 10–15 cm (4–6 in) of positive ease, depending on the fit you prefer. For example, if your bust circumference is 96 cm (37¾ in), a finished circumference of approximately 108 cm (42½ in) will provide a comfortable relaxed fit.
Before starting the garment, crochet a gauge swatch measuring at least 15 × 15 cm (6 × 6 in). Wash or block the swatch according to the yarn instructions, allow it to dry, and measure the central 10 × 10 cm (4 × 4 in). For this example, we will work with an approximate gauge of 16 half double crochet stitches and 12 rows per 10 cm.
Gauge is essential because even small differences in stitch tension can significantly affect the finished size of a long crochet garment. If your stitches are too tight, increase the hook size. If they are too loose, try a smaller hook. Record your final gauge before calculating the required stitch counts for the front and back panels.
2. How to Crochet the Main Body Panels of the Turtleneck Tunic Vest
The main body of the Crochet Turtleneck Tunic Vest Pattern consists of two large rectangular panels: one for the front and one for the back. The central portions are worked in a smooth, flexible stitch pattern, while the edges are finished with raised decorative crochet stitches. This construction allows the garment to remain relatively simple while still achieving the elegant appearance of the inspiration design.
To imitate the smooth, knitted texture visible in the photograph, use half double crochet in the third loop or a carefully worked half double crochet fabric. These techniques create attractive horizontal or knit-like textures, depending on how the work is oriented. For a straightforward beginner-friendly version, regular half double crochet provides an even fabric that is easy to measure and adjust.
US crochet abbreviations:
-
ch: Chain.
-
sc: Single crochet.
-
hdc: Half double crochet.
-
dc: Double crochet.
-
sl st: Slip stitch.
-
BLO: Back loop only.
-
st(s): Stitch(es).
-
rep: Repeat.
-
RS: Right side.
-
WS: Wrong side.
Begin with the back panel. Using the 5.0 mm hook and your chosen yarn, make a foundation chain long enough to measure approximately 52 cm (20½ in). With the example gauge of 16 stitches per 10 cm, a width of 52 cm requires approximately 83 stitches. Chain 84, then work the first row of half double crochet into the third chain from the hook, continuing across. This produces 82 half double crochet stitches. If exact sizing is important, adjust the foundation chain to match your personal swatch measurements.
Continue working one half double crochet into each stitch across every row, turning with a chain two at the beginning of each new row. In this tutorial, the turning chain does not count as a stitch. Maintain consistent tension to keep the edges straight. Work until the back panel reaches approximately 78 cm (30¾ in), or your preferred garment length.
For a more refined appearance, the lower 8–10 cm (3⅛–4 in) can be worked in a textured stitch pattern. One attractive option is alternating rows of single crochet and half double crochet in the back loop only. Another possibility is using the moss stitch, created by alternating single crochet stitches and chain spaces. These textured areas provide additional visual interest and can imitate the decorative lower border shown in the image.
Once the back panel reaches the required length, fasten off and weave in the yarn ends temporarily. Lay the panel on a flat surface and check its dimensions. The fabric should lie naturally without curling or pulling excessively at the corners. If the panel appears uneven, gently block it according to the yarn manufacturer’s recommendations before proceeding.
Create the front panel using the same foundation chain, stitch pattern, and overall dimensions. For the smoothest result, keep the stitch count identical to the back panel. If you want a slightly more fitted front neckline, you can introduce shaping near the upper edge, but the simplest approach is to maintain two rectangular panels and leave an appropriately sized opening when joining the shoulders.
For the example vest, leave approximately 24 cm (9½ in) across the center for the neckline and join the shoulder sections on either side. This creates an opening that will later support the tall crochet turtleneck collar. Adjust the neckline opening to fit comfortably over the head and around the neck, remembering that the finished collar will add structure.
A key feature of this easy crochet tunic vest tutorial is the long, relaxed silhouette. The front and back panels should extend comfortably over the hips, creating the appearance of a sleeveless sweater dress or tunic. If you prefer a shorter design, reduce the panel length to approximately 65 cm (25½ in). For a longer tunic, increase the length to 85 cm (33½ in) or more, depending on your height and personal preference.
3. Crocheting the Turtleneck Collar, Side Borders, and Decorative Pockets
The thick collar is one of the most distinctive elements of the Crochet Turtleneck Tunic Vest. It creates a cozy, sophisticated neckline while adding visual balance to the long sleeveless body. The inspiration image features a generously sized folded collar with deep vertical ribbing, giving the garment a structured and fashionable appearance.
To crochet a similar collar, use single crochet in the back loop only, which produces a flexible ribbed texture. Begin by measuring the neckline opening after joining the shoulders. The collar should be comfortable enough to pass over the head while remaining close to the neck when worn. A finished collar circumference of approximately 55–60 cm (21¾–23⅝ in) may work for many adults, but always verify the fit.
To create the collar as a separate piece, chain enough stitches to measure approximately 22–24 cm (8¾–9½ in), which will become the unfolded height of the collar. Work single crochet stitches across the first row, then continue working single crochet in the back loop only on every following row. This forms vertical ridges when the finished strip is attached around the neckline.
Continue until the ribbed strip is long enough to fit around the neckline without excessive stretching. Join the short ends with slip stitches or a yarn needle to form a tube. Attach the bottom edge of the tube evenly around the neckline, making sure the seam is positioned at the back. Fold the collar outward to create the thick, cozy crochet turtleneck effect shown in the photograph.
Next, prepare the decorative side borders. The image features textured vertical strips running along the sides of the tunic, decorated with wooden buttons. To reproduce this detail, crochet two long textured strips approximately 4–5 cm (1½–2 in) wide. You can use moss stitch, alternating single crochet and chain spaces, or a compact textured stitch that creates a slightly raised surface.
Attach these strips to the front side edges of the vest, positioning them neatly along the vertical seams. For a functional version, create buttonholes on one side and sew the buttons to the opposite side. For a decorative version, the buttons can be attached directly over secure side seams. If you plan to use functional button closures, reinforce the buttonhole edges to prevent stretching.
The front pockets are another charming and practical feature of this tunic vest. The photograph shows two rectangular pockets positioned near the lower front, each finished with a textured upper border. These pockets provide a useful place for small items while reinforcing the relaxed, casual appearance of the garment.
To create each pocket, chain enough stitches to produce a width of approximately 14 cm (5½ in). Work half double crochet rows until the pocket measures approximately 16 cm (6¼ in) high. For the upper 3–4 cm (1¼–1½ in), switch to moss stitch or another textured crochet pattern. Make two identical pockets, keeping the stitch counts and measurements consistent.
Position the pockets symmetrically on the lower front panel, approximately 8–10 cm (3⅛–4 in) above the bottom hem. Leave enough space between them to maintain a balanced appearance. Pin the pockets in place and sew along the sides and bottom using a yarn needle, leaving the upper edge open. Reinforce the upper corners with additional stitches to help the pockets withstand regular use.
For extra decorative detail, add a small handmade fabric or faux-leather label near the lower hem, similar to the design in the inspiration image. Choose a lightweight label that will not pull the crochet fabric out of shape. These small finishing touches can make the completed crochet tunic vest with pockets look more polished and professionally constructed.
4. Assembling, Finishing, and Styling Your Crochet Turtleneck Tunic Vest
Once the body panels, collar, borders, and pockets are complete, the next step is to assemble the Crochet Turtleneck Tunic Vest Pattern into a wearable garment. Careful assembly is essential for achieving a comfortable fit, particularly around the shoulders, neckline, and armholes. Take your time during this stage because neat seams and balanced proportions will greatly improve the finished appearance.
Begin by placing the front and back panels together with their right sides facing inward. Align the upper edges carefully and sew the shoulder seams, leaving the neckline opening free. Use a mattress stitch or whip stitch with a yarn needle, keeping the seam flexible but secure. Try the garment over your head before finishing the seams permanently to make sure the neckline opening is comfortable.
Next, join the side seams, leaving approximately 23 cm (9 in) open at the top of each side for the armholes. The photograph shows a sleeveless silhouette with generous openings designed for layering over a fitted long-sleeve shirt. You may also leave approximately 20 cm (8 in) open at the lower sides to create side slits. These openings allow easier movement and prevent the long tunic from feeling restrictive around the hips.
If you are adding functional side buttons, plan the closures before permanently joining the side edges. The button strips can be positioned along the lower side sections, allowing the wearer to adjust the fit. Decorative buttons may be sewn along the side borders after the garment is assembled. Ensure that every button is securely attached, especially if the vest will be worn frequently.
Finish the armhole openings with one or two rounds of single crochet stitches. Work evenly around each opening without adding too many stitches, which could cause the edges to flare. For a more textured finish, add a final round of reverse single crochet, also known as the crab stitch. This creates a neat decorative border that complements the raised side panels and lower hem.
Attach the completed turtleneck collar if it has not already been sewn into place. Distribute the neckline stitches evenly around the collar edge, making sure the front and back remain centered. The collar should fold naturally without pulling at the shoulders. If it feels too tight, remove the attachment stitches and adjust the collar circumference before sewing it back into place.
After assembly, weave in all loose yarn ends using a yarn needle. Check the seams, button attachments, pocket corners, and collar edges for consistency. Block the completed garment gently according to the yarn care instructions. For fibers suitable for wet blocking, lightly dampen the vest and lay it flat to dry, shaping the edges and ensuring that both sides remain symmetrical.
One of the greatest advantages of this stylish crochet turtleneck vest is its versatility. For an elegant everyday outfit, wear it over a black fitted sweater with tailored trousers and ankle boots. For a relaxed weekend appearance, pair it with leggings, a lightweight long-sleeve shirt, and comfortable boots. The sleeveless construction provides warmth around the body without restricting arm movement, making it a practical layering piece.
The finished vest can also be customized for different seasons. A wool-blend version is ideal for cold weather, while a cotton-blend version creates a lighter garment suitable for transitional temperatures. Longer versions offer additional coverage, while shorter designs work well with jeans and skirts. By experimenting with different yarn colors, collar heights, pocket shapes, and button styles, you can create several unique variations of this beautiful handmade crochet tunic pattern.
Frequently Asked Questions About the Crochet Turtleneck Tunic Vest Pattern
Is the Crochet Turtleneck Tunic Vest suitable for beginners?
Yes. This tutorial is suitable for confident beginners who understand basic crochet stitches and simple garment assembly. The design primarily uses half double crochet, single crochet, and basic ribbing techniques. Creating the collar, pockets, and side borders requires patience, but the overall construction is straightforward.
What is the best yarn for a crochet turtleneck tunic vest?
Soft worsted-weight yarn is an excellent choice because it provides warmth, structure, and comfortable drape. Acrylic and wool blends are popular options, while cotton blends may be suitable for lighter garments. Always make a gauge swatch before beginning the project.
How much yarn do I need to crochet this tunic vest?
The required amount depends on the garment size, length, yarn thickness, and crochet stitch density. A medium-sized tunic may require approximately 900–1,500 meters (985–1,640 yards) of worsted-weight yarn. Larger sizes or denser stitch patterns may require additional yarn.
Can I make the crochet vest in plus sizes?
Absolutely. The design can be adjusted for different body measurements by increasing the width and length of the front and back panels. Measure your bust, hips, desired garment length, and armhole depth before beginning. Use your personal gauge to calculate the required number of foundation stitches and rows.
How do I make the turtleneck collar stretchy?
Working single crochet stitches in the back loop only creates a flexible ribbed fabric. The collar should be long enough to fit comfortably around the neckline while stretching over the head. Avoid joining the collar too tightly, and use a slightly larger hook if additional flexibility is needed.
Can I crochet this tunic vest without pockets?
Yes. The pockets are optional and can be omitted for a cleaner, more minimalist appearance. You can also replace the rectangular pockets with smaller decorative pockets or position them at different heights according to your preference.
Are the wooden buttons functional or decorative?
The buttons can be either functional or decorative. If you want adjustable side closures, create reinforced buttonholes along the side borders. For a simpler project, sew the side seams securely and attach the buttons as decorative accents.
What crochet stitch looks most like knitting?
Half double crochet worked in the third loop, waistcoat stitch, and slip stitch crochet can create attractive knit-like textures. Each technique produces a different fabric structure, so experimenting with small swatches can help you select the appearance and flexibility you prefer.
Can I make a shorter version of this crochet tunic?
Yes. Simply reduce the number of rows in the front and back panels. A shorter vest measuring approximately 55–65 cm (21¾–25½ in) can be worn over jeans or skirts, while a longer version provides additional coverage over leggings or fitted trousers.
How should I wash and care for my handmade crochet vest?
Follow the care instructions provided by the yarn manufacturer. Many acrylic and cotton-blend garments can be washed gently in cool water, while some wool yarns require hand washing. Dry the vest flat whenever possible to preserve its shape and prevent stretching, particularly around the collar and pockets.
Conclusion
The Crochet Turtleneck Tunic Vest Tutorial is a beautiful example of how traditional crochet techniques can be transformed into elegant, comfortable, and practical handmade fashion. Its long sleeveless silhouette, richly textured borders, cozy folded collar, and decorative front pockets create a sophisticated garment that is perfect for layering during cooler seasons. The addition of wooden side buttons and carefully finished edges gives the vest a timeless appearance that can complement many different personal styles.
Another wonderful feature of this DIY Crochet Turtleneck Vest Pattern is the freedom to customize every detail. From selecting luxurious yarn colors to adjusting the garment length, modifying the collar height, or experimenting with different textured stitches, the design offers countless opportunities for creativity. Whether you prefer classic neutral tones, rich jewel colors, or soft pastel shades, the finished vest can reflect your individual taste while providing the comfort of handmade clothing.
With careful measurements, consistent stitch tension, and thoughtful finishing techniques, you can create a stunning handmade crochet tunic vest with pockets and buttons that will become a treasured addition to your wardrobe. This rewarding crochet project combines fashion, function, and craftsmanship, proving that handmade garments can be both beautifully detailed and wonderfully practical.