If you’re looking for a unique, adorable handmade gift that combines creativity with pure cuteness, this Amigurumi Kitten Bouquet – Easy Tutorial is just what you need. Whether you want to surprise someone special, decorate your craft room, or simply enjoy a relaxing crochet project, this tutorial walks you through every step.
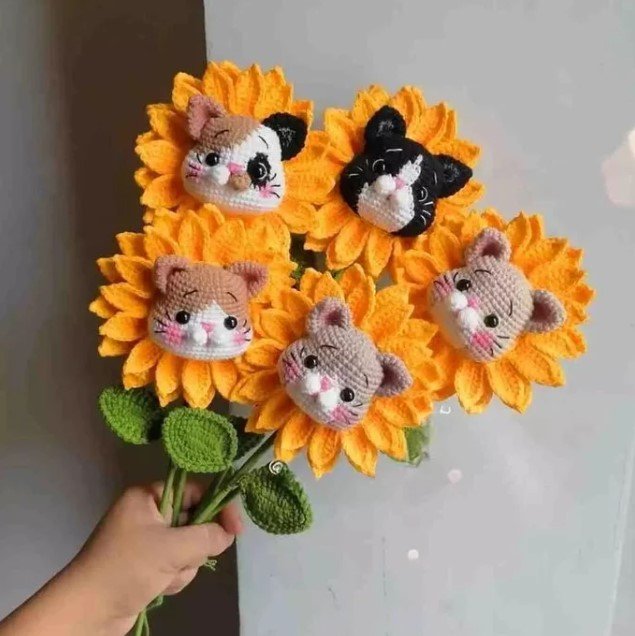
The idea of a kitten bouquet may sound whimsical — and it is! Picture a charming arrangement of tiny crocheted kittens, each nestled in place like flowers in a bouquet. The result is heart-melting and ideal for birthdays, Valentine’s Day, Mother’s Day, or just because.
In this Amigurumi Kitten Bouquet – Easy Tutorial, you’ll learn how to crochet small kittens, customize them with colors and accessories, and assemble them into a beautiful, giftable bouquet. With beginner-friendly instructions and tips throughout, this project is perfect for all skill levels.
1. Materials and Tools You’ll Need
To begin your Amigurumi Kitten Bouquet, gather the following materials. A little preparation goes a long way in making this project enjoyable and successful.
SEE OTHER FACE PATTERNS HERE!
Start with yarn — cotton or acrylic yarns work best. Use a light to medium-weight yarn in soft, kitten-like colors: grays, whites, creams, oranges, or pastel shades. Choose vibrant or floral tones if you’re going for a more playful bouquet look.
A small crochet hook, usually 2.5mm to 3.5mm, will help create tight stitches, preventing stuffing from showing through. Match your hook size to your yarn weight for the best results.
You’ll also need polyester fiberfill stuffing, black safety eyes (6mm–8mm), a yarn needle, and stitch markers. Optional materials include pink embroidery thread for noses, felt or fabric glue, and mini ribbons or flowers for decorating.
For the bouquet assembly, gather floral wire, green tape (floral tape), paper or fabric bouquet wrap, and a ribbon to tie it all together. You can also use artificial leaves for extra flair.
Keep a pair of sharp scissors and a hot glue gun (optional) nearby for finishing and assembling your kitten bouquet securely.
Having all your supplies organized will make the process smoother and let you focus on the fun part — bringing your tiny kittens to life!
2. Crocheting the Mini Kitten Bodies
Now for the heart of the Amigurumi Kitten Bouquet – Easy Tutorial: crocheting your adorable kittens! These are usually small, around 2″ to 4″ tall, and worked in the round using basic amigurumi techniques.
Begin with the head and body, which are often crocheted as one piece to keep the kitten seamless. Use a magic ring to start, and work in continuous rounds using single crochet stitches.
Gradually increase to form a rounded head, then continue with a few rounds for the body. After that, begin decreasing to shape the bottom. Stuff with fiberfill before fully closing.
The ears are tiny triangles, made separately and stitched onto the top of the head. Position them symmetrically to give your kitten that signature alert and curious look.
Add a short tail and tiny paws if you’d like, but these features are optional depending on how detailed you want each kitten to be.
Use safety eyes or embroider sleepy or smiling eyes for extra personality. A small pink embroidered nose adds the perfect kitten touch.
Repeat the process to create multiple kittens — ideally, 5 to 9 for a full bouquet. Vary the yarn colors slightly to make each kitten unique and expressive.
3. Customizing and Decorating Each Kitten
One of the best parts of the Amigurumi Kitten Bouquet – Easy Tutorial is personalizing your kittens. You can dress them up, give them accessories, or theme them based on the occasion.
Use small ribbons to create bow ties or collars for each kitten. Tiny crocheted flowers can be added to their heads, giving a sweet floral vibe.
If you want a seasonal bouquet, theme your kittens for spring (with daisies), fall (with acorns or tiny scarves), or Valentine’s Day (with heart patches on their bellies).
Use felt to cut out tiny accessories, like hats, petals, or wings. Secure them with a glue gun or by stitching gently onto the kittens.
Add light blush with soft pastels or fabric-safe markers to the cheeks for a cute, rosy look. These little details bring your kittens to life and make your bouquet more dynamic.
Try giving each kitten a different facial expression — sleepy, surprised, winking — to make your bouquet full of personality and charm.
Finally, attach each kitten to a piece of floral wire or stick using hot glue or sewing, making sure it’s secure enough to hold the kitten upright.
4. Assembling and Wrapping the Kitten Bouquet
Once all your kittens are finished and decorated, it’s time to turn them into a bouquet. This is where the magic of the Amigurumi Kitten Bouquet – Easy Tutorial really shines.
Wrap each wire stem with floral tape to make it look like a real flower stem. Add small artificial leaves if you want the bouquet to feel fuller and more plant-like.
Start arranging the kittens in your hand like you would with real flowers. Place the taller ones in the center and shorter or smaller kittens around them.
Use floral tape to secure the stems together. You can also add tissue paper or mesh around the bottom of the bouquet for extra volume and a polished look.
Wrap the entire arrangement in a cone-shaped bouquet wrap. This can be thick paper, fabric, or felt in coordinating colors. Secure it with glue, tape, or staples.
Finish by tying a ribbon around the bouquet. You can even add a gift tag or small card to personalize it further.
The result is a one-of-a-kind, heartwarming gift that anyone would treasure — all thanks to your handmade touch and this easy tutorial.
🌟Join our exclusive Quilt broadcast list on Messenger! Receive the best patterns, tips, and updates directly in your inbox. Our team is ready to send you delightful content that will inspire your projects. Don’t miss this opportunity to stay updated and create amazing pieces. Join now and be part of this passionate quilt community!✨📩
FAQ – Amigurumi Kitten Bouquet Tutorial
Q: Is this project beginner-friendly?
A: Yes! The kittens use basic amigurumi stitches like single crochet, increasing, and decreasing. With a bit of practice, even new crocheters can complete them.
Q: How many kittens should I make for a bouquet?
A: It depends on the size of your bouquet, but typically 5 to 9 kittens make a full and balanced arrangement.
Q: Can I use bulky yarn for larger kittens?
A: You can! Just be aware that the final bouquet will be bigger, and you may need stronger stems and more support for assembly.
Q: What’s the best way to attach kittens to the bouquet?
A: Use floral wire or sticks and secure with hot glue. Wrap the stems in floral tape for a clean, finished look.
Q: How do I make the kittens look more expressive?
A: Vary their facial expressions, add blush, and personalize with small accessories like bows, flowers, or embroidery.
Q: Can I sell Amigurumi Kitten Bouquets I make?
A: Yes, as long as the pattern is original or free for commercial use. Always credit the designer if required and ensure your finished items are high quality.
Conclusion
The Amigurumi Kitten Bouquet – Easy Tutorial is more than just a craft — it’s a heartfelt handmade gift full of personality and joy. From creating each tiny kitten to assembling them into a beautiful bouquet, this project offers endless room for creativity and customization.
Whether you’re making it for yourself or gifting it to someone special, we hope this tutorial brought inspiration and confidence to your crafting. 💐🐱
If you try this pattern, please leave your honest opinion and suggestions below — we’d love to hear how your bouquet turned out and what ideas you added!