
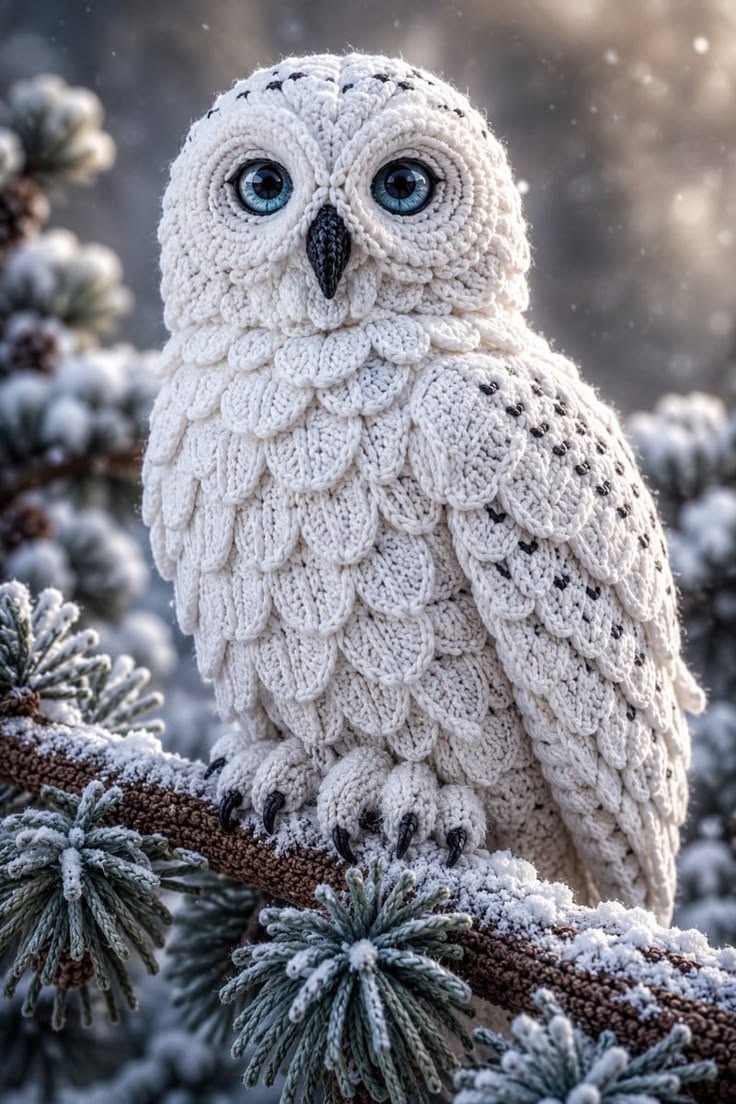
Crochet Amigurumi Snowy Owl is a delightful crochet project that captures the beauty and elegance of one of nature’s most fascinating birds. With its oversized expressive eyes, beautifully textured feathers, and soft snowy white color palette, this charming owl makes a wonderful handmade decoration, thoughtful gift, nursery accessory, or collectible amigurumi. Whether you’re an experienced crocheter or looking to challenge your skills with a rewarding project, the Crochet Amigurumi Snowy Owl offers an enjoyable creative journey from the first stitch to the final detail.
One of the reasons the Crochet Amigurumi Snowy Owl has become increasingly popular among amigurumi enthusiasts is its combination of realistic textures and approachable construction. Although the finished owl appears highly detailed, it is created by working individual sections—including the body, wings, eyes, beak, feet, and layered feather pieces—that are later assembled into a stunning finished figure. This step-by-step approach makes the project easier to manage while allowing plenty of opportunities for customization.
In this complete guide, you will learn how to choose the best materials, crochet every section of the owl using US crochet terminology, create dimensional feather textures, safely assemble all the pieces, and finish your Crochet Amigurumi Snowy Owl with professional-looking details. Along the way, you’ll discover practical tips that improve shaping, symmetry, and durability, resulting in an heirloom-quality handmade creation.
Choosing Materials for Your Crochet Amigurumi Snowy Owl
Selecting quality materials is the first step toward creating a beautiful Crochet Amigurumi Snowy Owl. Cotton yarn is one of the most popular choices because it offers excellent stitch definition and helps maintain the owl’s sculpted appearance.
DISCOVER MORE FREE PATTERNS HERE!
Soft white or ivory yarn forms the foundation of the owl’s snowy feathers. Small amounts of gray, charcoal, and black yarn can be used for subtle feather markings, while dark gray or black works well for the beak and claws.
A crochet hook one size smaller than normally recommended for your yarn helps create tight stitches that prevent stuffing from showing through. Most makers use hooks between 2.25 mm and 3.5 mm depending on yarn weight.
Safety eyes between 18 mm and 30 mm create the owl’s signature expressive appearance. If the toy is intended for young children, embroidered eyes provide a safer alternative while still maintaining a charming look.
Additional supplies include polyester fiberfill, stitch markers, embroidery needles, tapestry needles, scissors, sewing pins, and optional pipe cleaners or floral wire for added stability in larger versions.
Before beginning the project, crochet a small gauge swatch to ensure your stitches remain tight and even. Consistent tension is essential for creating smooth shaping throughout the entire owl.
Crocheting the Body and Main Structure
Begin your Crochet Amigurumi Snowy Owl by creating a magic ring and working continuous rounds of single crochet. The body is generally crocheted from the bottom upward, gradually increasing to create the rounded belly before decreasing toward the head.
Carefully follow the increase and decrease rounds to achieve the owl’s natural oval silhouette. Use stitch markers to keep track of round beginnings and maintain perfect symmetry.
Stuff the body gradually as you work rather than waiting until the final rounds. Adding small amounts of stuffing throughout the process creates smooth shaping without lumps.
The head is often crocheted as part of the same continuous piece, creating a seamless transition between body and head. This method increases durability while reducing finishing work.
The ears are formed by strategically shaping the upper corners of the head with decreases and light sculpting. Small embroidered markings add realistic feather accents around the crown.
After completing the main body, gently shape the owl by hand before closing the final opening. Even shaping creates the sturdy base needed for attaching the remaining pieces.
Creating the Eyes, Wings, and Feather Details
The oversized eyes are the defining feature of the Crochet Amigurumi Snowy Owl. Crochet circular eye surrounds using white or light gray yarn before attaching the safety eyes through the center.
Position both eyes carefully before securing them permanently. Balanced placement dramatically influences the owl’s final facial expression and overall personality.
The beak is usually crocheted separately as a small cone or triangle before being sewn between the eyes. Dark gray or black yarn creates beautiful contrast against the snowy white feathers.
Each wing is worked separately using shaped rows or rounds of single crochet. Layered feather sections can be created with shell stitches, puff stitches, or individually crocheted feather appliqués sewn onto each wing.
To mimic the realistic feather texture seen on snowy owls, crochet multiple overlapping feather panels and attach them in rows beginning at the bottom of the body, working upward. This layering technique creates beautiful depth and dimension.
Finish the facial details by embroidering small feather lines above the eyes and adding subtle gray or black speckles throughout the wings and upper body to imitate the natural markings of a snowy owl.
Assembling and Finishing Your Crochet Amigurumi Snowy Owl
Lay out every completed component before assembly to confirm symmetry and placement. Taking time during this stage greatly improves the finished appearance.
Attach the wings evenly along both sides of the body using strong whip stitches or mattress stitches. Secure each attachment firmly, especially if the owl will be handled frequently.
Sew the feet securely underneath the body, checking that the owl can sit upright without tipping. Slight adjustments before final stitching improve stability.
Weave in every yarn end carefully inside the body to create a neat, professional finish. Hidden ends also improve the durability of the completed amigurumi.
If desired, lightly brush certain feather sections with a soft brush to create a slightly fluffy appearance while preserving the overall stitch definition.
Your completed Crochet Amigurumi Snowy Owl is now ready to decorate shelves, nurseries, holiday displays, woodland-themed rooms, or become a treasured handmade gift for family and friends.
FAQ
Is the Crochet Amigurumi Snowy Owl suitable for beginners?
Confident beginners with basic knowledge of amigurumi techniques, including working in continuous rounds and simple increases and decreases, can successfully complete this project.
What yarn works best?
Cotton yarn is highly recommended because it provides excellent stitch definition and helps maintain the owl’s detailed texture.
Which crochet hook size should I use?
Most makers use hooks between 2.25 mm and 3.5 mm depending on the yarn weight and desired fabric density.
How do I keep the stuffing from showing?
Use a hook slightly smaller than recommended for your yarn and maintain consistent, tight stitch tension throughout the project.
Can I customize the colors?
Absolutely. While snowy white with gray markings is traditional, you can experiment with barn owl, great horned owl, or fantasy color combinations.
Are safety eyes required?
No. Embroidered eyes are an excellent alternative, especially for projects intended for infants or young children.
Can I make different sizes?
Yes. Simply change the yarn weight and corresponding hook size while following the same pattern instructions to create smaller or larger owls.
How should I clean the finished owl?
Spot clean gently with mild soap and water when needed. Allow the owl to air dry completely to preserve its shape and textured feathers.
Conclusion
The Crochet Amigurumi Snowy Owl is a captivating crochet project that combines sculptural shaping, layered feather textures, and expressive facial features into one unforgettable handmade creation. Throughout this guide, you’ve learned how to select the right materials, crochet the body and wings, build realistic feather layers, assemble every component, and apply professional finishing techniques that give your owl a polished appearance.
Whether you create this owl as seasonal décor, a nursery companion, a woodland-themed gift, or a collectible amigurumi, the Crochet Amigurumi Snowy Owl is a project that showcases both creativity and craftsmanship. Every carefully placed stitch contributes to a finished piece that is both beautiful and durable, making it a treasured keepsake for years to come.
If you enjoyed this Crochet Amigurumi Snowy Owl tutorial, we would love to hear your honest opinion. Share your finished owl, tell us which colors and yarns you used, and leave your suggestions for future crochet patterns. Your feedback helps inspire new designs and supports our growing community of crochet enthusiasts.