
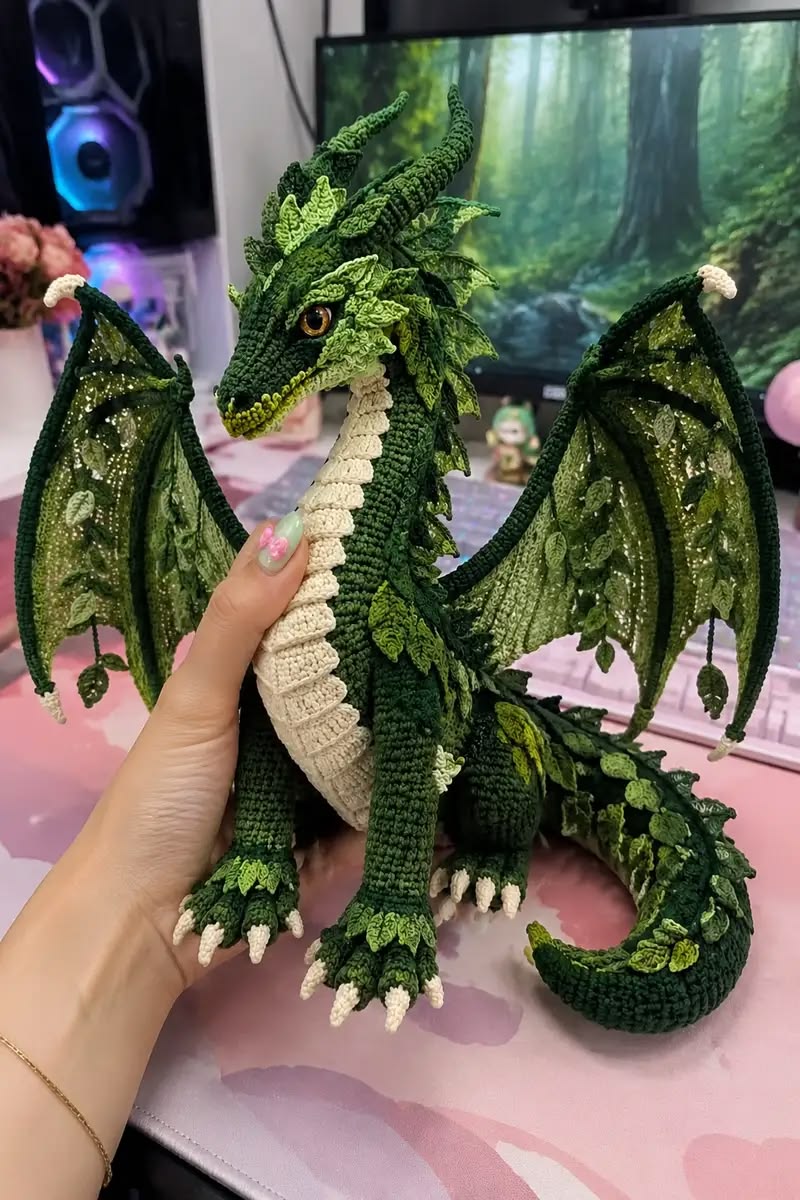
The Forest Dragon Crochet Tutorial is a richly textured amigurumi project inspired by the mysterious colors, leaves, scales, and organic shapes of a deep woodland. This impressive crochet dragon combines a sculpted head, curved horns, a long neck, powerful legs, a sweeping tail, decorative foliage, and large openwork wings. Although the finished piece looks highly detailed, the construction becomes much easier to understand when it is divided into individual crochet components and assembled gradually.
The dragon shown in the inspiration uses several shades of green to create depth. Dark forest green forms most of the body, while olive, moss, and brighter leaf-green accents imitate natural foliage. A contrasting cream belly creates definition along the neck and chest. This combination makes the crochet forest dragon particularly interesting because color, texture, and three-dimensional crochet details work together rather than relying on one complicated stitch pattern.
This tutorial uses U.S. crochet terminology and is intended as an intermediate project, although confident beginners can approach it one section at a time. Exact stitch counts may need minor adjustment depending on yarn, hook, tension, and desired finished size. The goal is to build the recognizable structure shown in the reference while explaining how increases, decreases, shaping, surface crochet, appliqués, and assembly work together in a detailed dragon amigurumi pattern.
Materials, Crochet Stitches, Colors, and Finished Size
For the main body, choose a smooth worsted-weight #4 cotton or cotton-blend yarn. Cotton provides excellent stitch definition for sculptural amigurumi, while an acrylic blend can make the finished dragon slightly softer. Approximately 500–750 yards (457–686 m) across all colors should be suitable for a medium decorative dragon, although heavily embellished versions may require more.
DISCOVER MORE FREE PATTERNS HERE!
Use approximately four colors: dark forest green for the body, moss or olive green for leaves and scales, light green for highlights, and cream or ivory for the belly and claws. Small amounts of black, brown, or gold can be used around the eyes. Combining several greens is one of the easiest ways to reproduce the woodland character of this Forest Dragon Crochet Tutorial.
A 3.0–3.5 mm crochet hook is appropriate for many worsted-weight amigurumi yarns. The stitches should be tighter than they would be for a blanket because dense fabric prevents stuffing from showing. You will also need polyester fiberfill, stitch markers, scissors, a yarn needle, sewing pins, and optional safety eyes.
The principal stitches are ch (chain), sl st (slip stitch), sc (single crochet), hdc (half double crochet), dc (double crochet), tr (treble crochet), inc (increase) and dec (invisible decrease). Most three-dimensional body pieces are crocheted continuously in spirals rather than joined rounds.
A medium finished dragon can measure approximately 14–18 inches (36–46 cm) from the top of the horns to the lower body when seated. With the tail extended, the overall length may reach 22–28 inches (56–71 cm). Each wing can span approximately 10–13 inches (25–33 cm), depending on how dramatically you shape it.
For a decorative dragon intended for adults or display, safety eyes can create the glossy appearance seen in the inspiration. If making the project for a young child, avoid detachable pieces and use embroidered eyes instead. Long wires, beads, buttons, and other rigid decorative components should also be avoided in toys intended for children.
Crocheting the Dragon Head, Neck, Body, and Tail
Begin the crochet dragon head with dark green yarn. Make a magic ring and work 6 sc into the ring. Increase evenly during the following rounds: 12 stitches in Round 2, 18 stitches in Round 3, and then gradually continue increasing until the head reaches approximately 30–36 stitches around.
Work several rounds evenly to form the main skull. To produce the elongated dragon muzzle, increases should be concentrated toward the front rather than distributed indefinitely around the entire head. Another beginner-friendly method is to crochet a separate tapered muzzle and sew it securely to the head.
Stuff the head gradually. The muzzle should remain relatively firm so it retains its shape, while the rear portion of the head can be slightly softer. Position the eyes symmetrically before completely closing the piece. Small embroidered nostrils and a subtle mouth line will immediately make the face more expressive.
The dragon neck begins as a narrow cylindrical section attached beneath the head. Start with approximately 18–24 stitches and crochet downward in continuous rounds. Every few rounds, add two evenly distributed increases. This slow expansion creates the long tapered neck visible in the reference instead of a straight tube.
Continue increasing until the neck transitions naturally into the torso. The body should be wider through the chest and narrower toward the lower abdomen. A useful approach is to reach approximately 42–48 stitches around the widest section, work several rounds evenly, and then begin gradual decreases toward the base.
The tail can be crocheted separately or continued from the body. Start with the body circumference and gradually decrease as you work toward the tip. For a dramatic curved crochet dragon tail, stuff the base firmly but use progressively less stuffing toward the end. During assembly, gently shape the tail into an S-shaped or curled position.
Making the Legs, Claws, Belly Scales, Horns, and Forest Details
Crochet four legs using the same dark green as the body. The hind legs should be noticeably thicker than the front legs. Begin each limb with a magic ring, increase to the desired circumference, and work several rounds before gradually shaping the upper portion.
For the front legs, approximately 18–24 stitches around can create a slender structure. The hind legs may reach 24–30 stitches at their widest point. Stuff the paws firmly and the upper limbs more lightly so they remain easier to position during assembly.
The claws are made separately with cream yarn. Start with a very small magic ring and work a narrow cone using sc. Gradually decrease or simply finish the cone after several rounds. Make three or four claws for each visible foot and sew them securely along the toes.
The distinctive cream crochet dragon belly can be constructed from individual overlapping scales. One simple scale begins with a short chain followed by hdc and dc stitches that widen toward the center before narrowing again. Crochet enough scales to create a continuous strip from beneath the jaw down the neck and across the chest.
For the horns, begin with approximately 6 sc in a magic ring and crochet a narrow cone. Introduce occasional increases if you want a thicker horn base. To create a natural curve without internal wire, place increases on one side and decreases on the opposite side over several rounds. Make two large horns and several smaller spikes.
The woodland appearance comes from the crochet leaf appliqués. Chain 5–8 stitches, work along one side using sc, hdc, dc, and tr, then mirror those stitches along the opposite side. Finish with a pointed tip. Make leaves in several sizes and shades of green, then arrange them around the cheeks, head, neck, spine, legs, and tail.
Crocheting the Large Dragon Wings and Final Assembly
The wings are the most visually dramatic component of this Forest Dragon Crochet Tutorial. Start with the structural ribs. Crochet several long chains and return along each chain with tightly worked sc. These narrow strips act as the framework that gives each wing its characteristic pointed sections.
A typical wing can use one main outer edge approximately 10–13 inches (25–33 cm) long and three or four shorter internal ribs. Arrange the ribs so they spread outward like fingers from the shoulder. Their exact lengths do not have to match perfectly; slight variation creates a more organic appearance.
Between the ribs, crochet open mesh panels. A repeating combination such as dc, ch 1, skip 1 produces lightweight fabric, while groups of chains and double crochet can create a more decorative lace structure. Gradually decrease the width as each panel approaches its outer tip.
Add small leaf shapes directly onto the wing surface or sew individual leaf appliqués over the mesh. Using olive and light green against the dark structural ribs produces the layered botanical appearance that makes this forest dragon amigurumi distinctive.
Before sewing anything permanently, pin all major components into position. Attach the head to the neck, position the front and back legs, arrange the tail, and finally place the wings. View the dragon from the front, back, and both sides. Correcting symmetry is much easier while pieces are pinned.
Finish by sewing the foliage securely along the spine and tail. Add additional small spikes around the head and jaw if desired. Weave every loose yarn end into the interior of the project. Shape the wings and tail by hand, distribute the stuffing evenly, and make final adjustments until the dragon can sit securely.
FAQ About the Forest Dragon Crochet Tutorial
Is the Forest Dragon Crochet Tutorial suitable for beginners?
The complete dragon is better classified as an intermediate crochet project because it combines amigurumi shaping, multiple pieces, appliqués, wings, and detailed assembly. A confident beginner who already understands single crochet, increases, and decreases can still complete it by working one component at a time.
What is the best yarn for a crochet dragon?
Cotton and cotton-blend yarns are excellent because they provide strong stitch definition. Acrylic can also work well and is often lighter and softer.
What hook size should I use?
For worsted-weight yarn, approximately 3.0–3.5 mm is a useful range for tight amigurumi stitches. Adjust the hook if stuffing becomes visible.
How large will the finished dragon be?
A medium version can be approximately 14–18 inches (36–46 cm) tall while seated and up to 22–28 inches (56–71 cm) long when the tail is extended.
How do I make the dragon larger?
The easiest method is to use thicker yarn and an appropriately larger hook. You can also add rounds to the body pieces, but stitch-count adjustments require more experience.
How do I keep stuffing from showing?
Use a smaller hook than you would normally use for the same yarn and maintain firm, consistent tension. Tight single crochet stitches are particularly important for amigurumi.
How are the forest leaves crocheted?
Most can be made around a short foundation chain using a progression of sc, hdc, dc, and sometimes tr stitches. Mirroring those stitches on the opposite side creates a pointed leaf.
How many leaves should I make?
There is no required number. A richly decorated version may contain dozens of small leaves. Make them gradually and stop when the dragon has the amount of texture you prefer.
Can the wings be simplified?
Yes. Beginners can replace the detailed leaf-filled wings with solid triangular crochet panels bordered with single crochet.
How do I make the wings hold their shape?
Tight outer borders and reinforced crochet ribs provide some structure. For an adult display piece, additional internal support may be used if appropriate, but rigid wire should not be used in a child’s soft toy.
Can I make the dragon without safety eyes?
Yes. Embroidered crochet toy eyes are a good alternative and are especially appropriate when avoiding small detachable components.
What colors work besides green?
Try black and red for a volcanic dragon, blue and silver for an ice-inspired version, cream and gold for a fantasy dragon, or purple and teal for a magical color palette.
Why are invisible decreases useful?
An invisible decrease reduces two stitches into one while minimizing visible gaps. This creates smoother shaping on the head, limbs, body, and tail.
Should I stuff the wings?
Usually not. The wings should remain relatively flat and lightweight. Only the body, head, legs, neck, and part of the tail need substantial stuffing.
How should I attach the wings securely?
Use a long yarn tail and sew repeatedly through both the wing base and several stitches of the torso. Attach each wing across a reasonably wide area rather than relying on a single point.
Conclusion
The Forest Dragon Crochet Tutorial turns traditional amigurumi techniques into an elaborate fantasy-inspired project. Its impressive appearance comes from layering relatively understandable components: a sculpted head, tapered neck, stuffed body, curved tail, four legs, pointed claws, horns, belly scales, openwork wings, and dozens of small botanical details.
The most important technique is to build the dragon gradually. Complete the large structural pieces first, check their proportions, and then move to the decorative elements. Working this way prevents the leaves, horns, scales, and wing details from making the construction feel unnecessarily complicated.
Color is equally important. Combining dark forest green, moss green, olive, bright leaf green, and cream creates depth even when the individual stitches are simple. Small changes in leaf size and placement make the finished dragon appear more organic and detailed.
Whether displayed on a shelf or created as a special handmade fantasy project, this crochet forest dragon pattern provides an excellent opportunity to practice amigurumi shaping, crochet appliqués, textured details, assembly, and creative colorwork. The result is a dramatic woodland dragon with enough customization possibilities to make every finished version unique.