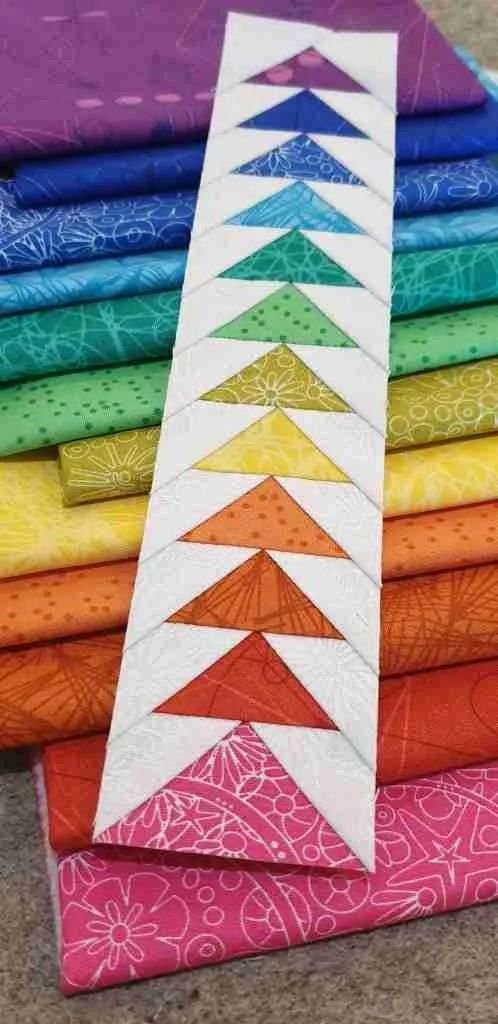
The Flying Geese Strip – Pattern is a cornerstone in the world of quilting, offering versatility, symmetry, and timeless appeal. Whether you’re a beginner just entering the quilting community or an experienced crafter looking for a new project, this pattern provides a perfect blend of structure and creativity. Known for its triangle-based design, it mimics the V-formation of flying geese in the sky — a symbol of direction, movement, and elegance.
This pattern is not only beautiful but also functional. It’s used in borders, central quilt designs, or as an accent in patchwork projects. The Flying Geese Strip – Pattern is popular among quilters because of how easily it can be adapted to different styles, colors, and themes. Plus, it’s a great way to use up fabric scraps in a meaningful and aesthetically pleasing way.
In this article, you’ll discover everything you need to know to create your own Flying Geese Strip – Pattern, from basic construction methods to design tips and frequently asked questions. Let’s dive into the art of creating a design that’s both classic and endlessly customizable.
1. Understanding the Basics of the Flying Geese Strip – Pattern
The Flying Geese Strip – Pattern is composed of one large triangle (the “goose”) flanked by two smaller triangles (the “sky”). When repeated in a strip, these units create a visually striking and dynamic flow, ideal for adding direction and movement to any quilt layout.
SEE OTHER FACE PATTERNS HERE!
The size ratio of the goose to the sky is generally 2:1, meaning if your goose unit is 2 inches tall, it will be 4 inches wide. This proportion gives the design its signature V-shape and allows for endless variation in layout.
There are several methods to create this pattern, such as the traditional stitch-and-flip, the no-waste four-at-a-time method, and paper piecing. Each technique offers different benefits depending on the desired accuracy, time, and resources available.
Choosing the right fabric is another essential step. Contrasting colors work best to highlight the distinct shape of the geese. Many quilters opt for bold prints for the geese and neutral tones for the sky to make the design pop.
Accuracy in cutting and sewing is key to maintaining the integrity of the pattern. Using a rotary cutter and quilting ruler ensures that all pieces align correctly, and that the triangle points remain sharp.
Lastly, always press your seams carefully—pressing them toward the sky fabric often yields flatter results, making the final quilt easier to layer and stitch.
2. Methods to Create the Flying Geese Strip – Pattern
There’s more than one way to construct the Flying Geese Strip – Pattern, and choosing the right technique depends on your project goals and personal preference.
The no-waste method is perfect if you want efficiency. It allows you to create four flying geese units at once using one large square and four small squares. This technique reduces fabric waste and ensures uniformity.
The stitch-and-flip method is great for beginners. It involves sewing a small square to a corner of a rectangle, trimming, and pressing it open to form a triangle. It’s simple but may lead to fabric waste.
Paper piecing offers ultimate precision. You stitch directly onto a paper template, which ensures perfect points every time. This is ideal for advanced designs or when creating intricate quilt tops.
For strip piecing, you sew long strips together first, then cut the flying geese units out. This method is useful for making the Flying Geese Strip – Pattern faster and more consistent across the quilt.
Regardless of the method, always square up your units after sewing. This keeps the design aligned and ensures all points match up beautifully.
Experimenting with each method will help you find your preferred approach while allowing you to discover new techniques that improve both your speed and accuracy.
3. Creative Uses of the Flying Geese Strip – Pattern in Quilts
The versatility of the Flying Geese Strip – Pattern is one of its biggest appeals. Its geometric consistency makes it suitable for a variety of quilt types and themes.
You can use it as a border around a quilt top to add motion and frame the central design. This helps lead the viewer’s eye around the quilt and adds a professional touch.
Incorporate it into the quilt center as a dynamic layout. Staggered or mirrored geese strips can add depth and complexity to even the simplest quilt tops.
Use it in a modern quilting style by spacing out the geese on a solid background. This minimalist approach makes the geese appear to “fly” across the fabric.
Try a color gradient technique by making each goose a different shade within a color family. This creates a stunning visual effect that mimics movement and light.
In scrappy quilts, the pattern is an excellent way to use leftover fabric. A diverse collection of geese in different prints can make your quilt vibrant and unique.
The pattern can also be used for seasonal quilts—think orange and black for Halloween or red and green for Christmas—allowing you to tailor your design to specific themes and holidays.
4. Tips for Perfecting the Flying Geese Strip – Pattern
Even though the Flying Geese Strip – Pattern is straightforward, a few key tips can elevate your quilt from good to great.
Always test one unit first. Before cutting all your fabric, make a single unit to check sizing and seam allowance. It’s easier to adjust early than to fix an entire batch later.
Use high-quality fabric that maintains its shape during cutting and sewing. Stretchy or loosely woven fabrics can distort, affecting the triangle shapes.
Maintain a consistent ¼-inch seam allowance. Use a quilting foot or seam guide to ensure accuracy across all units.
Ironing techniques matter. Use pressing, not ironing, to avoid stretching the fabric. Press seams toward the darker fabric to avoid shadowing through lighter fabrics.
Label your strips and segments as you go. It’s easy to mix up direction or order, especially with mirrored or complex layouts. Keeping things organized saves a lot of frustration.
Lastly, consider using a design wall to preview your flying geese layout before sewing everything together. This allows you to tweak color placement and symmetry for maximum visual impact.
🌟Join our exclusive Quilt broadcast list on Messenger! Receive the best patterns, tips, and updates directly in your inbox. Our team is ready to send you delightful content that will inspire your projects. Don’t miss this opportunity to stay updated and create amazing pieces. Join now and be part of this passionate quilt community!✨📩
FAQ – Frequently Asked Questions About the Flying Geese Strip – Pattern
Q1: What is the ideal fabric size to start a Flying Geese Strip – Pattern?
A: It depends on your preferred unit size, but a common formula is one large square at 5.25″ and four small squares at 2.875″ for 4 geese units using the no-waste method.
Q2: Can I make the Flying Geese Strip – Pattern without a sewing machine?
A: Yes, it’s possible to hand sew flying geese, although it requires more time and precision. A sewing machine provides more consistent results.
Q3: What’s the best method for beginners?
A: The stitch-and-flip method is the easiest for beginners because it’s simple and doesn’t require complex math or templates.
Q4: Why do my triangle points get cut off?
A: This usually happens when the seam allowance is too large or the units aren’t squared up correctly before assembly.
Q5: How can I use Flying Geese strips in non-quilt projects?
A: You can incorporate flying geese into bags, pillow covers, wall hangings, and even clothing accents like cuffs or collars.
Q6: Is the Flying Geese Strip – Pattern suitable for modern quilts?
A: Absolutely. When paired with solid fabrics or asymmetrical layouts, it becomes a sleek and bold design element in modern quilting.
VIDEO PATTERN:
Conclusion
The Flying Geese Strip – Pattern is a timeless quilting technique that blends tradition with endless customization possibilities. From choosing the best method of construction to creatively using it in your projects, this pattern offers both beauty and functionality for quilters at every skill level.
We’ve covered essential construction methods, creative applications, and practical tips for perfecting your flying geese units. Whether you’re designing a full quilt or adding a stylish border, this pattern has the potential to elevate your work.
If this guide helped you, we’d love to hear your honest opinion and suggestions! Have you tried the Flying Geese Strip – Pattern before? Drop a comment with your experience or tips!