
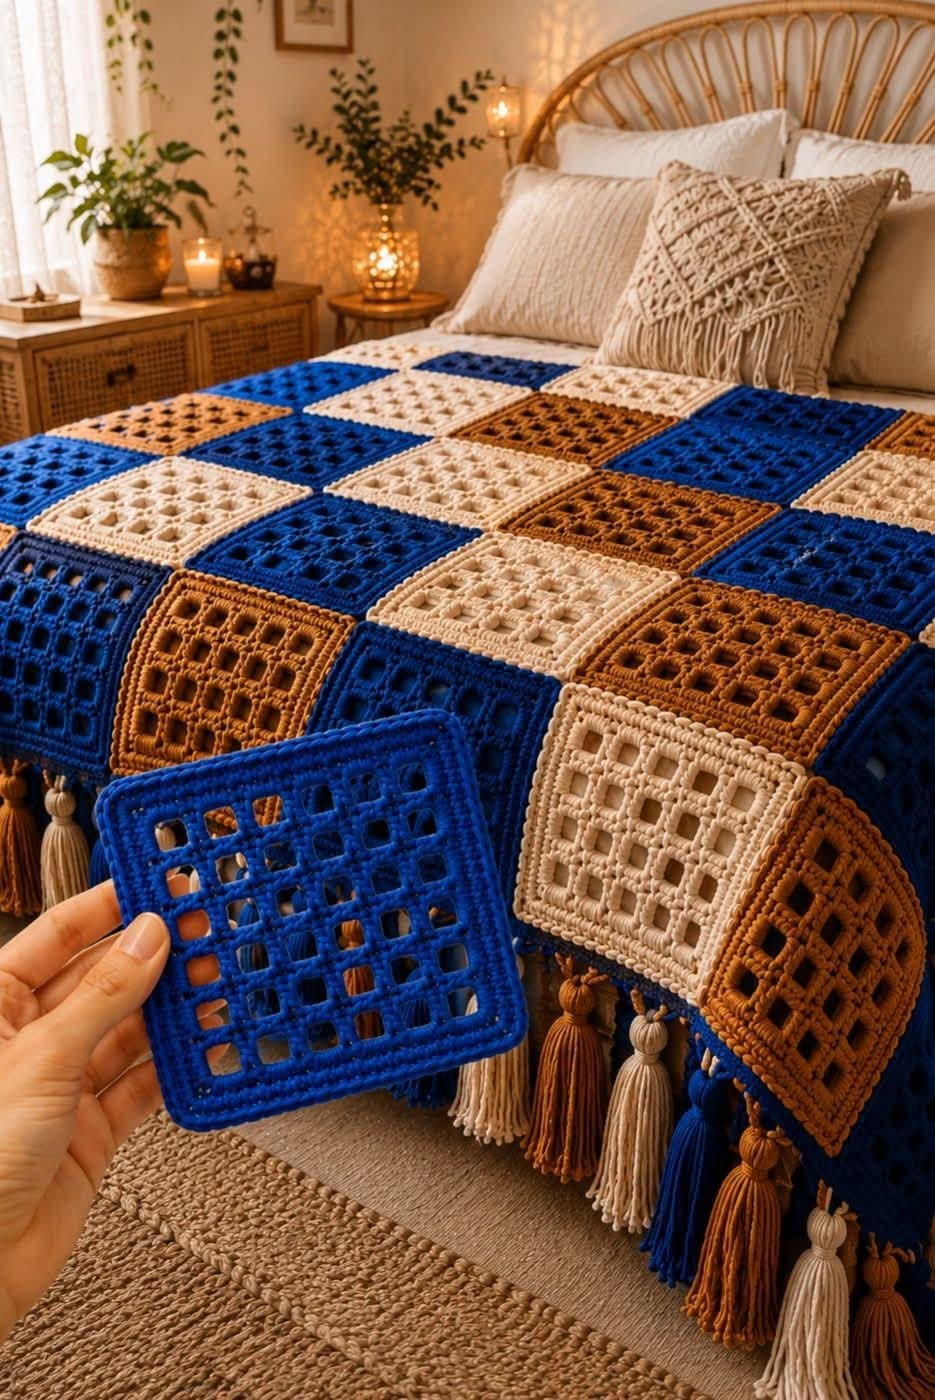
Granny Square Blanket Pattern is a beautiful way to combine traditional crochet construction with a modern geometric look. The blanket shown in the inspiration uses individual square motifs arranged in rich royal blue, warm caramel brown, and soft cream. Instead of a very dense traditional granny square, the motifs feature openwork spaces, textured borders, and structured geometric stitches, creating a blanket that feels decorative, handmade, and sophisticated.
One of the greatest advantages of a crochet granny square blanket is that you do not need to work the entire blanket at once. Each square is crocheted separately, making this a comfortable project to carry in a small crochet bag. You can complete a few motifs whenever you have time, block them to a consistent size, and eventually join them into a full throw or bed blanket. The modular construction also makes the pattern easy to customize for different bed sizes.
For a blanket inspired by the photo, the key is consistency. Every square should finish at approximately the same measurement so the rows join neatly. A finished motif of about 7 inches (18 cm) works well, although you can make the squares larger or smaller. The open grid effect can be created with combinations of chains, single crochet, double crochet, and chain spaces, while several solid rounds around the perimeter provide stability for joining. Add generous handmade tassels along the lower edge for the luxurious finishing detail seen in the inspiration.
Materials, Crochet Stitches, Gauge and Blanket Measurements
For this Granny Square Blanket Pattern, a smooth medium-weight yarn is an excellent choice. Worsted weight #4 yarn provides enough body to emphasize the geometric squares while remaining comfortable for a blanket. Cotton or a cotton-acrylic blend will provide excellent stitch definition, while acrylic yarn can make the project lighter and easier to care for.
DISCOVER MORE FREE PATTERNS HERE!
To reproduce the warm color palette of the inspiration, choose three coordinating shades: royal blue or cobalt, caramel or cinnamon brown, and cream or natural ivory. You can distribute these colors randomly or establish a repeating sequence. A fourth neutral shade can also be introduced if you want greater variety.
A 5.0 mm (H-8) crochet hook is a practical starting point for worsted yarn. If your stitches are particularly tight, try 5.5 mm. If they are loose, a 4.5 mm hook may give the square more definition. Always crochet one sample motif before committing to the entire blanket.
You will also need scissors, a yarn needle, locking stitch markers, blocking pins, and blocking mats. A measuring tape or quilting ruler is especially useful because the individual motifs need to remain consistent.
The main U.S. crochet abbreviations used in this tutorial are: ch = chain, sl st = slip stitch, sc = single crochet, hdc = half double crochet, dc = double crochet, sp = space, st = stitch, sts = stitches, and rnd = round. The instructions below use U.S. crochet terminology.
For an approximately 52 × 66 inch (132 × 168 cm) throw, make around 56 squares, arranged as 7 squares across and 8 squares down when each blocked square measures close to 7½ inches (19 cm), allowing for joining. For a larger bed blanket, simply add additional rows and columns.
A medium throw may require approximately 2,500–3,500 yards (2,285–3,200 m) of yarn depending on the exact square design, yarn thickness, hook size, joining method, border, and number of tassels. Purchase a little extra of your dominant color so that the border and joining remain consistent.
The finished fabric should feel structured without becoming stiff. Because this design contains open spaces, gauge does not need to match a garment pattern precisely. What matters most is that every granny square finishes at approximately the same dimensions.
How to Crochet the Openwork Granny Square
Begin your first square with a magic ring, or chain 4 and join with a slip stitch to form a small ring. The center should remain compact because the geometric openings will develop farther outward.
For Round 1, chain 3 to represent the first double crochet. Work 2 dc into the ring, ch 2, then work 3 dc into the ring. Repeat the sequence of 3 dc, ch 2 until you have four groups. Join with a slip stitch.
For Round 2, slip stitch into the first corner space. Chain 3 and work 2 dc into the same corner, ch 2, and work another 3 dc into that corner. Chain 2 to create an open side space. In the next corner work 3 dc, ch 2, 3 dc. Continue around and join.
During Round 3, begin developing the open grid. Work the corner as before. Along each side, use combinations of ch 2, dc into the next chain space, ch 2, keeping the spaces evenly distributed.
The objective is to create recognizable square openings rather than a completely solid traditional granny motif. Maintain the same number of open sections on every side.
On the following round, work single crochet or double crochet around each chain space according to the amount of structure you want. The inspiration has clearly defined horizontal and vertical lines, so the open squares should look intentional rather than loose.
You can create a stronger grid by working 3 dc around a chain space, ch 2, skip the next section, and 3 dc into the following space. Repeat the same sequence symmetrically on all four sides.
As the motif grows, place ch 2 at each corner. These corner chains allow the square to expand without curling.
Check the motif after every round. Lay it flat on a table. If the edges are beginning to ripple, you may have too many stitches. If the corners pull upward, additional chains or stitches may be required.
Continue alternating openwork and more solid rounds until the square measures approximately 5½–6 inches (14–15 cm).
Now begin the substantial outer frame visible in the inspiration. Work one round of sc evenly around the square, placing sc, ch 2, sc in each corner.
Follow with one or two rounds of hdc or dc. Keep the corner increases consistent.
For a pronounced raised edge, work one round through the back loop only. This creates a subtle ridge that frames the geometric center.
Finish with another round of sc. The completed motif should measure approximately 7–7½ inches (18–19 cm) after blocking.
Fasten off, leaving a tail long enough for weaving in.
The exact number of open grid sections can be changed. What matters is repeating the same structure for every square.
Before making dozens of motifs, write down your exact round sequence from the successful sample. This prevents small differences from appearing later in the blanket.
Blocking, Arranging and Joining the Granny Squares
Blocking is extremely important for a project built from geometric motifs. Even carefully crocheted squares can vary slightly before they are shaped.
Weave in the yarn tails first, leaving the final tail if you intend to use it for joining.
Lightly dampen each square or use the blocking method recommended for your yarn fiber.
Place the motif on a blocking mat and gently stretch it to the intended dimensions. For this Granny Square Blanket Pattern, approximately 7–7½ inches (18–19 cm) is a useful target.
Pin all four corners first.
Next, place pins evenly along the sides so the edges remain straight rather than bowing outward.
Allow the motifs to dry completely before removing them.
Once all squares are blocked, arrange them on a large clean surface. This is the stage where the color distribution becomes important.
For a palette similar to the inspiration, allow royal blue to act as the dominant shade. Scatter cream and caramel squares throughout the layout so no large area becomes visually heavy.
Take a photograph of the arrangement before joining. This simple trick prevents confusion if the squares become mixed while you work.
You can join the squares using a whip stitch, mattress stitch, single crochet join, slip-stitch join, or join-as-you-go method.
For an almost invisible connection, mattress stitch is an excellent option.
Place two motifs beside each other with their edges aligned. Thread a yarn needle and sew through corresponding edge stitches, maintaining gentle, even tension.
Do not pull excessively. Tight seams can cause the blanket to bunch.
For a more pronounced handmade appearance, use a single crochet join on the right side.
Hold two squares together and work sc through corresponding stitches of both motifs.
A contrasting joining yarn can create an attractive grid, while matching yarn makes the seams less prominent.
Join the motifs into horizontal rows first.
Once each row is complete, join the rows together.
Frequently lay the blanket flat during assembly. This allows you to identify tension problems before the entire blanket is completed.
After joining, weave in all remaining ends securely.
At this stage, measure the blanket. Modular crochet sometimes changes slightly after assembly, so use the actual measurement before planning the final border.
Border, Tassels and Professional Finishing
A strong border helps unify all the individual motifs and gives the crochet blanket a polished appearance.
Attach your main border color at any corner.
Work one complete round of sc around the blanket.
Along the outer edges, aim for consistent stitch spacing. At each corner, work sc, ch 2, sc into the corner space.
For the second round, use hdc or dc.
If you want a substantial frame similar to the thick edges visible on the squares, continue for another two or three rounds.
Alternating a solid round with a back-loop-only round can create subtle decorative ridges.
For the final border round, reverse single crochet—sometimes called crab stitch—can provide a beautiful corded edge.
Alternatively, finish with ordinary single crochet for a cleaner minimalist appearance.
The tassels are one of the most distinctive decorative details of this blanket.
Cut several strands of yarn approximately 12–14 inches (30–35 cm) long.
Bundle approximately 15–25 strands together, depending on yarn thickness and the fullness you want.
Fold the bundle in half.
Tie tightly approximately 1 inch (2.5 cm) below the folded top to form the tassel head.
Wrap yarn several times around the neck and secure it firmly.
Trim the lower ends evenly.
A finished tassel approximately 5–6 inches (13–15 cm) long works beautifully on a large throw.
Attach tassels at regular intervals along the two shorter edges, or around the entire blanket for a more decorative bohemian appearance.
You can alternate blue, cream, and caramel tassels to coordinate with the squares.
After attaching the tassels, examine every seam and woven end.
Secure any loose tails.
Give the blanket a final gentle blocking if necessary.
The finished project should have defined square motifs, straight joining lines, balanced colors, and an attractive drape.
The combination of openwork crochet squares, saturated blue, warm brown, and creamy neutral yarn gives this blanket the sophisticated handcrafted character seen in the inspiration.
FAQ – Granny Square Blanket Pattern
Is this Granny Square Blanket Pattern suitable for beginners?
Yes, although it is most comfortable for an adventurous beginner who already understands chains, single crochet, double crochet, slip stitches, and working into chain spaces.
What yarn is best for a granny square blanket?
Worsted weight #4 yarn is a versatile option. Acrylic is practical and easy to care for, while cotton and cotton blends provide excellent stitch definition.
What crochet hook should I use?
A 5.0 mm hook is a good starting point for medium-weight yarn, but adjust the hook size to achieve the desired fabric.
How large should each square be?
The motifs in this tutorial are designed to finish at approximately 7–7½ inches (18–19 cm) after blocking.
How many granny squares are needed for a blanket?
It depends on the desired size. A medium throw using approximately 7½-inch squares might use around 56 motifs arranged 7 × 8.
Can I make a larger blanket?
Absolutely. Simply add additional rows and columns of squares.
Can I use different colors?
Yes. This design works beautifully with three coordinated colors, scrap yarn, monochromatic shades, pastels, or a rainbow palette.
Why are my granny squares curling?
Curling can result from tight tension, insufficient corner increases, or an unsuitable hook size. Blocking can correct minor curling, but significant distortion usually indicates a stitch-count issue.
Why are my squares different sizes?
Changes in tension are the most common reason. Use the same yarn weight and hook throughout and block every motif to a consistent measurement.
Should I weave in ends before joining?
Yes. Weaving in most ends as you work makes final assembly considerably easier.
What is the easiest joining method?
Whip stitch and single crochet joins are both beginner-friendly.
How can I make the seams almost invisible?
Use matching yarn and a mattress-stitch join.
Can I crochet the squares directly together?
Yes. A join-as-you-go technique can reduce finishing work.
Are tassels necessary?
No. They are decorative and can be omitted if you prefer a cleaner edge.
Can this pattern be made with chunky yarn?
Yes, but the squares will become larger and heavier. Reduce the number of motifs accordingly.
How do I wash a granny square blanket?
Always follow the care instructions on the yarn label. A washable yarn is particularly convenient for frequently used blankets.
Can I use leftover yarn?
Definitely. Granny square blankets are among the best scrap yarn crochet projects, provided the yarns have reasonably similar weights and care requirements.
How do I keep the blanket from becoming too heavy?
Use openwork motifs, avoid excessively thick yarn, and choose a lightweight fiber if making a large bed-size blanket.
Conclusion
The Granny Square Blanket Pattern combines one of crochet’s most recognizable construction methods with an elegant modern grid design. By building the blanket one motif at a time, even a large project becomes manageable. Each completed square represents a small milestone, and watching the individual pieces gradually become a full blanket is one of the most satisfying parts of modular crochet.
The rich combination of royal blue, caramel brown, and cream gives the design warmth and visual depth, while the open geometric centers prevent the blanket from looking overly heavy. Structured outer rounds frame every motif and make the individual squares easier to join into clean rows.
Take time to make one successful sample square before beginning the full project. Record your stitch counts, measure the finished motif, and use that first square as a reference for every piece that follows. Consistent tension and careful blocking are more important than crocheting quickly.
Once the motifs are joined, a substantial border and handmade tassels transform the project into a finished decorative throw suitable for a bedroom, living room, reading chair, or handmade gift. Whether you follow the three-color palette or create your own combination, this Granny Square Blanket Pattern offers plenty of room for creativity while maintaining a structured, timeless crochet style.