
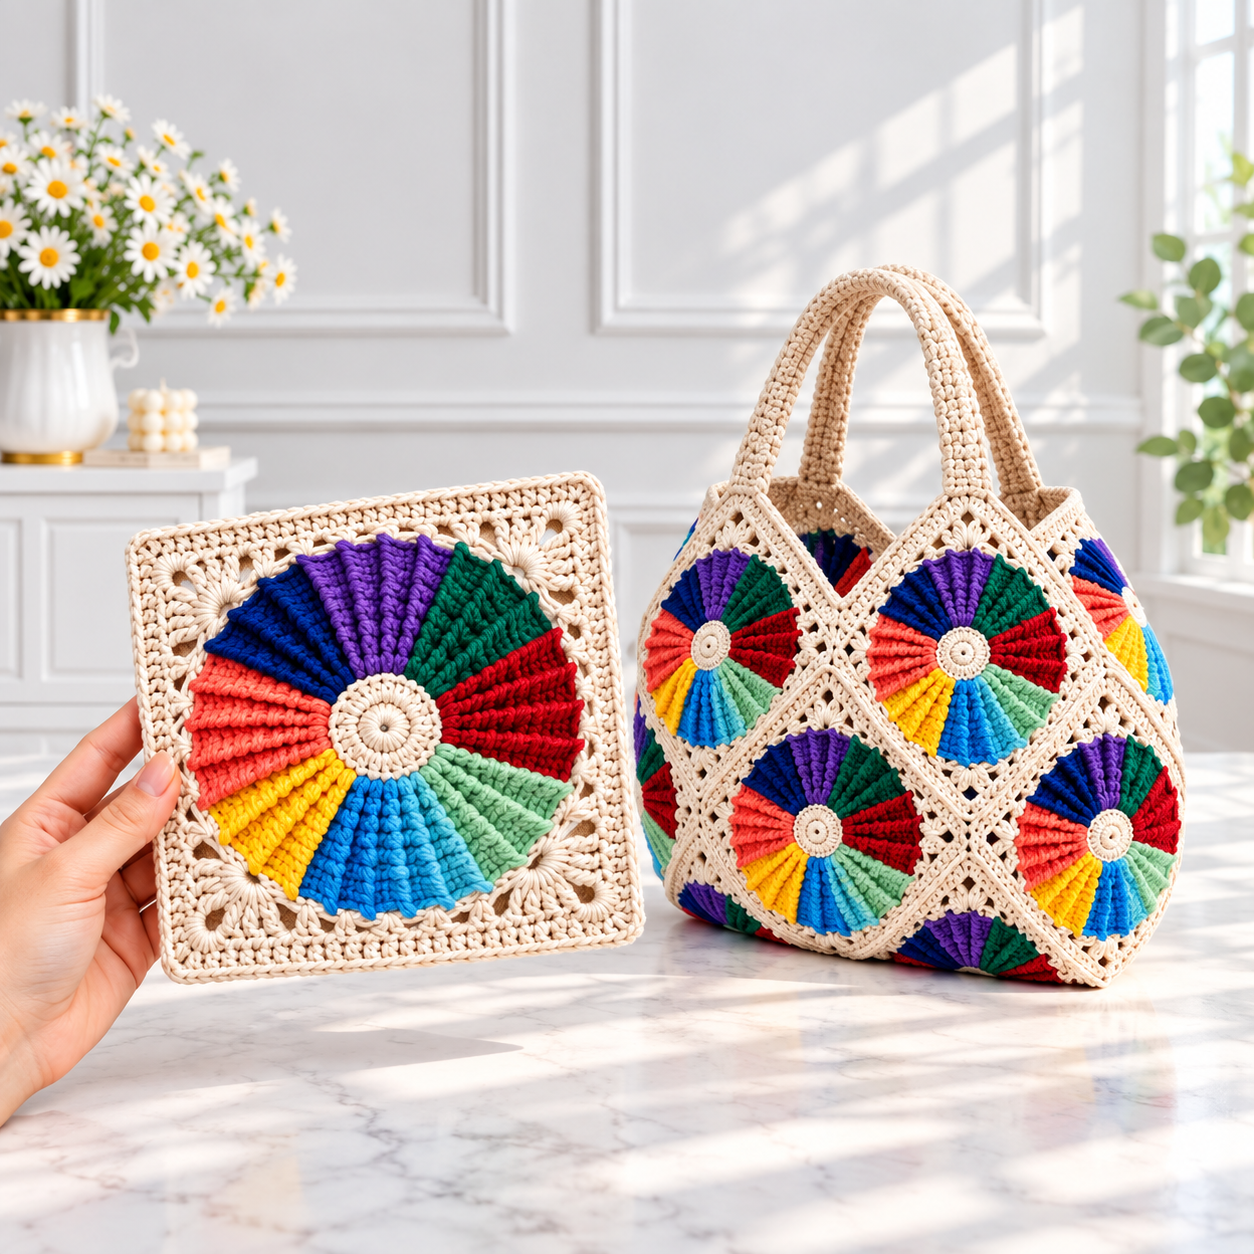
The Beginner Bag Pattern is a colorful and approachable crochet project designed around decorative square motifs that can be joined together to create a practical handmade bag. The design shown combines a neutral cream background with bright sections of blue, purple, green, red, coral, yellow, turquoise, and mint, producing a cheerful stained-glass or color-wheel effect. Although the finished bag looks detailed, its construction is based on repeating the same motif, making it an excellent project for crocheters who want to move beyond basic practice swatches and create something useful.
One of the best features of this easy crochet bag pattern is its modular construction. Instead of crocheting an entire handbag as one complicated piece, you make individual squares, block them to consistent dimensions, arrange them in the desired layout, and join them together. This allows beginners to concentrate on one manageable section at a time. It also provides plenty of opportunities to practice fundamental crochet skills such as working in rounds, changing colors, counting stitches, making chains, joining motifs, and creating sturdy handles.
The finished size can easily be customized. For a medium everyday bag inspired by the photograph, aim for approximately 12–14 inches (30–36 cm) wide, 10–12 inches (25–30 cm) tall, with handles approximately 16–20 inches (41–51 cm) around, depending on how you want to carry the bag. Because individual tension, yarn thickness, and motif size vary, these measurements should be treated as a flexible guide rather than an exact gauge requirement. The real secret to this Beginner Bag Pattern is consistency: once your first square looks good, repeat the same measurements for every remaining motif.
Materials, Crochet Abbreviations, and the Colorful Square Motif
For this crochet granny square bag, choose a yarn that gives the finished motifs enough structure to hold their shape. Medium-weight cotton or a cotton-blend yarn is particularly suitable because it provides excellent stitch definition and tends to stretch less than very soft yarns. Approximately 700–1,000 yards (640–915 m) total is a reasonable starting estimate for a medium handbag, although the exact amount depends on the number and size of squares.
DISCOVER MORE FREE PATTERNS HERE!
A 4.0 mm to 5.0 mm crochet hook works well with many medium-weight yarns. Choose the hook recommended on your yarn label and then crochet a test motif. If the fabric feels loose and floppy, try going down one hook size. A bag generally benefits from tighter tension than a blanket because the fabric needs to support its contents.
You will also need scissors, a yarn needle, stitch markers, a measuring tape, and blocking pins. Optional materials include cotton fabric for lining, fusible interfacing for additional stability, a magnetic closure, and a removable plastic-canvas base. The sample uses many colors, so this is also a wonderful scrap yarn crochet project.
This tutorial uses U.S. crochet terminology. The primary abbreviations are ch = chain, sl st = slip stitch, sc = single crochet, hdc = half double crochet, dc = double crochet, tr = treble crochet, st = stitch, sts = stitches, sp = space, and rep = repeat. Beginners should become comfortable with chain, slip stitch, single crochet, and double crochet before starting.
Begin the center with cream yarn. Make a magic ring, ch 3 to represent the first dc, and work approximately 11 dc into the ring. Pull the ring closed and join with a sl st. You now have a compact circular center that will anchor all of the colorful sections.
For the next stage, divide the circle into equal sections. The photographed motif has a radial appearance similar to slices around a wheel. Each section can be created with a small group of taller stitches worked outward from the center. You can use dc and tr stitches to gradually increase the height of each colored wedge.
Change colors for each section. Work one wedge in royal blue, another in purple, then green, red, coral, yellow, turquoise, and mint. The precise number of colors is flexible. What matters is distributing the sections evenly around the center so the circle remains flat.
When changing yarn colors, complete the final yarn-over of the previous stitch using the new color. This produces a cleaner transition. Leave tails long enough to weave in securely later.
Continue increasing the colored sections until the circular motif measures approximately 6–7 inches (15–18 cm) across. Keep checking that the piece lies flat. If it curls upward, you may need additional increases; if it begins to ripple excessively, reduce the number of increases.
The final step is converting the colorful circle into a square. Attach the cream yarn and work around the outside using combinations of sc, hdc, dc, and tr. Use the tallest stitches near the four corners and shorter stitches along the middle of each side. This gradually transforms the circular shape into a square.
Create each corner with a group such as 3 dc, ch 2, 3 dc worked into the same space. Continue around and join with a slip stitch. Add another cream round if necessary until your finished motif measures approximately 8 inches (20 cm) square.
Making Matching Squares and Building the Crochet Bag Body
After completing your first motif, measure it carefully. This square becomes the template for every additional piece. Consistent motif size is more important than achieving a specific published gauge.
Make enough squares for your desired bag dimensions. A compact handbag may require approximately 8–10 squares, while a larger tote could use 12–16 squares or more. The exact arrangement depends on whether you want a flat rectangular bag or the dimensional, angled construction suggested by the inspiration photograph.
For a beginner-friendly version, start with a simple rectangular arrangement. Lay several squares side by side to form the front panel and repeat the same arrangement for the back panel. Additional motifs can become the sides and bottom.
Place every finished square on a blocking mat and gently shape it to identical dimensions. Blocking helps straighten the edges and makes joining dramatically easier. Always follow the care recommendations for the yarn fiber you are using.
Arrange the colors before joining. Even though every motif may contain the same colors, rotating individual squares can change the overall appearance. Try several layouts and take a photograph of your favorite arrangement before sewing anything together.
To join the motifs, place two squares with the desired sides facing each other and use a slip stitch seam through corresponding edge stitches. This produces a strong and relatively flat connection.
Alternatively, use single crochet joins with the right sides facing outward. This creates a decorative raised seam and works particularly well with the cream border because the joining lines become part of the design.
For a flatter finish, sew the motifs together with a yarn needle using a mattress-style seam. Whichever technique you choose, keep your tension relaxed. Pulling the joining yarn too tightly can cause the squares to bunch.
Once the front and back sections are assembled, connect the sides and bottom. Check frequently that the corners align and that the bag remains symmetrical.
The photograph shows an attractive dimensional construction in which the square motifs meet at different angles. More experienced beginners can recreate this by arranging the squares diagonally and joining them along their full edges. The resulting peaks and valleys at the upper edge give the bag a distinctive handmade shape.
Before completing every seam, temporarily pin or clip the squares together. This allows you to preview the three-dimensional shape and correct the arrangement before permanently joining it.
After assembling the body, work one round of sc around the upper opening. This creates a continuous edge and stabilizes the individual motifs.
Work another one or two rounds of sc if additional strength is needed. At this stage, the bag should hold its general shape even before the handles are attached.
How to Crochet Strong Handles and Add a Professional Lining
Handles are one of the most important structural components of any handmade crochet bag. Decorative motifs can be relatively flexible, but the handles must withstand repeated pulling and the weight of the bag’s contents.
Mark the center of the front and back sections. Position two stitch markers where the first handle will attach, leaving enough space between them for a comfortable opening.
Attach the cream yarn at the first marker and ch 55–70, depending on the desired handle length. Before attaching the chain at the second marker, hold the bag up and check the size.
Slip stitch into the second marked position. Work sc back around the chain to create the first layer of the handle.
Continue working additional rows or rounds of sc until the handle measures approximately ¾–1 inch (2–2.5 cm) thick. Dense stitches create a much stronger strap.
For extra reinforcement, place cotton cord inside the handle and crochet around it. Another option is to sew a narrow strip of non-stretch fabric or webbing to the underside of the finished crochet handle.
Repeat exactly the same process for the second handle. Count both the starting chains and subsequent stitches so the handles have identical lengths.
Reinforce each attachment point with several additional stitches. Handle connections experience more stress than almost any other area of a crochet handbag.
A lining is optional, but it significantly improves the finished project. Measure the inside width and height after the bag has been assembled rather than relying solely on the original motif measurements.
Cut two pieces of cotton fabric approximately ½ inch (1.3 cm) larger than the required finished dimensions on all seam edges. Sew the sides and bottom together.
If your bag has a separate bottom or side gusset, construct the lining in a matching three-dimensional shape. Press the seams carefully before inserting it.
Fold the upper raw edge toward the wrong side approximately ½ inch (1.3 cm) and press. Insert the lining into the crochet bag.
Hand-sew the lining beneath the upper crochet border using small stitches. Avoid pulling the crochet fabric while sewing.
An interior pocket is easy to add before installing the lining. Cut a small rectangle of fabric, hem the upper edge, fold the remaining raw edges underneath, and sew it to one lining panel.
You can also install a magnetic snap in the lining. Add it before attaching the lining to the bag so the hardware remains concealed between the crochet and fabric layers.
Finishing, Customizing, and Avoiding Common Beginner Mistakes
Once the Beginner Bag Pattern is fully assembled, inspect every joining seam. Look particularly closely at the corners where several motifs meet.
Weave in every yarn tail securely. Pass each tail through several stitches on the wrong side, change direction, and weave it through another section before trimming.
Do not simply cut yarn ends close to a knot. Crochet projects experience movement during use, and unsecured ends can eventually work loose.
Check the handles by gently loading the bag with lightweight objects. If the attachment areas stretch excessively, reinforce them before regular use.
One common beginner mistake is changing hook size or tension midway through the project. Even small differences can result in squares that do not align correctly. Make all motifs using the same hook and approximately the same tension.
Another issue is inaccurate stitch counting. Count each round, particularly while forming the central circle. Too many stitches create waves, while too few cause the motif to cup.
Color changes should also be planned. Before beginning, place the yarn colors next to one another and decide on a repeating sequence.
The photographed combination uses cream as the neutral framework with saturated rainbow colors in the centers. This balance prevents the bag from appearing visually overwhelming while allowing every bright color to stand out.
For a softer version, try cream with dusty rose, sage green, pale blue, lavender, and mustard. For a dramatic version, use black borders around jewel-toned centers.
You can also make every motif different. This transforms the project into an excellent way to use leftover yarn while still maintaining unity through a consistent neutral border.
The same motif can be used for other projects. Several squares can become a cushion cover, table runner, wall decoration, or small pouch.
FAQ – Beginner Bag Pattern
Is this Beginner Bag Pattern really suitable for beginners?
Yes. It is best for beginners who already understand basic crochet stitches. The repeated motif construction gives you plenty of practice without requiring complicated garment shaping.
What crochet stitches do I need to know?
The most useful stitches are chain, slip stitch, single crochet, half double crochet, double crochet, and treble crochet.
What yarn should I use for a crochet handbag?
Cotton and cotton-blend yarns are excellent because they generally provide good structure and stitch definition.
What crochet hook size should I use?
A 4.0–5.0 mm hook is a practical range for many medium-weight yarns. Always adjust according to your yarn and desired fabric density.
How big should each square be?
For the medium bag described here, approximately 8 inches (20 cm) is a useful target.
How many squares do I need?
The number depends on your construction. A smaller handbag may use 8–10 motifs, while a larger version could require 12–16 or more.
Can I make the bag with leftover yarn?
Yes. This is an excellent scrap yarn crochet pattern, particularly if you use one consistent neutral color for all the outer borders.
Why is my crochet circle becoming wavy?
You may have too many increases. Reduce the number of added stitches and check the piece after every round.
Why does my motif curl into a bowl shape?
There may be too few increases, or your tension may be particularly tight.
Do I need to block the squares?
Blocking is strongly recommended because it helps make the motifs uniform and easier to join.
Should I line the bag?
You do not have to, but lining provides structure and prevents small objects from passing through openings between stitches.
How do I keep crochet handles from stretching?
Use dense stitches and reinforce them with cotton cord, fabric webbing, or another non-stretch material.
Can I make a shoulder bag instead?
Yes. Replace the two short handles with one longer strap and reinforce the attachment points carefully.
Can the bag be made in one color?
Certainly. A monochromatic version emphasizes the raised texture of the circular motifs and can create a very elegant result.
Conclusion
The Beginner Bag Pattern is an enjoyable way to turn basic crochet skills into a colorful, practical accessory. The project looks sophisticated because of its radial motifs and geometric assembly, yet the construction can be approached one square at a time. That makes it particularly useful for crocheters learning how individual motifs can be transformed into larger three-dimensional projects.
The combination of a cream framework and vibrant color-wheel centers gives this crochet granny square bag its distinctive personality. Blue, turquoise, mint, yellow, coral, red, green, and purple can all be incorporated without making the finished design feel chaotic because the neutral border visually connects the motifs.
Take your time with the first square, record your stitch counts, and use it as the reference for all remaining pieces. Careful blocking, strong joins, reinforced handles, and an optional fabric lining will make a major difference in the durability and appearance of the finished handbag.
PATTERN VIDEO:
Most importantly, treat the pattern as a starting point rather than a rigid formula. Change the colors, increase or decrease the number of squares, lengthen the handles, add a closure, include interior pockets, or use leftover yarn from previous projects. Once you understand the basic construction, this Beginner Bag Pattern can be adapted into many different handmade bags while helping you practice some of the most useful techniques in crochet.