
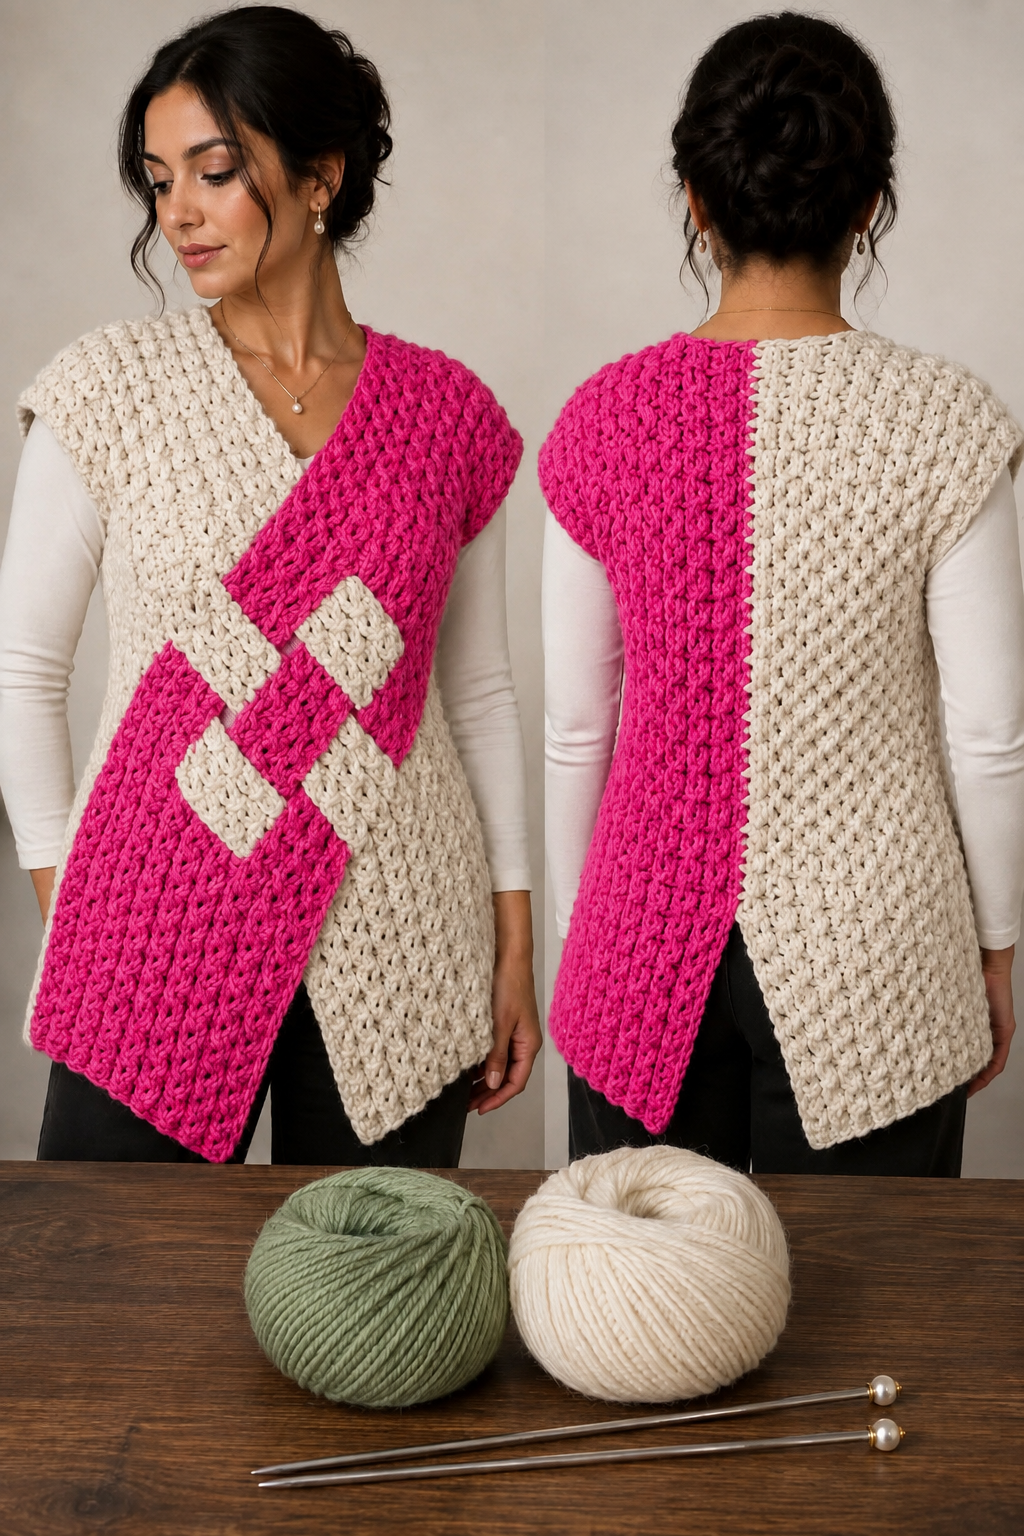
Cable-Knit Sweater Pattern is a cozy, modern garment project that combines bold texture, oversized comfort, and an eye-catching two-tone construction. Inspired by the reference design, this sleeveless wrap-style sweater features long textured panels that cross dramatically across the front, creating a relaxed layered look that can be worn over a fitted shirt, blouse, or lightweight sweater. Although the finished texture resembles traditional knitted cables, this version can be recreated with crochet cable techniques and post stitches, making it an interesting project for crocheters who enjoy textured garments.
The most distinctive feature of this Cable-Knit Sweater Pattern is its unconventional construction. Instead of creating a traditional fitted sweater with separate sleeves, the garment is built from wide elongated panels. These sections travel over the shoulders and down the body, with the front panels crossing over one another. Small woven or interlocking sections near the center help create the decorative lattice appearance shown in the inspiration. The back remains relatively straight, allowing the contrasting panels to create a striking vertical color-block effect.
This project is especially suitable for intermediate crocheters because the basic garment shapes are relatively straightforward while the texture provides an opportunity to practice front post double crochet, back post double crochet, crossed post stitches, cable-style crochet, seaming, and garment sizing. The measurements below are customizable, so the sweater can be adapted for different body sizes and desired lengths. The goal is not a tightly fitted garment; a little positive ease helps create the soft, comfortable drape visible in the finished design.
Materials, Measurements, and Crochet Cable Stitches
For this Cable-Knit Sweater Pattern, a soft bulky #5 yarn is an excellent choice because it creates the thick, prominent texture shown in the reference project. A heavy worsted #4 yarn can also work if you prefer a slightly lighter garment. Choose yarn with enough stitch definition to make the raised cable texture clearly visible.
DISCOVER MORE FREE PATTERNS HERE!
For an adult medium-sized version, plan for approximately 1,300–1,800 yards (1,190–1,645 m) of yarn in total. If making a two-color sweater, you might use approximately 55% of the yarn for the dominant color and 45% for the contrasting section. Larger or longer versions will naturally require additional yarn.
A 6.0 mm to 8.0 mm crochet hook is a practical starting range, depending on the selected yarn. Always create a gauge swatch before beginning. The fabric should be thick and textured but still flexible enough to fall comfortably around the shoulders.
You will also need scissors, a yarn needle, stitch markers, measuring tape, and optional blocking mats. Stitch markers are particularly helpful when identifying shoulder positions, panel intersections, and the points where the front sections will cross.
Useful U.S. crochet abbreviations include ch – chain, sc – single crochet, hdc – half double crochet, dc – double crochet, FPdc – front post double crochet, BPdc – back post double crochet, sl st – slip stitch, and st – stitch. Crossed FPdc stitches can be used to imitate traditional knitted cable movement.
For a medium garment, consider an approximate finished back width of 20–22 inches (51–56 cm) and a total length of 28–32 inches (71–81 cm). Each front panel can measure approximately 9–11 inches (23–28 cm) wide. These measurements are guidelines rather than strict requirements because the design is easy to customize.
Crocheting the Textured Back and Shoulder Panels
Begin the Cable-Knit Sweater Pattern by determining the desired finished length. Measure from the shoulder to the point where you want the garment to end. The reference design falls around the upper thigh, giving it the appearance of a long sweater vest.
Chain enough stitches to obtain approximately 9–11 inches (23–28 cm) of panel width. Work one foundation row of double crochet or foundation double crochet. Check the width before proceeding because this measurement determines how substantial the crossed front panels will appear.
For a simple cable-inspired texture, alternate sections of FPdc and BPdc. For example, work four FPdc, four BPdc, and repeat across the row. On subsequent rows, follow the established posts so the raised columns remain visible.
To create stronger cable movement, cross groups of post stitches periodically. Skip two posts, work FPdc around the following two posts, and then carefully work FPdc around the two skipped posts. This produces a raised crossing effect reminiscent of a knitted cable.
Repeat the textured sequence until the first panel reaches the required length from the lower front, across the shoulder, and toward the back. Because this garment uses elongated panels, regularly place the work against your body or a garment with similar dimensions to evaluate the length.
Create the contrasting panel in exactly the same manner. In the pictured concept, a vivid pink and warm cream create a dramatic division. Other attractive combinations include navy and ivory, burgundy and oatmeal, sage and cream, charcoal and blush, mustard and beige, or two shades of the same color.
Creating the Crossed Front and Decorative Woven Detail
The crossed front is what gives this Cable-Knit Sweater Pattern its distinctive personality. Instead of simply allowing two straight panels to hang beside one another, position them diagonally across the torso.
Place the first panel over one shoulder and bring it toward the opposite side of the body. Position the second panel in the opposite direction. Experiment with the overlap before permanently joining anything.
The neckline should remain comfortable and open. Avoid pulling the panels tightly against the neck. A relaxed V-shaped opening approximately 7–10 inches (18–25 cm) deep generally works well for this style.
The decorative woven section can be created using narrower crocheted strips. Crochet approximately four short strips measuring around 2–3 inches (5–7.5 cm) wide and 6–8 inches (15–20 cm) long. Use the same textured stitch or a dense half double crochet.
Arrange these strips through openings between the crossed panels, alternating over and under to imitate a woven lattice. Secure the ends invisibly to the wrong side with yarn and a tapestry needle.
Try the garment on before completing the seams. The crossed panels should remain secure without restricting movement. Make small adjustments to their position until both sides look balanced and the lower edges hang naturally.
Assembly, Edging, Sizing, and Professional Finishing
Once the front placement is established, lay the Cable-Knit Sweater Pattern flat with the wrong side facing upward. Align the shoulder and back sections carefully.
Join the panels along the center back where required. A mattress stitch produces an understated seam, while slip-stitch joining creates a firmer structural line. Keep the tension relaxed so the seam does not shorten the garment.
The back should display two long vertical sections, creating the attractive color-block effect visible in the inspiration. Check that both sections have approximately equal finished lengths before securing all yarn tails.
Finish the neckline with one or two rounds of single crochet. Work evenly around the opening without adding excessive stitches. Too many stitches can cause the neckline to ripple, while too few may make it pull inward.
The arm openings can also be finished with single crochet or reverse single crochet. A simple border gives the heavily textured garment a cleaner visual edge without competing with the cable design.
Finally, gently block the sweater according to the yarn manufacturer’s care recommendations. Blocking helps straighten the long panels, relax the seams, improve the cable definition, and give the finished crochet sweater vest a more polished appearance.
FAQ About the Cable-Knit Sweater Pattern
Is the Cable-Knit Sweater Pattern knitted or crocheted?
The visual inspiration resembles cable knitting, but this tutorial recreates the effect using crochet cable stitches and post stitches.
What skill level is recommended?
Intermediate is ideal. Crocheters comfortable with double crochet and post stitches should be able to learn the cable sections with practice.
What is FPdc?
Front post double crochet is worked around the vertical post of the stitch below rather than through its top loops. This pushes the stitch forward and creates raised texture.
What is BPdc?
Back post double crochet is worked around the post from behind, causing the stitch to recede relative to FPdc.
How do crochet cables work?
Crochet cables are generally created by working post stitches out of their normal sequence so that groups visually cross over one another.
What yarn works best?
A bulky #5 yarn with good stitch definition is an excellent option for achieving the chunky appearance shown in the inspiration.
Can I use worsted-weight yarn?
Yes. A #4 yarn creates a lighter garment, although you will need to adjust your stitch count according to gauge.
How much yarn will I need?
Approximately 1,300–1,800 yards is a reasonable starting estimate for an adult garment, depending on size, length, yarn thickness, and stitch density.
Can I make the sweater longer?
Absolutely. Simply add additional rows to the long panels before assembly.
Can I make it shorter?
Yes. Reduce the number of rows equally on corresponding sections.
How do I adjust the pattern for a larger size?
Increase the width of each panel and adjust the overall back width according to the wearer’s bust measurement and preferred ease.
How much positive ease should I add?
Approximately 4–8 inches (10–20 cm) of positive ease works well for a relaxed garment, although personal preference should determine the final fit.
Does this sweater need sleeves?
No. The inspiration is designed as a sleeveless sweater vest, making it easy to layer over long-sleeved tops.
Can beginners make this pattern?
An adventurous beginner can attempt it after practicing FPdc and BPdc on a swatch. The garment construction itself is less complicated than a fitted sweater with sleeves.
Why are my cables difficult to see?
Very fuzzy yarn, loose tension, or insufficient contrast between raised and recessed stitches can reduce cable definition.
Why is my panel getting narrower?
You may accidentally be skipping stitches around the cable sections. Count your stitches after every few rows.
Can I make the sweater in one color?
Yes. A monochromatic version can look particularly elegant because the texture becomes the main decorative element.
What colors work well together?
High-contrast combinations highlight the unusual construction, while neighboring shades produce a subtler appearance.
Should I block the finished sweater?
Yes. Light blocking can dramatically improve the drape and definition of textured crochet garments.
Can I modify the front crossing?
Yes. You can create a shallow overlap for a traditional vest appearance or a deeper diagonal crossing for a more dramatic wrap effect.
Conclusion
The Cable-Knit Sweater Pattern offers an interesting way to combine the appearance of classic cable knitting with practical crochet techniques. Its oversized texture, long silhouette, contrasting panels, and dramatic crossover front transform relatively simple geometric construction into a distinctive wearable garment.
The key to achieving the look is choosing yarn with excellent stitch definition. A soft bulky-weight yarn allows FPdc, BPdc, and crossed post stitches to stand prominently above the surface while providing the substantial texture associated with cozy cable sweaters.
Before making the complete garment, crochet a generous swatch. Measure your gauge, practice the cable repeat, wash or block the swatch, and then calculate the number of stitches needed for your desired panel width. This small preparation can prevent significant sizing problems later.
The two-tone design also provides plenty of room for personalization. Bright pink and cream create a bold contemporary appearance, while neutral shades can make the Cable-Knit Sweater Pattern feel more classic. Earth tones, jewel colors, pastels, or even scrap-yarn combinations can produce completely different interpretations.
Pay special attention to the crossover placement before sewing. Temporarily pin or mark the panels, try the garment on, and check the neckline, arm openings, overall length, and ease. Only after you are satisfied with the fit should the woven sections and permanent seams be secured.
With carefully measured panels, consistent crochet cable stitches, balanced front crossing, neat edging, and thoughtful finishing, this Cable-Knit Sweater Pattern becomes a cozy statement garment that combines dramatic texture with an approachable construction method.