
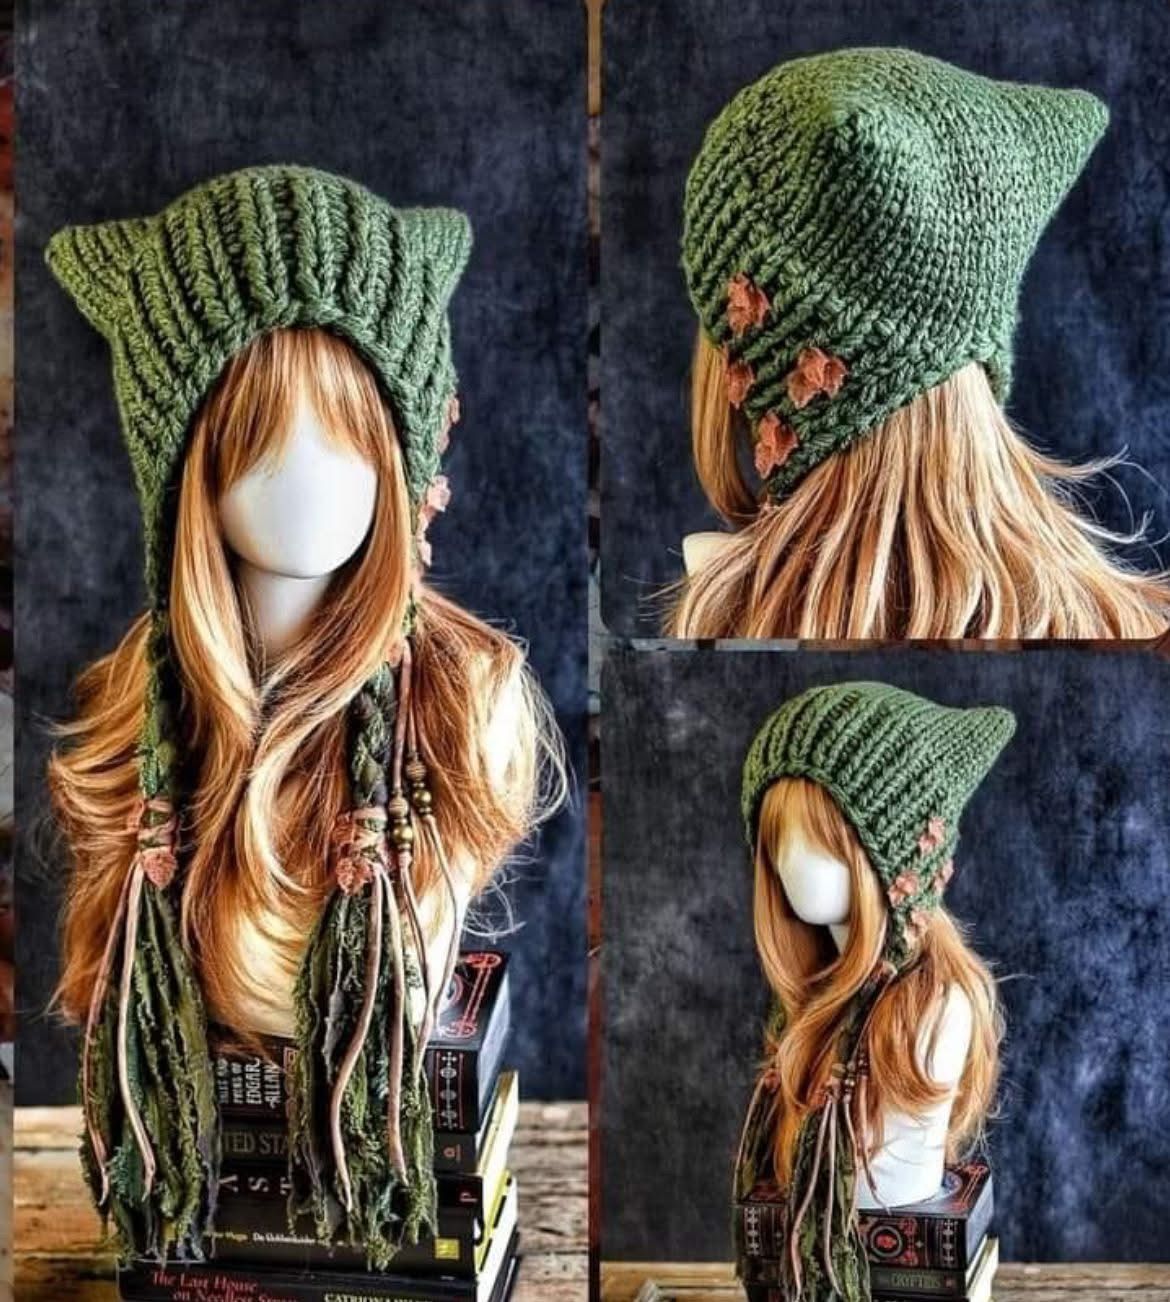
Cat Hat Pattern is a creative crochet project that combines the warmth of a hood, the playful shape of cat ears, and the relaxed handmade appearance of a long winter accessory. Inspired by the green hood shown in the reference image, this design features a beautifully textured crochet fabric, pointed ears formed naturally at the top, extended sides that frame the face, and optional decorative flowers and long ties. It is an excellent project for crocheters who enjoy crochet hats, cat ear hats, hooded scarves, textured crochet stitches, and handmade winter accessories.
One of the most attractive details of this Cat Hat Pattern is its simple construction. Instead of creating complicated three-dimensional ears separately, the upper portion can be shaped so that the corners naturally become pointed when the hood is worn. Ribbed or highly textured crochet stitches make those points more defined while giving the entire project the cozy appearance visible in the inspiration photo. The result is somewhere between a crochet cat hat, a bonnet, and a hood, making it a versatile accessory for fall and winter.
The pattern can also be customized easily. Olive or sage green creates the earthy woodland appearance shown in the photo, while black, gray, cream, burgundy, lavender, dusty rose, or multicolored yarn can completely change its personality. Small crochet flowers can be attached along the sides, and long ties can be decorated with tassels, beads, leaves, or additional flowers. The instructions below use U.S. crochet terminology and provide a practical framework that can be adjusted to your own measurements.
Materials, Measurements, and Crochet Stitches for the Cat Hat Pattern
For this Cat Hat Pattern, choose a medium worsted weight #4 yarn or a slightly heavier aran weight yarn if you want a thick winter hood. Approximately 350–500 yards (320–460 m) should be enough for most adult sizes, including the long decorative ties. Extra yarn may be needed for very long extensions or an oversized hood.
DISCOVER MORE FREE PATTERNS HERE!
A 5 mm (H-8) crochet hook is a useful starting size for worsted yarn. If your stitches are naturally tight, try a 5.5 mm hook. If they are loose, a 4.5 mm hook may provide better structure. The goal is to create fabric that is flexible enough to drape comfortably but firm enough to maintain the pointed cat-ear shape.
You will also need scissors, a yarn needle, stitch markers, a flexible measuring tape, and optional contrasting yarn for flowers. Wooden beads can be added to the ties for decoration, but simple tassels or crocheted embellishments are equally attractive.
The main U.S. crochet abbreviations used in this pattern are ch – chain, sc – single crochet, hdc – half double crochet, dc – double crochet, sl st – slip stitch, BLO – back loop only, and FO – fasten off. Working stitches through the back loop is particularly useful for producing the raised ribbed texture visible in the reference.
For an average adult size, aim for a finished hood width of approximately 10–11 in (25–28 cm) when laid flat. The hood depth from forehead to back can measure approximately 12–14 in (30–36 cm). These dimensions should be treated as adjustable guidelines because head sizes and preferred fits vary.
Before beginning the full crochet cat hood, make a small gauge swatch. A useful approximate gauge is 14–16 hdc stitches across 4 in (10 cm), although matching the desired finished measurements is more important than matching an exact stitch count.
Crocheting the Main Hood and Creating the Cat Ear Shape
Begin the Cat Hat Pattern by making a foundation chain long enough to reach from the front edge of the hood toward the back while allowing sufficient depth for the pointed upper section. For many adult sizes, approximately 40–46 chains with worsted yarn will provide a useful starting point.
Row 1: Hdc in the second or third chain from the hook according to your preferred turning-chain method. Work 1 hdc in each chain across. Ch 1 or ch 2 and turn.
Row 2: Work 1 hdc BLO in every stitch across. Working through the back loops produces raised horizontal ridges that give the hood the strong textured appearance seen in the reference photograph.
Repeat Row 2 until your rectangular panel is wide enough to wrap comfortably around the upper head. Depending on gauge, approximately 40–50 rows may be required. Instead of relying entirely on row count, periodically hold the panel around the head or compare it with your measurements.
Once the rectangle has reached the desired size, fold it so the two short upper edges meet. Using a yarn needle or slip stitches, seam the back/top portion securely. Keep the seam neat because this construction creates the characteristic hood shape.
When the hood is turned right side out, gently push the two upper corners outward. These corners naturally become the cat ears. This method eliminates the need to crochet separate triangular ears and gives the hat a clean, sculptural silhouette.
Try the hood on and adjust the points with your fingers. If you want sharper ears, add a few discreet stitches inside each corner to hold the fold. For softer ears, simply allow the corners to form naturally.
Adding the Face Border, Long Ties, and Decorative Flowers
Once the main hood is complete, join the same yarn near one lower front corner. Work single crochet evenly around the face opening. Place stitches carefully so the border does not become too tight or begin to ripple.
Work another one or two rounds of sc if you want a thicker border. For an especially textured appearance, the final round can be worked in reverse single crochet or another simple decorative edging.
The long sides visible in the inspiration are one of the most distinctive elements of this Cat Hat Pattern. At each lower corner, attach yarn and create a long chain approximately 24–35 in (61–89 cm), depending on how dramatic you want the hanging sections to appear.
Work slip stitches or single crochet back along the chain to create a stronger cord. Alternatively, crochet several narrow cords of different lengths and attach them together for a layered woodland appearance.
Small flowers can be added along the sides of the hood. To make a simple crochet flower, begin with a magic ring. Work ch 2, 2 dc, ch 2, sl st into the ring and repeat five times. Pull the ring closed and fasten off. This creates five soft petals.
Make three to six flowers in dusty pink, peach, cream, burgundy, or another contrasting shade. Sew them securely near one or both sides of the hood. Small crocheted leaves can also be added using green yarn.
Finish the long cords with tassels, small crochet flowers, or leaves. If the accessory is intended for an adult, decorative beads may also be incorporated. Keep embellishments securely attached and select finishing details appropriate for the intended wearer.
Finishing, Sizing, and Customizing Your Crochet Cat Hat
After completing all crochet sections, weave every yarn tail securely into the wrong side using a yarn needle. Because the hood may be stretched while being worn, weave the ends in several directions rather than simply trimming them close to the fabric.
Lightly block the finished crochet cat hat according to the yarn manufacturer’s care instructions. For acrylic yarn, gentle steam held safely above the fabric can help relax the stitches. Avoid excessive heat because acrylic fibers can be permanently altered.
For wool or wool-blend yarn, wet blocking can help define the ribbing beautifully. Shape the hood while damp, paying particular attention to the two pointed upper corners. Allow it to dry completely before wearing.
To make a smaller version, reduce both the initial chain length and the number of rows. For a larger or more relaxed hood, increase the depth and width gradually. Measuring the intended wearer is the most reliable way to achieve a comfortable fit.
You can also experiment with different stitch textures. Half double crochet in the back loop creates attractive ribbing, while front-post and back-post stitches can create deeper vertical texture. Single crochet produces a denser hood, and double crochet creates a softer, lighter fabric.
Color changes provide another easy customization. Forest green with dusty pink flowers creates a woodland style similar to the inspiration. Black with purple details produces a dramatic cat look, cream with blush flowers feels romantic, and psychedelic multicolored yarn can transform the same Cat Hat Pattern into a bold statement accessory.
FAQ About the Cat Hat Pattern
Is the Cat Hat Pattern suitable for beginners?
An adventurous beginner should be able to complete it. The main techniques are chains, half double crochet, back-loop crochet, simple seaming, single crochet edging, and basic decorative flowers.
What crochet terminology does this pattern use?
The instructions use U.S. crochet terms.
What yarn weight works best?
A worsted weight #4 yarn is an excellent starting choice. Aran yarn can also be used for a thicker hood.
What hook size should I use?
Start with approximately a 5 mm (H-8) crochet hook and adjust according to your yarn, gauge, and desired fabric density.
How much yarn will I need?
Approximately 350–500 yards (320–460 m) should be sufficient for many adult versions. Long decorative cords and extensive embellishments may require additional yarn.
Do I need to crochet the cat ears separately?
No. One of the easiest construction methods is to shape the main hood so the two upper corners naturally form pointed cat ears.
How do I make the ears more pointed?
Shape the upper corners carefully and add a few hidden stitches inside each corner if additional definition is required.
Can I make the hood without flowers?
Absolutely. The flowers are optional decorations and can be omitted for a simpler design.
Can I make the ties shorter?
Yes. The long ties are decorative. Make them as short or long as you prefer.
Can I use chunky yarn?
Yes, but you will need to reduce the stitch and row counts because chunky yarn produces a substantially larger fabric.
What is the best stitch for the ribbed texture?
Half double crochet worked in the back loop only (hdc BLO) is a simple way to produce pronounced crochet ridges.
Can I make this hat in black?
Yes. Black would create a classic cat-inspired look. Gray, cream, orange, purple, burgundy, and multicolored yarn are also excellent options.
How can I make a psychedelic version?
Use a highly variegated yarn with bright pink, purple, turquoise, orange, yellow, and electric blue. A self-striping yarn works particularly well because the ribbed construction emphasizes every color change.
Can the pattern be adjusted for different head sizes?
Yes. Adjust the length of the foundation chain for hood depth and change the number of rows for circumference and overall width.
Should I block the finished hat?
Light blocking is recommended because it helps even the stitches and gives the pointed ears a cleaner shape.
Conclusion
The Cat Hat Pattern is a distinctive crochet project that turns a relatively straightforward textured hood into a charming cat-inspired winter accessory. By combining a ribbed main panel, simple seaming, pointed upper corners, a neat face border, and long decorative ties, you can create the recognizable silhouette without complicated shaping.
Using approximately 350–500 yards (320–460 m) of worsted weight yarn and a 5 mm crochet hook provides a practical starting point for an adult-sized version. The measurements can then be customized according to the wearer, yarn thickness, and desired fit.
Decorative details make this project especially versatile. Small crochet flowers can create the woodland-inspired style shown in the reference, while tassels, leaves, contrasting borders, or multicolored yarn can produce completely different interpretations. Even without embellishments, the two pointed corners immediately give the hood its playful cat character.
VIDEO PATTERN
Whether you choose earthy green, classic black, soft pastels, or intensely colorful yarn, this Cat Hat Pattern offers plenty of room for creativity while using approachable crochet techniques. It is a cozy handmade accessory and an enjoyable way to practice ribbed crochet, hood construction, edging, simple flowers, and finishing techniques in one project.