
The Crochet Bracelet with Pearls Pattern is a beautiful handmade jewelry project that combines delicate crochet stitches, an elegant floral centerpiece, and decorative pearl-style beads. Inspired by the bracelet shown in the reference image, this design features a sophisticated forest green color, a charming five-petal crochet flower, shiny golden beads, and an adjustable sliding closure. The result is a romantic, vintage-inspired accessory that brings together the beauty of traditional crochet and modern handmade jewelry.
One of the most attractive features of the Crochet Bracelet with Pearls Pattern is its delicate combination of texture and decorative details. The bracelet band has a braided appearance, created with small crochet stitches and carefully selected cotton cord. At the center, a raised flower adds dimension and personality, while golden pearl-style beads provide an elegant contrast against the deep green yarn. The adjustable closure makes the bracelet comfortable to wear and allows the size to be customized for different wrists.
Learning how to crochet a bracelet with pearls is an excellent opportunity to practice small crochet projects, decorative flower construction, bead placement, and adjustable jewelry finishing. Unlike larger crochet projects that require several hours or days, this bracelet can be completed relatively quickly using a small amount of yarn. It is also an excellent project for using leftover cotton thread, experimenting with color combinations, and creating thoughtful handmade gifts.
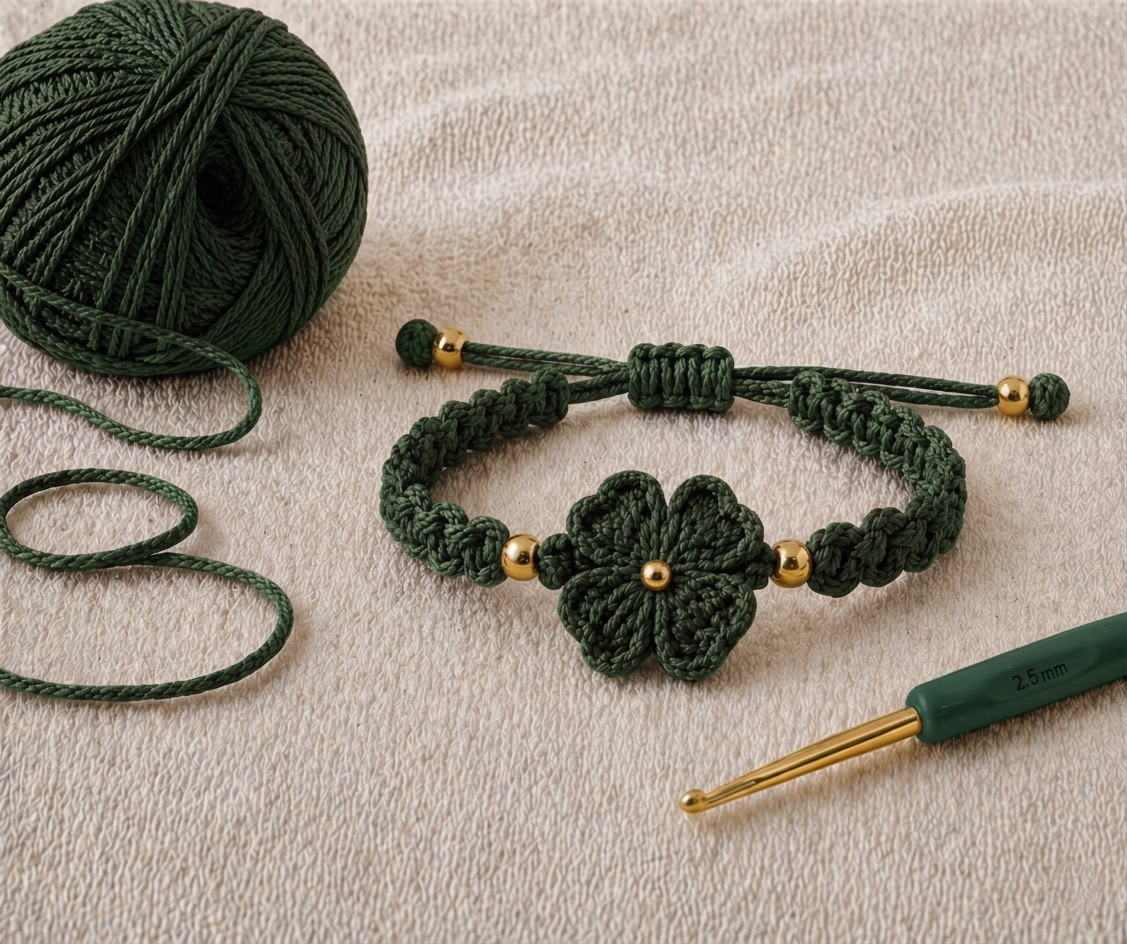
The finished Floral Crochet Bracelet with Pearls in this tutorial is designed for an adjustable wrist circumference of approximately 6–8 inches (15–20 cm). Its lightweight construction makes it suitable for everyday accessories, handmade gift collections, and special occasions. The pattern uses U.S. crochet terminology and includes detailed instructions for creating the bracelet band, crocheting the flower, attaching decorative beads, and finishing the adjustable sliding closure.
DISCOVER MORE FREE PATTERNS HERE!
Materials, Crochet Stitches, and Measurements for the Crochet Bracelet with Pearls Pattern
Before beginning your Crochet Bracelet with Pearls Pattern, gather the materials needed to complete the project. Choosing the correct yarn and hook is especially important because jewelry requires smaller, more precise stitches than traditional crochet accessories.
For a design inspired by the reference image, choose dark forest green mercerized cotton cord. This material creates well-defined stitches and provides a slightly polished appearance.
The golden beads add an elegant finishing touch. Although the reference image uses metallic gold beads, the same design can be made with ivory faux pearls for a softer, more traditional pearl bracelet.
A small crochet hook helps produce compact stitches that maintain their shape during regular use.
Materials needed
- Approximately 15–25 yards (14–23 m) of size 3 crochet cotton or fine braided cotton cord.
- One 2.5 mm crochet hook.
- Two decorative beads measuring approximately 5–6 mm.
- One small bead measuring approximately 3–4 mm for the flower center.
- Two optional beads for the adjustable cord ends.
- Tapestry needle suitable for the chosen cord.
- Small sharp scissors.
- Measuring tape.
- Stitch markers or sewing clips.
- Fine sewing needle and strong matching thread, if required.
- Optional fabric-safe jewelry adhesive for securing hidden cord ends.
- Small jewelry pliers if using beads with narrow openings.
Choose beads with holes large enough to accommodate the cotton cord or the sewing thread used for attachment.
For the most elegant appearance, select beads with a smooth, polished finish.
Finished bracelet measurements
| Component | Approximate Measurement |
|---|---|
| Adjustable Wrist Size | 6–8 in (15–20 cm) |
| Decorative Bracelet Band | 5½–6½ in (14–16.5 cm) |
| Bracelet Band Width | ¼–⅜ in (0.6–1 cm) |
| Crochet Flower Diameter | 1¼–1½ in (3.2–3.8 cm) |
| Sliding Closure Length | ½–¾ in (1.3–1.9 cm) |
| Adjustable Cord Tails | 2–3 in (5–7.6 cm) |
| Crochet Hook | 2.5 mm |
| Skill Level | Confident Beginner |
These measurements are approximate and depend on yarn thickness, stitch tension, and the size of the decorative flower.
The bracelet should fit comfortably around the wrist without feeling tight.
U.S. crochet abbreviations
| Abbreviation | Meaning |
|---|---|
| ch | Chain |
| sl st | Slip Stitch |
| sc | Single Crochet |
| hdc | Half Double Crochet |
| dc | Double Crochet |
| tr | Treble Crochet |
| st | Stitch |
| sts | Stitches |
| sp | Space |
| rep | Repeat |
| FO | Fasten Off |
| MR | Magic Ring |
All crochet instructions in this tutorial use U.S. crochet terminology.
Recommended color combinations
| Bracelet Color | Decorative Beads | Style |
|---|---|---|
| Forest Green | Gold | Vintage Elegant |
| Ivory | Champagne Pearls | Romantic Classic |
| Burgundy | Gold | Sophisticated |
| Dusty Rose | Cream Pearls | Delicate Feminine |
| Navy Blue | Silver | Timeless |
| Lavender | White Pearls | Soft Pastel |
| Emerald Green | Gold | Luxurious |
| Black | Ivory Pearls | Modern Elegant |
The forest green and gold combination closely reflects the reference image and creates a beautiful vintage-inspired appearance.
Before beginning, make a small test chain to check the thickness and flexibility of the cord.
Step-by-Step Crochet Bracelet with Pearls Pattern: Creating the Bracelet Band
The first stage of the Crochet Bracelet with Pearls Pattern involves creating the textured bracelet band.
The reference image features a compact braided appearance, so this tutorial uses a narrow crochet strip that can be shaped into a decorative wristband.
The band should remain flexible while maintaining enough structure to support the flower and beads.
Step 1: Measure the wrist
Wrap a measuring tape comfortably around the wrist.
Record the measurement.
For an average adult bracelet, use a decorative band length of approximately 5½–6½ inches.
The adjustable closure will provide the additional length needed for fitting.
Leave room for the flower and bead arrangement.
Step 2: Begin the crochet band
Make a slip knot.
Chain 4.
Row 1: Work 1 sc into the second chain from the hook and into each remaining chain.
You should have 3 sc.
Chain 1 and turn.
Step 3: Create the textured rows
Row 2: Work 1 sc into the back loop only of each stitch.
Chain 1 and turn.
Repeat Row 2.
The back-loop stitches create subtle ridges that resemble braided cord.
Keep the tension even.
Step 4: Continue the bracelet band
Continue crocheting the textured rows until the band reaches the desired length.
Measure the band occasionally.
Avoid stretching the fabric while measuring.
The finished strip should remain narrow and flexible.
Keep the edges straight.
Step 5: Prepare the bracelet ends
When the band reaches the required length, fasten off.
Leave a long yarn tail for finishing.
Repeat the process if you prefer making two separate band sections with the flower positioned between them.
For the easiest construction, use one continuous band and attach the flower at the center.
Step 6: Shape the finished band
Place the crochet strip on a flat surface.
Smooth the edges gently.
Check the width and length.
If necessary, lightly steam-block the strip without stretching it.
Allow the crochet fabric to dry completely.
The completed Crochet Bracelet Band should be narrow, flexible, and neatly textured, ready for the decorative flower and beads.
How to Crochet the Five-Petal Flower and Add the Pearl Beads
The floral centerpiece is the most decorative feature of the Crochet Bracelet with Pearls Pattern.
The reference image shows a raised five-petal flower in matching dark green cotton, decorated with a small golden bead at the center.
This tutorial uses a simple flower construction that creates five rounded petals.
Step 1: Begin the flower center
Using the same forest green cotton cord, make a magic ring.
Work 10 sc into the ring.
Pull the ring closed.
Join with a sl st to the first sc.
You should have 10 sc.
Step 2: Create the first petal
Chain 2.
Work 3 dc into the next stitch.
Chain 2.
Slip stitch into the following stitch.
This creates the first rounded petal.
Keep the stitches relaxed enough to form a soft curve.
Step 3: Crochet the remaining petals
Repeat the petal sequence four more times around the flower center.
Each petal uses two stitches from the original round.
Continue until all five petals are complete.
Join with a slip stitch.
Fasten off, leaving a long sewing tail.
Step 4: Shape the flower
Place the flower on a flat surface.
Arrange the five petals evenly.
Gently shape each petal with your fingers.
Check that the flower is symmetrical.
If necessary, lightly steam-block the flower.
Allow it to dry before adding the beads.
Step 5: Attach the center pearl
Thread a sewing needle with strong matching thread.
Position the small golden bead at the center of the flower.
Sew through the bead and crochet center several times.
Secure the thread on the back.
Keep the stitches hidden.
The center bead should sit firmly against the flower.
Step 6: Add the side pearls
Position one decorative bead on each side of the flower.
For a design inspired by the reference image, use two medium-sized golden beads.
Attach the beads securely to the bracelet band using strong thread.
Check that the beads are symmetrical.
Reinforce the stitches.
Trim and secure the thread ends.
The completed Crochet Flower with Pearls should feature five rounded petals, a small central bead, and two decorative side beads.
Adjustable Sliding Closure, Professional Finishing, and Creative Bracelet Designs
The final stage of the Crochet Bracelet with Pearls Pattern involves attaching the flower, preparing the adjustable closure, and finishing the bracelet.
The adjustable sliding closure is especially useful because it allows the bracelet to fit different wrist sizes.
The reference image features two cord ends passing through a small decorative sliding knot.
This tutorial uses a macramé-style square-knot closure to achieve a similar adjustable finish.
Step 1: Attach the crochet flower
Position the flower at the center of the bracelet band.
Check that the petals are facing upward.
Use the long yarn tail to sew the flower securely to the band.
Pass the needle through several stitches.
Keep the sewing thread hidden.
Secure the yarn tail on the back.
Step 2: Prepare the adjustable cords
Cut two lengths of matching cotton cord, each approximately 8 inches (20 cm) long.
Attach one cord securely to each end of the crochet band.
Reinforce the attachment points with several stitches.
Check that the cords are firmly connected.
Trim any loose yarn ends.
Step 3: Position the sliding closure
Overlap the two adjustable cords in opposite directions.
Arrange them so they slide past each other.
Hold the cords together using a small clip.
Cut an additional 8-inch (20 cm) length of cotton cord for the closure.
Position the closure cord beneath the two overlapping cords.
Step 4: Create the sliding square knots
Bring the left end of the closure cord over the two central cords and beneath the right end.
Pass the right end behind the central cords and through the loop on the left.
Tighten gently.
Repeat the process in the opposite direction.
Continue alternating until the closure measures approximately ½–¾ inch.
Step 5: Secure the closure
Tie the closure cord ends securely on the underside.
Weave the ends beneath several knots.
Trim carefully.
Apply a tiny amount of fabric-safe jewelry adhesive if needed.
Allow the adhesive to dry completely.
Check that the two adjustable cords slide smoothly.
Step 6: Finish the adjustable cord ends
Thread a decorative bead onto each adjustable cord end.
Tie a secure stopper knot beneath each bead.
Trim the excess cord.
Check that the beads cannot slip off.
Adjust the bracelet to the desired wrist size.
The completed Adjustable Crochet Bracelet with Pearls should feature a textured green band, decorative flower, golden beads, and a smooth sliding closure.
Beautiful Color Combinations for Crochet Bracelets with Pearls
A forest green and gold Crochet Bracelet with Pearls creates an elegant vintage appearance similar to the reference image. The rich green cord and polished golden beads offer a sophisticated handmade design.
An ivory and champagne Crochet Bracelet with Pearls produces a romantic classic style. Cream-colored crochet thread combined with champagne pearls creates a delicate accessory suitable for special occasions.
A burgundy and gold Crochet Bracelet with Pearls offers a luxurious vintage appearance. Deep wine-colored cotton paired with gold beads creates a rich and elegant combination.
A dusty rose and cream Crochet Bracelet with Pearls creates a soft feminine design. The delicate pink shade works beautifully with ivory pearls and a matching crochet flower.
A navy blue and silver Crochet Bracelet with Pearls offers a timeless and sophisticated appearance. Dark blue cotton combined with silver beads creates an elegant accessory suitable for everyday wear.
A lavender and white Crochet Bracelet with Pearls produces a delicate pastel variation. Soft purple cotton and white faux pearls create a charming handmade bracelet.
Helpful Tips for Crocheting a Beautiful Bracelet with Pearls
Choose high-quality mercerized cotton or fine braided cord. These materials create defined stitches and help the bracelet maintain its shape.
Use a small crochet hook for compact stitches. A 2.5 mm hook works well with many fine cotton cords, although the ideal size depends on the yarn.
Keep the stitch tension consistent. Even tension helps create a smooth bracelet band and symmetrical flower petals.
Attach decorative beads securely. Reinforced stitching helps prevent beads from becoming loose during regular wear.
Test the sliding closure before finishing. The cords should move smoothly without becoming too loose or excessively tight.
Avoid wearing the bracelet during swimming, bathing, or activities that may damage the cotton cord or decorative beads.
Frequently Asked Questions About the Crochet Bracelet with Pearls Pattern
1. Is the Crochet Bracelet with Pearls Pattern suitable for beginners?
Yes. This project is suitable for confident beginners who understand basic crochet stitches and simple jewelry finishing techniques.
2. What is a Crochet Bracelet with Pearls?
A Crochet Bracelet with Pearls is a handmade jewelry accessory combining crocheted cotton cord, decorative beads, and a bracelet closure.
3. What yarn is best for this pattern?
Mercerized cotton thread or fine braided cotton cord is recommended because it creates defined stitches and a durable finish.
4. What crochet hook should I use?
A 2.5 mm crochet hook is recommended for the sample pattern.
5. What size is the finished bracelet?
The suggested adjustable wrist size is approximately 6–8 inches (15–20 cm).
6. Can I make the bracelet larger?
Yes. Crochet a longer bracelet band and adjust the closure cords to fit a larger wrist.
7. Can I make a smaller Crochet Bracelet with Pearls?
Absolutely. Reduce the band length and adjust the sliding closure for a smaller wrist.
8. Can I use real pearls?
Yes. Real pearls can be used if their holes and size are compatible with the chosen attachment method.
9. Can I use golden beads instead of white pearls?
Yes. Golden beads create a beautiful vintage-inspired appearance similar to the reference image.
10. Can I crochet the bracelet without a flower?
Yes. The bracelet can be made with a simple textured band and decorative beads.
11. Can I add more flowers?
Yes. Small crochet flowers can be attached along the bracelet band to create a more decorative design.
12. Can I use different yarn colors?
Yes. Forest green, ivory, burgundy, dusty rose, lavender, navy blue, and emerald green are all beautiful choices.
13. How long does it take to crochet this bracelet?
The time required depends on experience. Many crocheters may need approximately one to three hours to complete the project.
14. How should I clean the finished bracelet?
Gently spot-clean the bracelet with a damp cloth. Avoid soaking delicate beads or using harsh cleaning products.
15. Can I make Crochet Bracelets with Pearls as handmade gifts?
Yes. These bracelets make thoughtful handmade gifts for birthdays, holidays, special occasions, and anyone who appreciates delicate crochet jewelry.
Conclusion
The Crochet Bracelet with Pearls Pattern is a beautiful and creative crochet project that combines delicate stitches, decorative beads, and an elegant floral centerpiece. Its forest green cotton cord, five-petal flower, golden accents, and adjustable sliding closure create a charming handmade accessory inspired by the reference image.
By following the instructions in this tutorial, you can create a lovely Handmade Crochet Bracelet with Pearls using basic crochet techniques, accurate measurements, carefully attached beads, and professional jewelry finishing methods.
One of the greatest advantages of this pattern is its versatility. Elegant forest green and gold designs, romantic ivory and champagne combinations, rich burgundy variations, and delicate pastel arrangements can all be created using the same basic construction.
The finished bracelet is lightweight, adjustable, and comfortable to wear. Its floral centerpiece and decorative pearl-style beads make it suitable for everyday accessories, handmade gift collections, and special occasions.
With consistent stitch tension, careful bead placement, secure finishing, and a smooth adjustable closure, your Crochet Bracelet with Pearls can combine durability with the timeless beauty of handmade crochet jewelry.
Enjoy selecting your favorite colors, experimenting with beautiful vintage combinations, and bringing your own Crochet Bracelet with Pearls Pattern to life through the creative and rewarding art of crochet.