
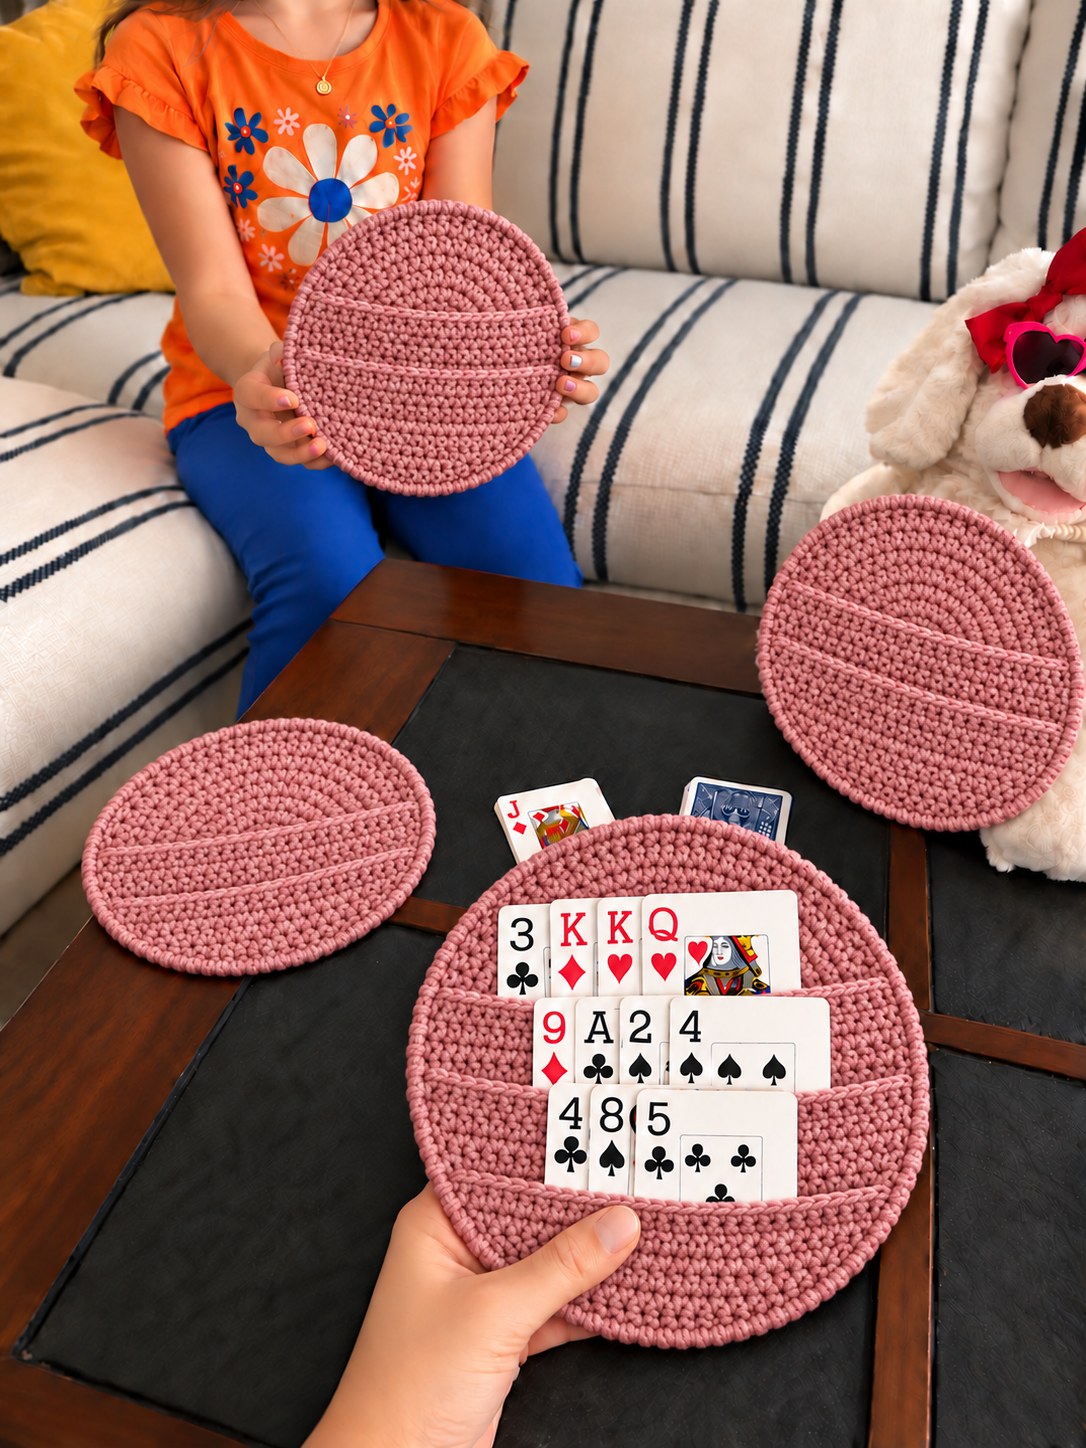
One of the greatest advantages of the Crochet Card Holder Pattern is its simple yet clever construction. The circular base is made using sturdy crochet stitches worked in continuous rounds, while the horizontal pockets are attached to the front surface to create separate compartments for playing cards. This design allows players to organize their hands into multiple rows, making it easier to see the cards and select the next move. The project is especially useful for people who experience hand fatigue or simply prefer keeping their cards displayed on a stable surface. It is also a wonderful gift idea for grandparents, card game enthusiasts, and anyone who appreciates thoughtful handmade accessories.
Creating a Crochet Card Holder is an enjoyable project for crocheters who want to make something both decorative and useful. Unlike complicated garments or large blankets, this accessory requires a relatively small amount of yarn and can be completed with basic crochet techniques. The pattern can be customized with different colors, sizes, and pocket arrangements to suit individual preferences. This tutorial explains the complete process, including recommended materials, measurements, crochet abbreviations, step-by-step instructions, pocket construction, assembly, and finishing techniques. By following these instructions, you can create a beautiful round crochet card organizer inspired by the photograph, with enough structure to hold playing cards securely during your favorite games.
Materials, Measurements, and Basic Crochet Stitches for the Crochet Card Holder
1. Choosing the Best Yarn for Your Crochet Card Holder
DISCOVER MORE FREE PATTERNS HERE!
Selecting the right yarn is essential for creating a sturdy and long-lasting Crochet Card Holder. Cotton yarn is highly recommended because it provides excellent stitch definition, durability, and a firm texture that helps the organizer maintain its circular shape. Medium-weight cotton yarn, commonly classified as worsted weight yarn (Category 4), is a good choice for this project. You can also use cotton-blend yarns, provided they are not overly stretchy. Avoid very soft or fluffy yarns because they may produce pockets that sag or lose their shape after repeated use.
2. Essential Materials and Tools
Before beginning your crochet playing card holder, gather the following supplies:
-
Approximately 100–150 yards (90–137 meters) of worsted-weight cotton yarn.
-
Crochet hook size 4.0 mm (G/6) or a size that produces firm stitches.
-
Yarn needle for sewing and weaving in ends.
-
Stitch markers for tracking rounds.
-
Sharp scissors.
-
Measuring tape or ruler.
-
Optional fabric stiffener suitable for cotton crochet.
-
Optional round plastic canvas insert or thin, firm craft plastic for extra support.
-
Optional non-slip backing material.
-
A standard deck of playing cards for testing pocket sizes.
The dusty rose yarn shown in the image creates a beautiful vintage-inspired appearance, but you can use any color that complements your home or personal style.
3. Recommended Finished Measurements
For a standard round crochet card holder, the following measurements provide a useful starting point.
| Component | Suggested measurement |
|---|---|
| Finished circular diameter | 8.5–9 in (21.5–23 cm) |
| Approximate radius | 4.25–4.5 in (10.8–11.5 cm) |
| Number of card pockets | 3 horizontal pockets |
| Pocket depth | 1–1.25 in (2.5–3.2 cm) |
| Pocket opening width | 5–7 in (13–18 cm), depending on position |
| Recommended yarn weight | Category 4 cotton |
| Crochet hook | 4.0 mm |
| Approximate project time | 3–5 hours |
These dimensions are suggestions based on the style in the photograph. Your finished measurements may vary depending on yarn thickness, hook size, and crochet tension.
4. Understanding the Crochet Abbreviations
This Crochet Card Holder Pattern uses standard United States crochet terminology.
| Abbreviation | Meaning |
|---|---|
| MR | Magic Ring |
| ch | Chain |
| sl st | Slip Stitch |
| sc | Single Crochet |
| hdc | Half Double Crochet |
| dc | Double Crochet |
| inc | Increase (2 sc in the same stitch) |
| BLO | Back Loop Only |
| st(s) | Stitch(es) |
| rnd | Round |
| FO | Fasten Off |
The primary stitch used throughout this project is single crochet (sc). This stitch creates a dense, durable fabric that works especially well for functional accessories. The pattern also uses increases to form a flat circular base.
5. Understanding the Circular Construction
The main body of the Crochet Card Holder is worked from the center outward in a spiral. Each round increases the number of stitches evenly to create a flat circle. The pattern begins with six single crochet stitches in a magic ring, followed by additional increases in subsequent rounds. Using a stitch marker at the beginning of each round makes it easier to track progress. Maintaining consistent tension is particularly important because uneven stitches may cause the circle to curl or ripple.
6. Preparing the Pocket Layout
The horizontal pockets are the defining feature of this crochet card organizer. The design shown in the image uses three overlapping card-support rows across the circular surface. Each pocket should be deep enough to hold the bottom portion of several playing cards while leaving their upper sections visible. Before attaching the pockets, place a few playing cards on the completed circular base to determine the most comfortable spacing. The upper pocket should sit slightly above the center, while the remaining pockets are arranged progressively lower. This creates a layered arrangement that helps players organize their cards.
Step-by-Step Crochet Card Holder Pattern: Creating the Circular Base and Card Pockets
Step 1: Begin the Circular Base with a Magic Ring
Start your Crochet Card Holder by creating a magic ring.
Round 1: Work 6 sc into the magic ring. Pull the ring closed. (6 sts)
Round 2: Work 2 sc in each stitch around. (12 sts)
Round 3: 1 sc, inc; repeat around. (18 sts)
Round 4: 2 sc, inc; repeat around. (24 sts)
Round 5: 3 sc, inc; repeat around. (30 sts)
Round 6: 4 sc, inc; repeat around. (36 sts)
Continue working in continuous rounds, placing a stitch marker in the first stitch of each round.
Step 2: Continue Increasing to Form a Flat Circle
Follow the same increase pattern, adding one additional single crochet between increases with each new round.
Round 7: 5 sc, inc; repeat around. (42 sts)
Round 8: 6 sc, inc; repeat around. (48 sts)
Round 9: 7 sc, inc; repeat around. (54 sts)
Round 10: 8 sc, inc; repeat around. (60 sts)
Continue increasing six stitches per round until the circle measures approximately 8.5–9 inches (21.5–23 cm) in diameter. For example, Round 20 has 120 stitches if you maintain the six-increase progression.
The exact number of rounds depends on your yarn and gauge. If the circle begins to ripple, reduce the frequency of increases. If it cups upward, check whether additional increases are needed.
Step 3: Finish and Reinforce the Circular Base
Once the circle reaches the desired diameter, work one round of single crochet without increases to strengthen the outer edge. For an additional decorative finish, you can work a round of reverse single crochet, also known as the crab stitch. This creates a slightly raised border that helps the circle maintain its shape.
Fasten off and weave in the yarn ends securely. Lay the circle on a flat surface and check that it remains even. If necessary, lightly block the piece according to the yarn manufacturer’s recommendations.
For a firmer organizer, crochet a second matching circle. You can later join the two circles together with a round of single crochet, inserting a thin plastic canvas circle between them.
Step 4: Crochet the Three Horizontal Card Pockets
The card pockets can be made as separate rectangular crochet strips and attached to the front of the circular base.
For the suggested 9-inch holder, prepare three strips:
-
Upper pocket: approximately 5.5 inches (14 cm) wide.
-
Middle pocket: approximately 6.5 inches (16.5 cm) wide.
-
Lower pocket: approximately 7 inches (18 cm) wide.
For each strip, make a foundation chain that measures the required width, then add one turning chain.
Row 1: Work 1 sc into the second chain from the hook and each remaining chain. Ch 1, turn.
Rows 2–6: Work 1 sc in each stitch across. Ch 1 and turn after each row, except the final row.
Continue until the strip measures approximately 1–1.25 inches (2.5–3.2 cm) deep. Fasten off, leaving a long yarn tail for sewing.
The exact number of foundation chains will depend on your gauge. Measure each strip rather than relying on a fixed stitch count.
Step 5: Position and Attach the Card Pockets
Place the completed circular base on a flat surface with the right side facing upward. Arrange the three pocket strips horizontally across the front.
Position the upper strip near the upper-middle portion of the circle, followed by the middle and lower strips. Leave approximately 1–1.5 inches (2.5–3.8 cm) of visible space between their upper edges.
Using a yarn needle and matching yarn, sew the lower edge and both short sides of each strip to the circular base. Leave the upper edge open so playing cards can slide inside.
For a stronger construction, use small backstitches or whipstitches along the attachment points.
Step 6: Test the Card Holder and Make Final Adjustments
Insert several playing cards into each pocket to test the fit. The cards should remain upright enough to be visible while still being easy to remove.
If a pocket feels too loose, add a few reinforcing stitches near its side edges. If the opening is too tight, remove a small section of stitching and adjust the pocket placement.
For added stability, attach a non-slip backing or insert a firm circular support between two crocheted layers. A reinforced base is especially useful when several cards are placed in the organizer simultaneously.
Your handmade Crochet Card Holder is now ready for use.
How to Customize Your Crochet Playing Card Holder for Different Games and Styles
1. Choosing Beautiful Color Combinations
One of the easiest ways to personalize your Crochet Card Holder is through color selection. Dusty rose, as shown in the photograph, creates a soft and sophisticated appearance. Other attractive options include lavender, sage green, navy blue, cream, burgundy, and mustard yellow. You can also create a two-tone version by crocheting the circular base in one color and the pockets in another. For a vintage-inspired look, consider muted shades such as antique pink, olive green, or warm beige. Bright colors can make the organizer more playful and suitable for family game nights.
2. Making a Larger Card Holder for Multiple Cards
Players who enjoy games requiring large hands of cards may prefer a larger crochet playing card organizer. To increase the size, continue adding rounds to the circular base until it reaches approximately 10–11 inches (25–28 cm) in diameter. Adjust the pocket widths accordingly, ensuring they extend far enough across the surface to hold several cards comfortably. A larger organizer may require additional yarn and reinforcement to maintain its shape. Test the layout with actual playing cards before permanently attaching the pockets.
3. Creating a Card Holder for Children
A smaller version of the Crochet Card Holder Pattern can be made for children learning to play card games. Reduce the circular diameter to approximately 7 inches (18 cm) and create two horizontal pockets instead of three. Choose bright, cheerful colors such as yellow, turquoise, coral, or purple. The smaller design is easier for little hands to manage and requires less yarn. For young children, avoid detachable beads, buttons, or other small decorative pieces that could present a choking hazard.
4. Adding Decorative Crochet Borders
A decorative border can make your round crochet card holder look even more polished. Instead of finishing with a simple single crochet round, consider using reverse single crochet or a narrow slip-stitch edging. These techniques create a clean, slightly raised border without adding excessive bulk. You can also work the final round in a contrasting color to highlight the circular shape. Keep the border relatively firm so the organizer remains functional and does not curl around the edges.
5. Making the Card Holder More Rigid
A common challenge when making crochet accessories is maintaining structure. Since the Crochet Card Holder is designed to support playing cards, a firm base is particularly important. Cotton yarn worked with a slightly smaller hook creates a dense fabric that naturally provides some stiffness. For additional support, insert a round piece of plastic canvas between two crocheted circles. Make sure the insert has smooth edges and is completely enclosed. This reinforcement helps the holder remain flat and prevents excessive bending during use.
6. Personalizing the Card Holder as a Handmade Gift
The Crochet Card Holder makes a thoughtful handmade gift for people who enjoy playing cards with family and friends. Consider creating a matching set in coordinating colors for a card club or game-night group. You can also add a small crocheted flower, embroidered initials, or a decorative border to personalize each organizer. Pairing the finished holder with a deck of playing cards creates a practical gift set. Because the project is relatively quick to complete, it is also suitable for holiday gifts, birthdays, and craft fair collections.
Expert Crochet Tips, Common Mistakes, and Care Instructions
1. Maintaining Consistent Crochet Tension
Consistent tension is one of the most important factors when making a Crochet Card Holder. If your stitches are too loose, the circular base may become floppy, and the pockets may stretch excessively. If your stitches are too tight, the circle may curl or become difficult to work. Use a hook size that produces firm but flexible stitches. Take short breaks while crocheting to prevent hand fatigue, and periodically measure your work to ensure the diameter remains consistent.
2. Preventing the Circular Base from Curling
A flat circular base requires evenly distributed increases. If your crochet circle begins curling upward, it may indicate that the stitch count is insufficient for your yarn and tension. If the circle develops waves or ruffles, there may be too many increases. Check your stitch count at the end of each round and compare the fabric against a flat surface. Small adjustments can help correct the shape before the problem becomes more noticeable. Remember that yarn thickness and personal tension affect how the circle behaves.
3. Ensuring the Card Pockets Hold Cards Securely
The pockets should provide enough support to keep playing cards upright without making them difficult to remove. A pocket that is too shallow may allow cards to fall forward, while one that is too deep may hide important card information. For most standard playing cards, a pocket depth of approximately 1–1.25 inches (2.5–3.2 cm) is a useful starting point. Test each pocket with several cards before securing the final stitches. If necessary, adjust the pocket depth or attachment points to improve stability.
4. Choosing the Best Crochet Stitch for Durability
Although many crochet stitches can be used for decorative accessories, single crochet is especially suitable for this project because it creates a dense and sturdy fabric. Half double crochet can be used for a slightly softer texture, but it may produce more stretch. Decorative stitches such as shell stitch or puff stitch can add visual interest, although they may not provide the same structural support. For the best combination of durability and appearance, use single crochet for the main base and pockets, reserving decorative stitches for the outer border.
5. Washing and Maintaining Your Crochet Card Holder
Proper care helps preserve the appearance and functionality of your handmade crochet card holder. If you use washable cotton yarn without a rigid insert, the organizer can generally be hand washed in cool water with mild detergent. Gently reshape the circle and allow it to dry flat. Avoid twisting or wringing the fabric, as this may distort the stitches. If your card holder contains plastic canvas, adhesive, or fabric stiffener, follow the care instructions for those materials. Regularly check the pocket seams and reinforce any loose stitches.
6. Improving the Design Through Practice
Like many crochet projects, the Crochet Card Holder Pattern becomes easier with practice. Your first version can serve as a prototype for testing dimensions, pocket placement, and yarn tension. After completing one organizer, you may discover that you prefer a slightly larger circle, wider pockets, or a different edging technique. These small adjustments can help you create a personalized design that suits your playing style. Experimenting with different yarns and color combinations also allows you to develop your own collection of handmade card holders.
Frequently Asked Questions About the Crochet Card Holder
What is a Crochet Card Holder?
A Crochet Card Holder is a handmade accessory designed to organize and display playing cards. It typically features a crocheted base with pockets that support cards during games.
Is the Crochet Card Holder suitable for beginners?
Yes. The pattern uses basic crochet techniques such as single crochet, increases, and simple rows. Beginners who understand these stitches can complete the project with patience.
What yarn is best for making a Crochet Card Holder?
Medium-weight cotton yarn is recommended because it creates a firm, durable fabric with good stitch definition.
What crochet hook size should I use?
A 4.0 mm crochet hook is a good starting point for worsted-weight cotton yarn. Adjust the hook size if necessary to achieve firm stitches.
How much yarn do I need?
Approximately 100–150 yards (90–137 meters) of yarn is usually sufficient for a standard-sized card holder, depending on your gauge and construction.
How large should a Crochet Card Holder be?
A diameter of approximately 8.5–9 inches (21.5–23 cm) works well for many standard playing card games.
How many pockets should the card holder have?
Three horizontal pockets provide a practical arrangement for organizing playing cards. However, you can make two or four pockets depending on your preferences.
Can I make the card holder without a plastic insert?
Yes. A tightly crocheted cotton base can provide enough structure for casual use. However, a rigid insert can improve stability.
Will the Crochet Card Holder work for Canasta?
Yes. A card holder can be useful for organizing the larger hands often used in Canasta. A wider or larger version may be especially convenient.
Can I use this card holder for Bridge or Rummy?
Absolutely. The design is suitable for many card games, including Bridge, Rummy, and other games played with standard-sized cards.
How do I prevent the pockets from stretching?
Use firm crochet tension, cotton yarn, and secure stitching along the pocket edges. Avoid overly loose stitches.
Can I make the card holder in different colors?
Yes. The project can be customized with solid colors, contrasting pockets, or decorative borders.
How long does it take to crochet a card holder?
Most crocheters can complete a standard version in approximately 3–5 hours, depending on their experience.
Can I sell handmade Crochet Card Holders?
Generally, you can sell items made from your own original crochet designs, subject to applicable laws and any third-party design rights.
Is a Crochet Card Holder a good gift for older adults?
It can be a thoughtful gift for anyone who enjoys playing cards, particularly people who prefer not to hold a large hand of cards for extended periods. However, it should not be considered a medical assistive device.
Can I wash my Crochet Card Holder?
Yes, if the yarn and any internal materials are washable. Hand washing and flat drying are generally recommended for preserving the shape.
Conclusion
The Crochet Card Holder is a wonderful example of how simple crochet techniques can be transformed into a practical and attractive handmade accessory. With its circular shape, sturdy construction, and convenient horizontal pockets, this project provides an elegant way to organize playing cards during family gatherings, card club meetings, and friendly game nights.
By following this step-by-step Crochet Card Holder Pattern, you can create a durable organizer using basic stitches and a relatively small amount of yarn. The project is easy to customize, making it suitable for crocheters who enjoy experimenting with colors, textures, and decorative details.
The dusty rose design shown in the reference image offers a beautiful starting point, but the possibilities are endless. Whether you prefer classic neutral tones, cheerful bright colors, or sophisticated vintage shades, each version can reflect your personal style while maintaining the same useful functionality.
A handmade crochet playing card holder is more than just a decorative craft project. It is a thoughtful accessory that combines creativity, comfort, and everyday usefulness. With careful stitching and a little imagination, you can make a charming organizer that brings handmade beauty to every card game.