
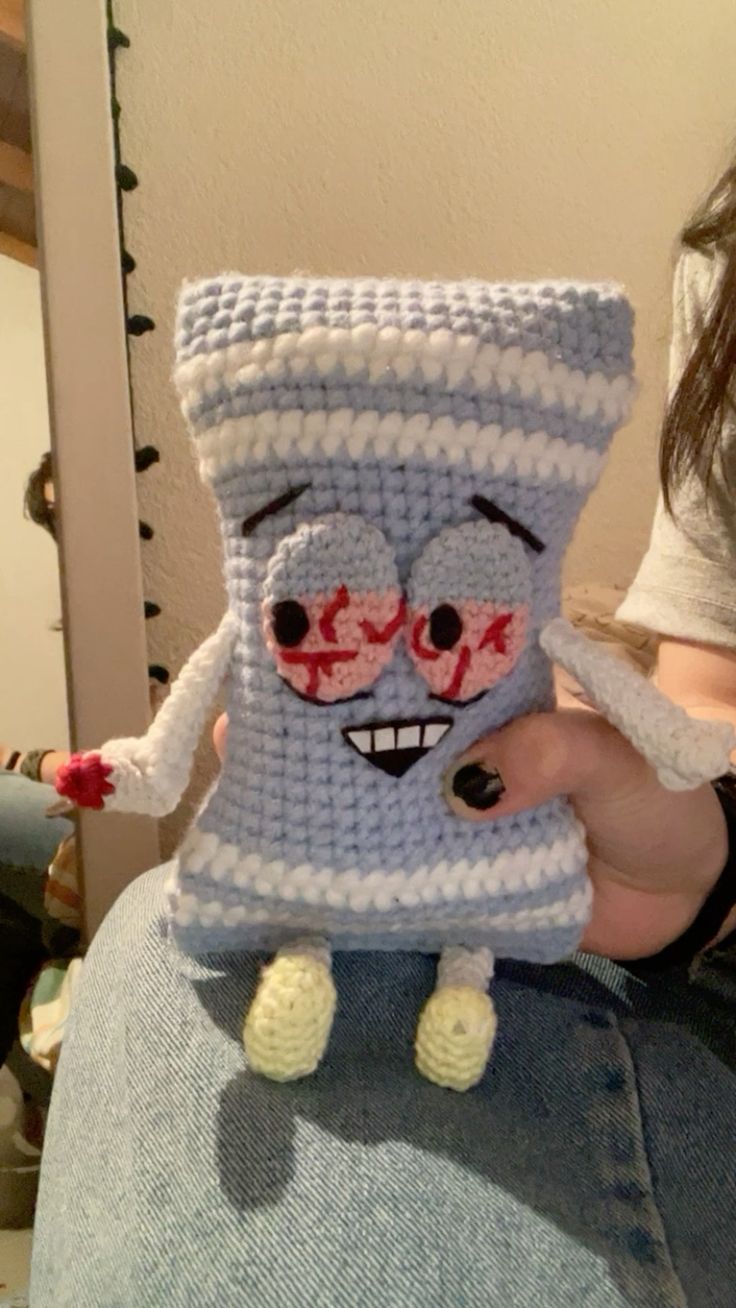
Crochet Character Pillow Pattern is a playful amigurumi-inspired project that combines the soft comfort of a small pillow with the personality of a handmade crochet character. Based on the reference design, this project features a rectangular light-blue body, textured white stripes, oversized dimensional eyes, expressive embroidered details, long flexible arms, small legs, and contrasting feet. The result is a whimsical crochet character cushion that can be displayed on a bed, craft-room shelf, reading chair, or used as a handmade decorative gift.
The charm of this Crochet Character Pillow Pattern comes from its exaggerated features. Instead of creating a complicated body shape, the main pillow is essentially a softly stuffed rectangle. Personality is then added through separate crochet pieces: raised eyes, arms, legs, feet, eyebrows, and facial embroidery. This construction method is useful because each component can be positioned before it is permanently attached, allowing you to adjust the expression and proportions until the character looks balanced.
This tutorial uses U.S. crochet terminology and is written as an adaptable recreation rather than an exact stitch-for-stitch copy of a commercial pattern. A finished character around 12–14 inches (30–36 cm) tall, excluding the legs, makes a comfortable decorative size. You can make a smaller version with DK yarn or create an oversized pillow using bulky yarn. Because the face contains small decorative components, the finished project is best treated as décor unless all features are adapted appropriately for the intended user.
Materials, Measurements and Stitches for the Crochet Character Pillow
For the main body, choose a soft worsted-weight yarn (#4) in light blue or another pastel color. Approximately 350–450 yards (320–410 m) should be enough for a medium pillow, depending on your gauge and finished dimensions. You will also need approximately 80–120 yards (73–110 m) of white yarn for the stripes and limbs.
DISCOVER MORE FREE PATTERNS HERE!
Small amounts of pink, red, black, cream, and pale yellow yarn can be used for the face, hands, and feet. Embroidery thread or thin yarn is useful for the eyebrows, mouth, eye details, and other small accents.
A 3.5–4.0 mm crochet hook works well with worsted yarn when making stuffed crochet projects. The fabric should be firm enough that the stuffing does not show through the stitches. If your crochet is naturally loose, move down one hook size.
You will also need polyester fiberfill, a yarn needle, stitch markers, scissors, straight pins, and optional removable stitch markers for positioning the facial pieces. When creating a decorative version, small felt details can also be used for portions of the mouth.
The main U.S. abbreviations are ch = chain, sc = single crochet, hdc = half double crochet, dc = double crochet, sl st = slip stitch, st = stitch, sts = stitches, inc = increase, and dec = decrease. An increase means working two stitches into the same stitch, while a decrease combines two stitches into one.
For approximately the proportions shown in the reference, aim for a body about 8–9 inches (20–23 cm) wide and 12–14 inches (30–36 cm) tall. The thickness after stuffing can be approximately 3–4 inches (7.5–10 cm).
Gauge is less important than creating a dense fabric. A useful approximate gauge is 16–18 sc × 17–20 rows per 4 inches (10 cm). Make a small swatch before beginning, especially if you want a specific finished size.
There are two practical ways to construct the body. You can crochet two flat rectangular panels and seam them together, or crochet continuously around a foundation chain to produce a pouch-like body. The two-panel method is particularly approachable and makes adding facial pieces easier.
For the two-panel version, ch enough stitches to reach approximately 8–9 inches in width. Work sc across, ch 1, turn, and continue until the panel measures approximately 12–14 inches tall.
Make two identical panels.
To create the striped appearance, alternate several rows of light blue with a narrow white textured stripe. For extra dimension, work the white sections in bobble stitches, puff stitches, or front-loop texture.
Keep both panels identical so the stripes align when the pillow is assembled.
Crocheting the Body, Stripes and Dimensional Eyes
Once both rectangular panels are complete, weave in the color-change tails securely. Lay the panels together and confirm that their widths and heights match.
If one panel is slightly larger, blocking may correct the difference. Avoid aggressively stretching the crochet because this can create openings through which stuffing becomes visible.
Before assembling the body, make the crochet eyes. The oversized eyes are the most distinctive part of this character and should be completed before stuffing the pillow.
Using light blue yarn, begin with a magic ring.
Round 1: Work 6 sc into the magic ring.
Round 2: Work 2 sc in each st around for 12 sts.
Round 3: Sc in next st, inc in next st around for 18 sts.
Round 4: Sc in next 2 sts, inc in next st around for 24 sts.
Continue increasing if you want larger eyes.
Once the circle reaches approximately 2½–3 inches (6.5–7.5 cm) across, work one or two rounds without increases. This creates the slightly raised dome visible in the reference.
Make a second identical eye.
For the lower eye area, crochet or embroider a pink section across part of each eye. Red surface embroidery can then be added to create the exaggerated vein-like details.
A black pupil can be crocheted as a small circle. Begin with a magic ring, work 6 sc into it, then increase to 12 sc if necessary.
Alternatively, embroider the pupils directly onto the eyes.
Before attaching anything permanently, place the eyes on the front body panel.
The two eyes should sit relatively close together and slightly above the vertical center of the pillow.
Pin them temporarily.
Step back and inspect the expression.
Move the eyes until they look balanced.
Add curved black eyebrows above them using surface crochet or embroidery.
The eyebrows can be angled slightly downward toward the center to create the exaggerated expression seen in the reference.
For the mouth, embroider a black curved or triangular outline beneath the eyes. Small white felt or crocheted rectangles can form the teeth.
If this pillow is intended for a young child, avoid glued pieces, buttons, loose felt, or other detachable components. Embroidered facial features are the safer construction choice.
Once you are satisfied with the face, sew each component securely using matching yarn.
Pass through multiple stitches around every piece rather than relying on only a few attachment points.
Making the Crochet Arms, Legs, Hands and Feet
The long narrow arms give this Crochet Character Pillow Pattern much of its personality. They can be worked in continuous rounds like small amigurumi tubes.
Using light blue or white yarn, make a magic ring.
Work 6 sc into the ring.
Continue working 6 sc around without increasing.
The tube will gradually lengthen.
For slightly thicker arms, begin with 8 sc instead.
Continue until each arm measures approximately 7–9 inches (18–23 cm).
Stuff the arms very lightly, or leave them unstuffed if you prefer a flexible dangling appearance.
For the hands, switch to white yarn near the end.
Increase slightly by working 2 sc into several stitches.
Work two or three rounds.
Decrease again to close the hand.
The reference design includes a small contrasting red detail at one hand. You can recreate this as a tiny crocheted flower, heart, pom-pom, or decorative cuff.
Make the second arm in the same manner.
Before attaching them, position one arm on each side of the pillow.
The arms can be sewn approximately halfway down the body or slightly higher.
Secure each arm firmly across several stitches.
The legs are shorter than the arms.
Using white or light-blue yarn, begin with 6–8 sc in a magic ring.
Work evenly until each leg measures approximately 3–4 inches (7.5–10 cm).
Stuff lightly.
For each foot, change to pale yellow, cream, or another contrasting color.
Increase evenly for one round to widen the foot.
Work several rounds without increases.
To create a slightly elongated foot, use decreases primarily around one end rather than closing the piece as a perfect sphere.
Stuff the feet before completing the final decreases.
Fasten off and leave a long tail.
Sew the feet to the legs if they were created separately.
Attach both legs along the lower edge of the body, keeping them approximately symmetrical.
Pin the limbs in place before sewing.
This simple step makes it much easier to check proportions.
For a humorous character, perfect symmetry is not essential. Slight differences between the arms and legs can actually increase the handmade personality.
Once the limbs are securely attached, the body is ready for assembly.
Assembling, Stuffing and Finishing the Character Pillow
Place the front and back panels with wrong sides together if you want a visible decorative crochet seam. Alternatively, place right sides together if you prefer a traditional hidden seam.
Using light-blue yarn, join at one lower corner.
Work sc evenly around the edges, joining both panels together.
Insert the arms into their planned positions as you reach the sides.
Crochet through the body and arm attachment points or reinforce them later with a yarn needle.
Continue around the top and opposite side.
Stop when approximately 4–5 inches (10–13 cm) remain open.
Begin adding polyester fiberfill.
Use small amounts at a time.
Push stuffing carefully into the upper corners first.
Continue filling the center.
The character should feel soft and substantial but not excessively hard.
Overstuffing stretches crochet stitches and can distort the rectangular shape.
Understuffing may make the pillow collapse around the eyes.
A good compromise is a gently rounded rectangle that still compresses easily when squeezed.
Check the front frequently while stuffing.
Adjust the filling behind the eyes so they remain dimensional rather than sinking inward.
Once the shape looks even, finish stuffing the lower corners.
Close the remaining opening with sc or a yarn needle.
Fasten off securely.
Weave the yarn tail deeply into the body.
Massage the stuffing with your hands to redistribute any lumps.
Now inspect the facial features.
If an eye edge lifts away from the body, add several invisible securing stitches.
Check the eyebrows and mouth as well.
Loose embroidery should be reinforced.
If desired, add a final row of surface crochet along one or more white stripes to emphasize the textured appearance.
Small details can dramatically change the character’s personality, so this is also the ideal stage for personalization.
You might embroider freckles, create different eyebrows, add a tongue, use mismatched eye colors, or crochet a miniature accessory.
For a cleaner amigurumi pillow appearance, keep the number of extra details limited and allow the oversized eyes to remain the main focus.
When complete, the finished piece should measure approximately 12–14 inches (30–36 cm) tall through the main body, with the legs extending several inches below.
Quick Assembly Order
- Crochet two rectangular body panels.
- Add the white textured stripes.
- Crochet two dimensional eyes.
- Add pupils and embroidered eye details.
- Embroider eyebrows and mouth.
- Crochet two long arms.
- Make two short legs and contrasting feet.
- Position all components before sewing.
- Join the body panels.
- Stuff gradually.
- Close the final opening.
- Reinforce every decorative attachment.
FAQ – Crochet Character Pillow Pattern
Is the Crochet Character Pillow Pattern suitable for beginners?
A confident beginner can make it. The body uses basic stitches, while the dimensional facial features introduce simple amigurumi techniques.
What terminology does this pattern use?
The tutorial uses U.S. crochet terms.
What yarn is best?
Smooth worsted-weight acrylic or cotton-blend yarn works particularly well because it provides clear stitches and a durable surface.
What hook size should I use?
Approximately 3.5–4.0 mm for worsted yarn, depending on your tension.
How large is the finished pillow?
The suggested body is approximately 12–14 inches (30–36 cm) tall and 8–9 inches (20–23 cm) wide.
Can I make it larger?
Yes. Use bulky yarn and a larger hook or increase the starting chain and number of rows.
Can I make it smaller?
Yes. Use DK yarn with a smaller hook or reduce the body dimensions.
How much stuffing will I need?
Approximately 8–14 oz (225–400 g) of polyester fiberfill is usually sufficient, depending on the finished size and desired firmness.
Can the body be worked in one piece?
Yes. You can crochet a long rectangle, fold it, and seam three sides, although two panels make facial placement particularly convenient.
How do I make textured white stripes?
Use puff stitches, bobbles, front-loop texture, or simply change to white yarn for several rows.
Should the arms be stuffed?
Only lightly. Leaving them flexible creates the dangling appearance shown in the reference style.
Can I use safety eyes?
For decorative projects intended for adults, they are an option. For items intended for babies or very young children, embroidered features avoid detachable eye components.
Why can I see stuffing through my crochet?
Your stitches may be too loose. Try a smaller hook or increase your tension.
Why is my pillow losing its rectangular shape?
Uneven seams or excessive stuffing can distort it. Add fiberfill gradually and distribute it evenly into all four corners.
Can I wash the pillow?
That depends on the yarn, stuffing, and decorative materials used. Always follow the care instructions for your chosen materials.
Can I change the expression?
Absolutely. Changing the eyebrows, pupils, mouth, and eye placement can completely transform the character.
Is gauge essential?
Exact gauge is not essential unless you require specific dimensions, but your stitches should be dense enough to contain the stuffing.
Conclusion
The Crochet Character Pillow Pattern is an entertaining way to combine basic crochet, amigurumi construction, embroidery, and imaginative character design. Its simple rectangular body provides an approachable foundation, while oversized dimensional eyes, textured stripes, expressive facial details, and dangling limbs turn an ordinary crochet cushion into something full of personality.
The project also offers plenty of opportunities for customization. Change the crochet pillow colors, experiment with different expressions, create striped or solid versions, add miniature accessories, or adjust the proportions of the arms and legs. Once the basic construction is understood, the same method can be used to design an entire collection of original crochet characters.
Careful assembly is the key to a polished result. Position the eyes and limbs before attaching them, keep the body stitches firm, add stuffing gradually, and securely weave in every yarn end. These details help the finished amigurumi character pillow maintain its shape and appearance.
Whether displayed in a bedroom, craft room, reading corner, or handmade collection, this Crochet Character Pillow Pattern turns simple stitches into a fun three-dimensional project that is as enjoyable to personalize as it is to crochet.