If you love unique crochet projects that mix creativity and coziness, this Crochet Druid Hood – TUTORIAL is the perfect pattern for you. Inspired by nature and fantasy, this hood combines warmth, texture, and artistry, making it ideal for cold days, festivals, or anyone who enjoys handmade fashion with a touch of magic. Whether you’re a beginner or an experienced crocheter, the Crochet Druid Hood – TUTORIAL will guide you through every step with clear instructions and room for customization. This project isn’t just about creating a hood — it’s about expressing your imagination and crafting a wearable piece of art that feels both comfortable and enchanting.
The Crochet Druid Hood is designed to be practical and stylish, offering full head and neck coverage while maintaining a mystical, draped appearance. It pairs beautifully with coats, dresses, or even fantasy costumes. The design allows flexibility in yarn choice and size, making it adaptable to different seasons and styles. You can create a rustic forest look using earthy tones or go bold with jewel colors for a statement piece.
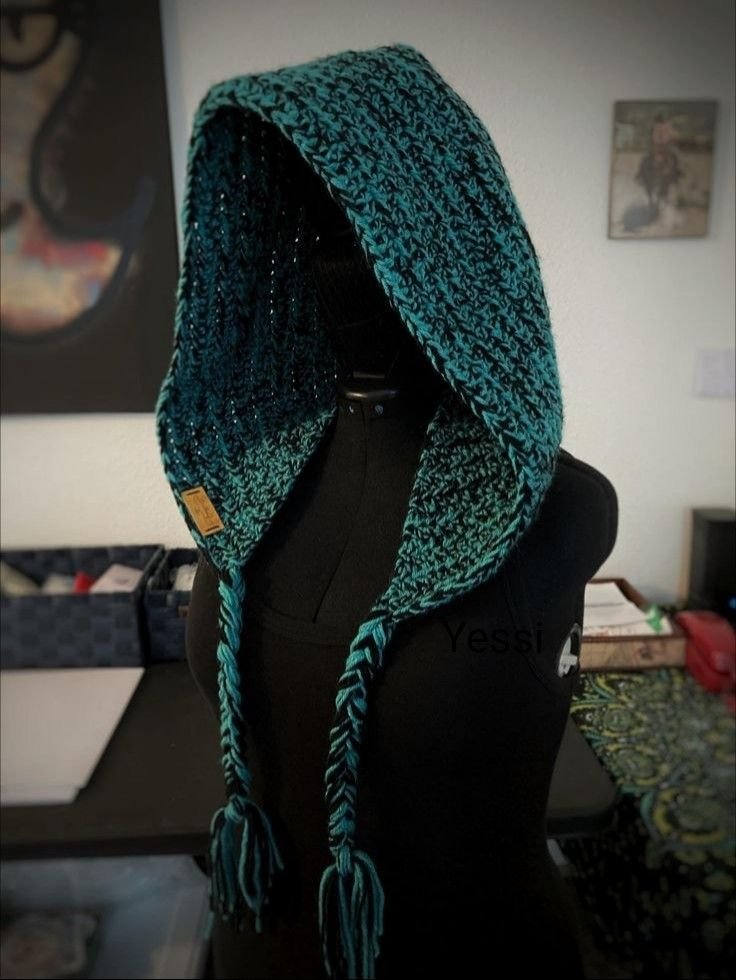
What makes this pattern so rewarding is how versatile it is. The hood can double as a scarf, cowl, or costume accessory. It’s also a wonderful handmade gift that carries a sense of care and magic. Crocheting this piece is a soothing process — perfect for relaxing evenings, creative weekends, or moments of inspiration. Now, let’s dive into how you can make your own using this Crochet Druid Hood – TUTORIAL.
1. Materials and Preparation
Before starting your Crochet Druid Hood – TUTORIAL, gather all your materials to ensure a smooth crocheting process. You’ll need medium or bulky yarn, depending on how thick and warm you want the hood to be. Wool and acrylic blends work perfectly because they hold shape and provide comfort. You’ll also need a crochet hook (usually 5.0 mm to 6.5 mm), scissors, and a tapestry needle for weaving in ends.
DISCOVER MORE FREE PATTERNS HERE!
Choosing the right yarn color sets the tone of your project. For a true druid-inspired look, consider natural shades like moss green, brown, or grey. These colors enhance the mystical aesthetic. If you prefer something more modern, you can use deep purples, blues, or even ombré yarns for a unique touch.
Gauge isn’t crucial in this project, but consistent tension is important to keep your stitches even. If you’re new to crochet, it’s a good idea to practice basic stitches before starting the pattern. The Crochet Druid Hood typically uses half double crochets, double crochets, and front post stitches to create a rich, textured appearance.
Start by making a long rectangular base that forms both the scarf and the hood. This modular construction makes the project beginner-friendly and easy to adjust for any size. Once the rectangle is done, you’ll fold and seam one section to create the hood.
Having stitch markers on hand is helpful for marking your fold lines and ensuring symmetry. Don’t forget to block your piece when finished — it will make the hood drape beautifully. Blocking involves dampening your crochet piece and shaping it as it dries, giving it a professional finish.
Lastly, prepare a cozy spot to work on your project. Crocheting the Crochet Druid Hood can take several hours, so make it enjoyable — grab a cup of tea, play your favorite music, and enjoy the meditative rhythm of each stitch.
2. Step-by-Step Instructions for the Crochet Druid Hood
The foundation of the Crochet Druid Hood – TUTORIAL begins with a chain long enough to wrap comfortably around your neck and shoulders. The number of chains determines how long your hooded scarf will be. Once you’ve chained your base, work in rows of your chosen stitch pattern until the scarf portion is about 10–12 inches wide.
After completing the scarf base, mark the center to begin forming the hood. You’ll crochet upward from the midpoint, building a rectangular panel. This section will fold to form the hood’s shape. Continue working evenly until the hood panel measures approximately 10–12 inches in height.
Fold the panel in half and use a slip stitch or whip stitch to seam the top edge. This creates the signature hood shape. Be sure to check the fit before securing all seams to make sure it’s comfortable and proportional.
Once the hood structure is complete, you can work a border around the entire piece. This not only strengthens the edges but adds a decorative touch. A simple single crochet or crab stitch border gives it a clean look, while a shell stitch or picot border adds elegance.
At this point, your Crochet Druid Hood is ready for customization. Add crocheted leaves, vines, or wooden buttons to capture the druid aesthetic. You can even attach tassels or pom-poms for a whimsical touch.
Finally, weave in all loose ends and block your finished project. This final step enhances the texture and ensures the hood sits perfectly on your shoulders.
3. Creative Styling Ideas
The Crochet Druid Hood – TUTORIAL creates a piece that can be styled in multiple ways depending on your outfit and mood. You can wear it as a cozy hood and scarf combo, draped elegantly around your shoulders for warmth and charm.
For everyday use, pair your hood with a long coat, boots, and neutral tones for a modern yet bohemian look. If you love fantasy-inspired fashion, complement it with flowy dresses or nature-themed accessories.
You can also experiment with different stitch textures to give your hood a unique flair. For example, alternating rows of puff stitches and front post double crochets creates an interesting pattern that catches the light beautifully.
The Crochet Druid Hood can be adapted into a lighter version by using cotton or linen yarn, perfect for spring and fall. Alternatively, use chunky yarn for an ultra-warm winter hood.
For those who enjoy creative photography or fantasy costumes, this hood makes an amazing prop. Its mystical vibe captures the essence of nature and old-world folklore, perfect for themed photoshoots or festivals.
Lastly, don’t forget that handmade items like this hood make thoughtful gifts. They show effort, creativity, and love — qualities that make crochet projects so special.
4. Helpful Tips for the Perfect Druid Hood
When making your Crochet Druid Hood – TUTORIAL, it’s important to keep a few tips in mind to get the best results. First, keep your tension even throughout the project to ensure a balanced shape. Uneven stitches can make the hood appear lopsided or loose.
If you want your hood to have a more structured look, choose yarns with a bit of stiffness, like wool blends. For a softer, flowing style, opt for alpaca or acrylic yarns.
You can also modify the size of your hood easily. To make it longer, add more chains to your foundation. To make it deeper, work additional rows on the hood section.
When seaming the top, try to use invisible or flat seams to maintain comfort, especially if you’ll wear it for long periods. A bulky seam can be uncomfortable around the head.
For an added layer of warmth, consider sewing a soft lining inside your hood using fleece or flannel. This gives it a luxurious, cozy feel.
Finally, enjoy the process! The Crochet Druid Hood isn’t just a project — it’s a creative journey. Every stitch brings you closer to a piece that reflects your imagination and skill.
FAQ
1. Is the Crochet Druid Hood beginner-friendly?
Yes! The Crochet Druid Hood – TUTORIAL is suitable for beginners who know basic stitches like single crochet and double crochet.
2. What type of yarn should I use?
Bulky or medium-weight yarns work best. Wool and acrylic blends provide warmth and structure.
3. How long does it take to finish?
Depending on your experience, it can take 6–10 hours to complete.
4. Can I adjust the size?
Absolutely. You can easily adjust the chain length or add more rows to fit your desired size.
5. How do I care for my Crochet Druid Hood?
Hand wash gently in cold water and lay flat to dry to maintain its shape and texture.
6. Can I add decorations?
Yes! Add leaves, vines, or tassels for a more fantasy-inspired design.
Conclusion
The Crochet Druid Hood – TUTORIAL is a perfect blend of creativity, comfort, and craftsmanship. It’s more than just an accessory — it’s a statement piece that reflects your style and imagination. Whether you wear it to stay warm or to embrace a mystical look, this hood will surely draw attention and admiration.
PATTERN VIDEO:
Take your time with each stitch, enjoy the process, and celebrate the beauty of handmade art. If you’ve tried this pattern, leave a sincere opinion and share your suggestions — your feedback inspires future creative projects for the crochet community!

