The Patchwork Highland Cow Quilt – Pattern is a delightful and creative project for quilt lovers who enjoy blending rustic charm with artistic design. This quilt captures the beauty and character of the famous Highland cow, known for its shaggy hair and gentle nature, while showcasing the timeless art of patchwork. It’s a perfect blend of country warmth and cozy elegance, ideal for decorating bedrooms, living spaces, or even as a thoughtful handmade gift. Whether you’re an experienced quilter or someone looking to take on a new creative challenge, this pattern will bring joy, texture, and personality to your quilting journey.
Creating the Patchwork Highland Cow Quilt allows you to play with colors, fabrics, and patterns that mimic the texture and tones of these beloved animals. Each piece you sew together contributes to forming a striking portrait that’s both rustic and modern. From soft browns and creams to golden hues and plaids, this quilt celebrates the natural beauty of the countryside while giving you the freedom to personalize it however you like.
If you’ve been searching for a quilt project that’s visually stunning yet deeply satisfying to make, the Patchwork Highland Cow Quilt – Pattern is the one for you. Let’s explore everything you need to know—from materials and layout to sewing techniques and creative tips—to bring your very own Highland cow to life in fabric form.
1. Materials and Fabric Selection for the Patchwork Highland Cow Quilt
Before you begin your Patchwork Highland Cow Quilt – Pattern, gather your essential materials. This includes high-quality cotton fabrics in various shades of brown, beige, white, black, and even a touch of gold or tan for highlights. Plaid or tweed prints also add a rustic feel and can be used to give your quilt a Scottish-inspired look. You’ll need background fabric, batting, and a coordinating fabric for the backing.
SEE OTHER FACE PATTERNS HERE!
Choose thread colors that complement your chosen palette and ensure your sewing machine is properly maintained for clean, smooth stitching. The beauty of this pattern is that it embraces texture and contrast, so don’t be afraid to mix patterns or fabric types—subtle variations make your Highland cow even more lifelike.
Before cutting your fabric, press all pieces to remove wrinkles. This step ensures precise cutting and piecing. A rotary cutter and quilting ruler will help you achieve straight, accurate edges.
It’s also important to pre-plan your layout. Lay out the pieces before sewing so you can visualize how the colors and shapes interact. This helps you decide where to place darker or lighter fabrics to enhance the cow’s depth and detail.
Lastly, gather your quilting notions: pins, fabric markers, and a seam ripper (just in case). With everything ready, you’ll be set for an enjoyable and rewarding quilting session.
2. Creating the Highland Cow Design
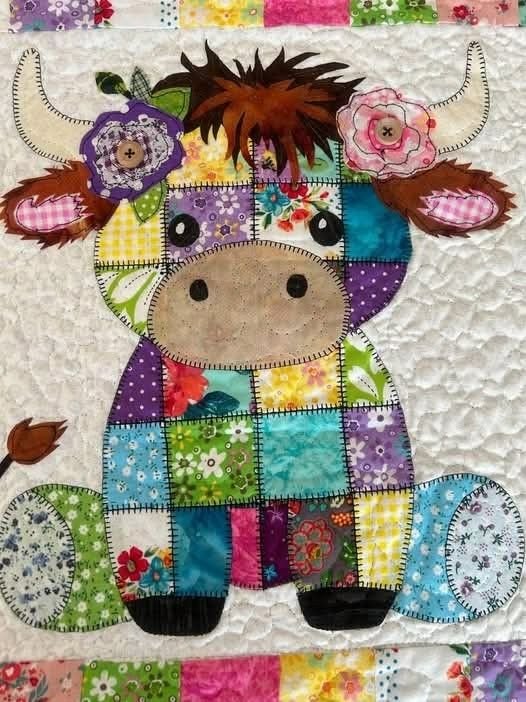
The heart of the Patchwork Highland Cow Quilt lies in its distinctive design. This quilt typically features a combination of geometric shapes—squares, rectangles, and triangles—that come together to form the detailed image of the cow’s face and fur.
Start by focusing on the cow’s head and fur pattern. This section uses patchwork blocks of varying shades to replicate the layered look of the cow’s long hair. Mixing prints and solids here creates visual movement and texture.
Once you’re satisfied with the arrangement, begin sewing the blocks together row by row. Take your time to align seams accurately; precision will ensure a neat final result. Press seams open or to one side as you go to avoid bulk.
Next, move on to the cow’s horns and nose. These elements add definition and personality to the design. You can use soft grays or tans for the horns and a deeper brown or black for the nose area. The key is maintaining contrast while keeping the palette cohesive.
For the background, consider light neutral tones such as cream or pale gray. This will make the cow’s figure stand out beautifully. You can also add simple patchwork elements to the background to tie the entire composition together.
Once all sections are pieced, sew the top panel together carefully. Step back and admire your work—you’ll already see your Highland cow taking shape in fabric form!
3. Quilting and Assembly Techniques
After completing your quilt top, it’s time to assemble and quilt your Patchwork Highland Cow Quilt. Start by layering your quilt sandwich: backing fabric on the bottom, batting in the middle, and your patchwork top on top. Smooth out each layer to avoid wrinkles and baste them together using safety pins or temporary spray adhesive.
When choosing a quilting design, you can go for simple straight-line quilting to keep the focus on the cow or opt for free-motion quilting to add texture resembling fur. Following the cow’s natural lines with wavy stitching can enhance the lifelike feel of the design.
Use a walking foot for straight quilting or a darning foot for free-motion designs. Always start quilting from the center and work your way outward to prevent puckering. Take your time and enjoy the process—the quilting stage truly brings the piece to life.
Once the quilting is complete, trim any excess batting and backing fabric, ensuring all edges are even. Prepare your binding strips using a coordinating fabric and attach them securely using your sewing machine or by hand for a traditional finish.
If you’re adding decorative details like embroidery for eyes or nostrils, this is the best time to do it. Small embellishments make your Highland cow even more expressive and unique.
Finally, press the entire quilt lightly to set the seams and smooth any wrinkles. You now have a finished quilt that’s both a work of art and a cozy addition to your home.
4. Creative Variations and Display Ideas
One of the best things about the Patchwork Highland Cow Quilt – Pattern is its versatility. You can adapt it to different color schemes, themes, and sizes depending on your preferences. For example, try making a smaller wall hanging version if you’re short on time or fabric. It can serve as a charming piece of rustic décor for your home.
Experiment with different backgrounds—pastel colors for a modern farmhouse look, or dark tones for dramatic contrast. You can even incorporate landscape elements, such as grassy fields or a mountain backdrop, to give your quilt a scenic touch.
For a more textured look, consider using wool or flannel fabrics in parts of the design. These materials not only add depth but also reflect the Highland cow’s naturally fluffy fur.
If you love personal touches, embroider the cow’s name or a meaningful quote along the quilt’s border. This adds a storytelling element that makes your piece one of a kind.
You can also turn this pattern into a family project. Invite loved ones to contribute fabric scraps or help with simple sewing tasks—it’s a wonderful way to create lasting memories together.
When your quilt is finished, display it proudly! Hang it on a wall, drape it over a sofa, or gift it to someone special. Its rustic charm and handmade detail will surely capture hearts wherever it goes.
FAQ – Patchwork Highland Cow Quilt Pattern
Q1: Is the Highland Cow Quilt suitable for beginners?
Yes! While it looks complex, the design is made of basic patchwork shapes. Beginners can follow the pattern with patience and achieve great results.
Q2: What fabric works best for this quilt?
High-quality cotton is recommended for precision and durability. Adding flannel or tweed accents enhances the rustic appeal.
Q3: How big is the finished quilt?
The standard size is usually around 60 x 70 inches, but you can easily adjust it depending on your preference or purpose.
Q4: Can I make this quilt with fabric scraps?
Absolutely! Using scraps gives your cow’s fur a unique, natural variation and adds personality to your quilt.
Q5: How should I wash and care for the quilt?
Machine wash gently in cold water and air dry or tumble dry on low. Avoid harsh detergents to preserve colors and texture.
Q6: Can I sell quilts made from this pattern?
Yes, handmade versions can be sold, but always credit the original pattern designer for their creative inspiration.
Conclusion
The Patchwork Highland Cow Quilt – Pattern is a heartwarming and rewarding project that brings together artistry, comfort, and tradition. From fabric selection to the final stitch, every step allows you to express creativity and passion for quilting. The end result is not just a quilt—it’s a masterpiece filled with texture, color, and character that embodies the beauty of handmade craftsmanship.
Now that you know how to create your own Highland cow quilt, it’s time to gather your materials, thread your machine, and start sewing! Once you’ve completed your piece, we’d love to hear your thoughts and see your finished work. Share your experience, ideas, or suggestions—we’re always inspired by your creativity and dedication to the quilting craft.