
The Crochet Fringe Vest Pattern is a beautiful handmade fashion project that combines delicate lacework, eye-catching circular motifs, and long flowing fringe. Inspired by the vibrant orange design shown in the reference image, this unique accessory brings together bohemian style and modern crochet craftsmanship. Its asymmetric silhouette, open mesh construction, and decorative tassels create a lightweight statement piece that can transform a simple outfit into something extraordinary.
One of the most distinctive features of this Boho Crochet Fringe Vest is its triangular shape. Unlike traditional crochet vests that cover the entire torso, this design drapes diagonally across the body, creating an elegant one-shoulder effect. The upper section rests over one shoulder, while the lower edge extends across the waist and finishes with long strands of fringe. A simple tie at the side helps secure the garment while maintaining its relaxed, flowing appearance.
The reference image features a striking burnt-orange color, three large circular crochet motifs, one smaller circular accent, and an open diamond-shaped mesh background. Long orange fringes decorated with wooden beads hang from the lower edge, adding movement and personality. The accessory is styled over a fitted sleeveless top and wide-leg jeans, demonstrating how beautifully handmade crochet can complement contemporary clothing.
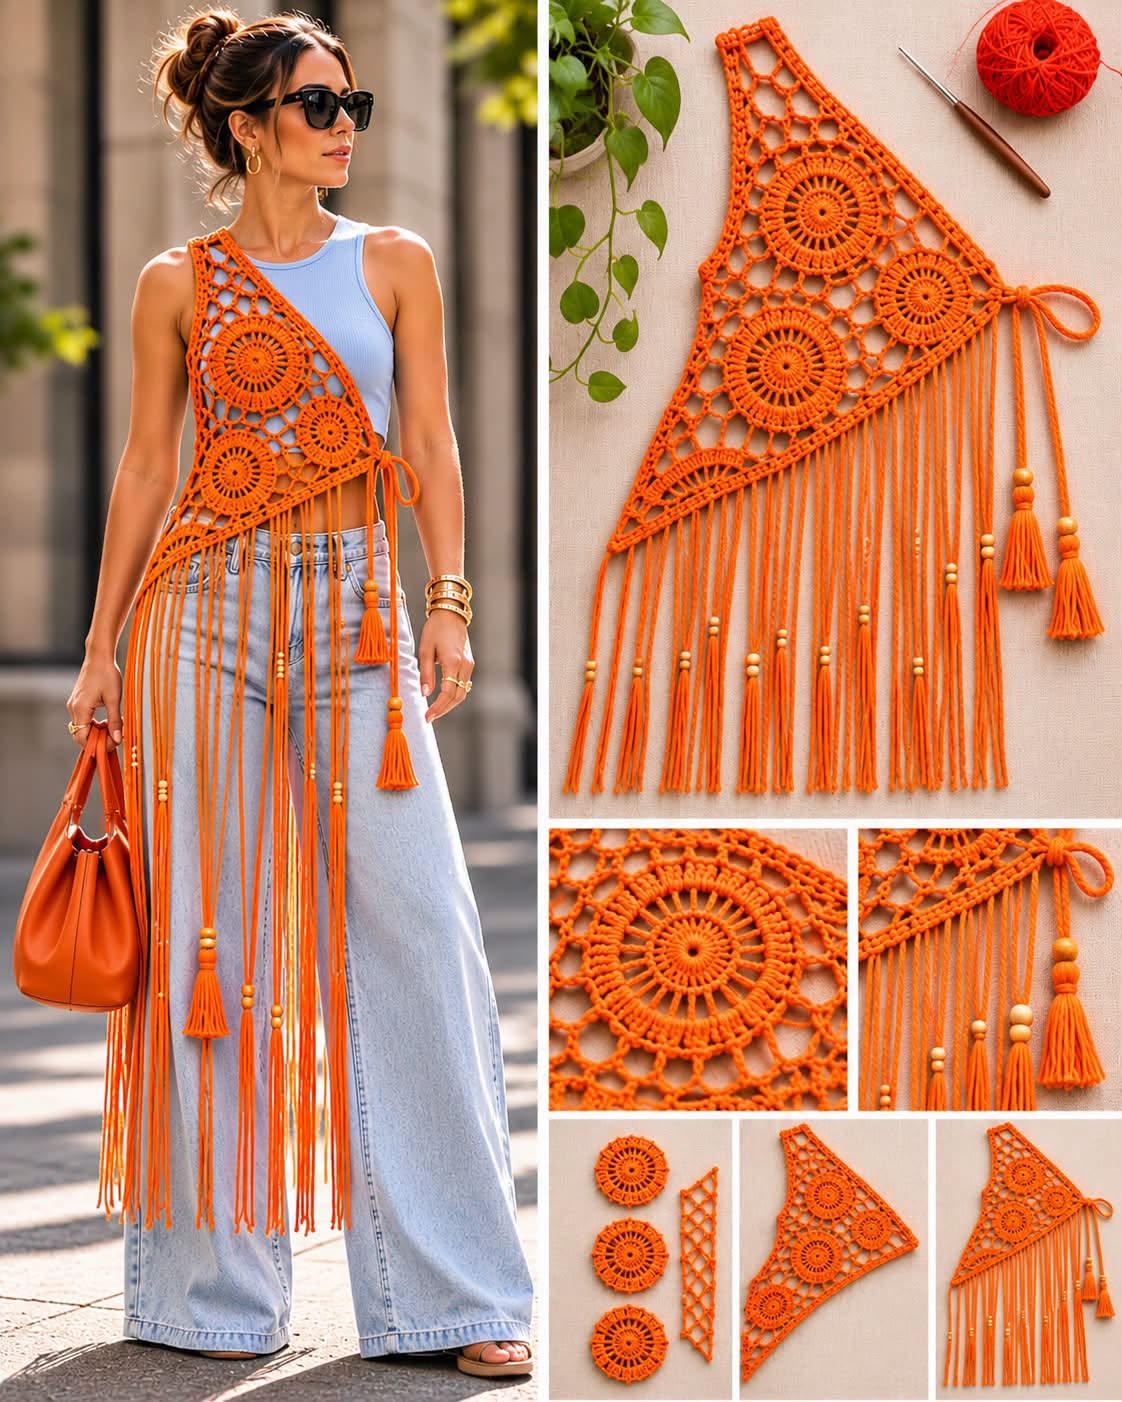
In this complete Crochet Fringe Vest Tutorial, you will learn how to select suitable yarn, crochet decorative circular motifs, create an open mesh foundation, assemble an asymmetric triangular panel, and add beautiful fringe and tassels. The instructions use US crochet terminology and provide an original, beginner-friendly interpretation of the photographed design. Whether you prefer vibrant orange, vintage cream, sage green, or earthy terracotta, this project offers endless opportunities to create a personalized fashion accessory.
DISCOVER MORE FREE PATTERNS HERE!
Materials, Crochet Stitches, and Measurements for the Crochet Fringe Vest Pattern
Before beginning your Crochet Fringe Vest Pattern, choosing the right yarn is essential. Because the design includes openwork lace, circular motifs, and long decorative fringe, the yarn should be lightweight, flexible, and strong enough to maintain its shape.
Cotton yarn is an excellent choice for this project. It creates defined stitches, holds decorative motifs beautifully, and provides a comfortable drape. A cotton-bamboo blend can also work well, especially if you prefer a softer and more fluid finish.
For a design inspired by the reference image, choose bright burnt orange or pumpkin orange. These warm shades highlight the intricate crochet details and create a beautiful contrast when worn over white, cream, or pale blue clothing.
Materials needed
- Approximately 500–700 yards (457–640 meters) of DK-weight cotton yarn.
- A 3.5 mm crochet hook.
- A 4.0 mm crochet hook for a looser mesh, optional.
- Yarn needle.
- Sharp scissors.
- Measuring tape.
- Stitch markers.
- Blocking mat and rustproof pins.
- Approximately 20–35 small wooden beads with holes large enough for the yarn.
- Two larger wooden beads for the decorative tassels, optional.
- A small crochet hook or beading needle for threading beads.
Suggested finished measurements
| Component | Approximate Measurement |
|---|---|
| Upper shoulder-to-side length | 22–25 in (56–63.5 cm) |
| Diagonal lower edge | 24–28 in (61–71 cm) |
| Maximum panel width | 16–19 in (40.5–48 cm) |
| Large circular motif diameter | 4–5 in (10–12.5 cm) |
| Small circular motif diameter | 3–3½ in (7.5–9 cm) |
| Fringe length | 12–18 in (30.5–46 cm) |
| Side tie length | 12–16 in (30.5–40.5 cm) |
These measurements are intended for an adjustable adult accessory.
The triangular panel can be enlarged or reduced depending on the desired coverage.
For this tutorial, the sample will use three large circular motifs, one smaller motif, and a lightweight mesh foundation.
Crochet abbreviations – US terminology
| Abbreviation | Meaning |
|---|---|
| ch | Chain |
| sc | Single crochet |
| hdc | Half double crochet |
| dc | Double crochet |
| tr | Treble crochet |
| sl st | Slip stitch |
| sp | Space |
| st | Stitch |
| rep | Repeat |
| RS | Right side |
| FO | Fasten off |
Special crochet techniques
Magic Ring: An adjustable loop used to begin circular crochet motifs.
Chain Space: An opening created by one or more chain stitches.
Open Mesh Stitch: A lace pattern formed by chains and anchoring stitches.
Slip Stitch Join: A stitch used to connect the end of a crochet round to its beginning.
Lark’s Head Fringe Knot: A simple knot used to attach folded yarn strands to the edge of a crochet project.
Understanding the vest construction
The Crochet Fringe Vest Pattern consists of four main sections.
The first section contains the decorative circular crochet motifs.
The second section is the open mesh background that connects the motifs and creates the triangular shape.
The third section is the reinforced border and side tie.
The fourth section contains the long fringe, wooden beads, and decorative tassels.
This modular construction allows you to prepare the motifs first and arrange them before joining the entire design.
Step-by-Step Crochet Fringe Vest Pattern: Making the Circular Lace Motifs
The circular motifs are the focal point of this Boho Crochet Vest Pattern.
Their radial stitch arrangement creates a beautiful sunburst effect that contrasts with the open diamond-shaped mesh.
For this tutorial, you will make three large circular motifs and one smaller accent motif.
Step 1: Create the magic ring
Using orange cotton yarn and a 3.5 mm crochet hook, make a magic ring.
Round 1: Chain 3, which counts as the first double crochet.
Work 11 additional double crochet stitches into the ring.
Pull the yarn tail gently to close the center.
Join with a slip stitch to the top of the beginning chain 3.
You should have 12 double crochet stitches.
Step 2: Create the first decorative round
Round 2: Chain 3, counting as the first double crochet.
Work one double crochet into the same stitch.
Work two double crochet stitches into each remaining stitch around.
Join with a slip stitch.
You should have 24 double crochet stitches.
This round creates the solid center of the motif.
Step 3: Begin the openwork spokes
Round 3: Chain 4, counting as one double crochet and one chain.
Skip the next stitch.
Work one double crochet into the following stitch.
Chain 1.
Repeat this sequence around.
Join with a slip stitch to the third chain of the beginning chain 4.
You should have 12 double crochet spokes separated by 12 chain-1 spaces.
Step 4: Create the sunburst effect
Round 4: Slip stitch into the first chain-1 space.
Chain 3, then work two additional double crochet stitches into the same space.
Chain 2.
Work three double crochet stitches into the next chain-1 space.
Chain 2.
Repeat around.
Join with a slip stitch.
You should have 12 groups of three double crochet stitches.
The motif will begin to resemble a decorative sunburst.
Step 5: Expand the outer lace ring
Round 5: Slip stitch into the next chain-2 space.
Chain 3 and work four additional double crochet stitches into that space.
Chain 1.
Work five double crochet stitches into each remaining chain-2 space, with one chain between groups.
Join with a slip stitch.
This creates 12 decorative fan-shaped groups around the motif.
Step 6: Finish the large motif
Round 6: Work one single crochet into the top of each double crochet stitch.
Work two single crochet stitches into each chain-1 space.
Continue around the entire motif.
Join with a slip stitch.
Fasten off and weave in the ends.
The finished motif should have a circular sunburst appearance.
Its exact diameter will depend on the yarn and tension.
Step 7: Make additional motifs
Repeat the instructions to create three large motifs.
For the smaller accent motif, work Rounds 1–4 only.
Finish with a round of single crochet stitches around the outer edge.
Fasten off.
You should now have four decorative circular motifs.
Step 8: Block the motifs
Lightly dampen the motifs according to the yarn manufacturer’s instructions.
Place them on a blocking mat.
Shape each motif into a smooth circle.
Pin the edges if necessary.
Allow the motifs to dry completely.
Blocking helps the motifs maintain their shape during assembly.
How to Assemble the Crochet Fringe Vest and Create the Open Mesh Panel
Once the circular motifs are complete, you can begin creating the triangular mesh panel.
This stage determines the overall shape of the vest.
The goal is to create an asymmetric triangle that drapes comfortably over one shoulder and extends diagonally across the torso.
Step 1: Create a full-size paper template
Lay a large sheet of paper on a flat surface.
Draw a triangle with approximate side lengths of 24, 25, and 28 inches.
The triangle should have one long diagonal edge.
Round the corners slightly if desired.
Mark the upper shoulder corner.
Mark the lower side corner where the tie will be attached.
This template will guide the assembly.
Step 2: Arrange the circular motifs
Place the three large circular motifs inside the triangular outline.
Position one near the upper portion.
Place the second near the center.
Position the third toward the lower section.
Add the smaller motif near the side corner.
Leave approximately 1–2 inches between the motifs.
Adjust their placement until the arrangement looks balanced.
Pin the motifs to the paper template or blocking mat.
Step 3: Create the open mesh strips
Using the 4.0 mm crochet hook, chain 15.
Row 1: Work one single crochet into the second chain from the hook.
Chain 5.
Skip four chains.
Work one single crochet into the next chain.
Repeat across as the foundation allows.
Chain 5 and turn.
The mesh will consist of large chain loops.
Continue working rows of chain-5 loops, anchoring each new loop into the center of a loop from the previous row.
This creates a lightweight diamond-shaped lace texture.
Step 4: Connect the mesh to the motifs
Position the mesh strips between the circular motifs.
Use slip stitches or single crochet stitches to connect the mesh to the motif edges.
Work into the outer stitches of each motif.
Avoid pulling the connections too tightly.
The mesh should remain flexible.
Continue adding mesh sections until the spaces between the motifs are filled.
Step 5: Fill the triangular background
Work additional mesh strips to fill the remaining areas of the paper template.
Join the strips using slip stitches.
Adjust the number of chain loops to accommodate the triangular shape.
Near the corners, use shorter chain spaces if necessary.
Keep the mesh evenly distributed.
The finished panel should lie flat without puckering.
Step 6: Crochet the outer border
Attach yarn to one corner of the completed panel.
Work one round of single crochet evenly around the entire triangular edge.
Place additional stitches around the corners.
Join with a slip stitch.
Work a second round of single crochet.
This creates a reinforced border.
The border also provides a secure foundation for attaching the fringe.
Step 7: Create the side tie
Attach yarn to the lower side corner.
Chain 55.
Work one slip stitch into each chain, beginning with the second chain from the hook.
Fasten off.
Repeat at the corresponding attachment point if you prefer two separate ties.
The ties should be long enough to secure the garment comfortably without pulling the lace.
Step 8: Test the fit
Drape the triangular panel over one shoulder.
Position the longer edge diagonally across the chest.
Bring the side corner toward the waist.
Secure the tie loosely.
Check that the panel lies comfortably.
Adjust the mesh connections or border if necessary.
The vest should feel lightweight and flexible.
Adding Long Fringe, Wooden Beads, Tassels, and Beautiful Finishing Details
The long fringe is one of the most eye-catching features of the Crochet Fringe Vest Pattern.
It creates movement and gives the accessory its unmistakable bohemian character.
The reference image features long orange strands, decorative wooden beads, and larger tassels near the side tie.
Step 1: Prepare the fringe strands
Cut yarn strands approximately 30–38 inches long.
Each strand will be folded in half.
For a finished fringe length of approximately 15 inches, cut strands around 32 inches long.
Prepare enough strands to cover the lower diagonal edge.
The exact quantity depends on the spacing and desired fullness.
Step 2: Attach the fringe
Fold one yarn strand in half.
Insert the crochet hook through a stitch along the lower border.
Pull the folded center through the stitch.
Pass the loose ends through the loop.
Pull gently to secure the fringe.
This creates a lark’s head knot.
Repeat along the lower edge.
Space the fringe evenly.
Step 3: Create a flowing fringe arrangement
Attach one or two strands to each available border stitch, depending on the desired density.
For a lighter appearance, leave small spaces between the knots.
For a fuller bohemian style, attach fringe more closely together.
Allow the strands to hang naturally.
Do not trim them yet.
Step 4: Add decorative wooden beads
Select several fringe strands.
Thread one or two wooden beads onto each selected strand.
Position the beads at different heights.
Tie a small knot beneath each bead to hold it in place.
Distribute the beads evenly across the fringe.
The wooden details create a beautiful rustic contrast against the orange yarn.
Step 5: Make decorative tassels
Cut approximately 20 yarn strands measuring 8 inches long.
Fold the strands in half.
Wrap another piece of yarn around the bundle approximately ½ inch below the fold.
Tie securely.
Trim the ends evenly.
Attach the tassel to the side tie.
Repeat to create a second tassel if desired.
Step 6: Add the final edging
Inspect the outer border.
If the edge appears too loose, work another round of single crochet.
For a more decorative finish, alternate single crochet and chain-1 stitches.
Keep the border flexible.
Avoid adding too many stitches around the corners.
The finished edge should maintain the triangular shape.
Step 7: Block the completed vest
Lay the vest flat on a blocking mat.
Gently shape the triangular panel.
Arrange the circular motifs.
Straighten the mesh sections.
Smooth the fringe strands.
Allow the project to dry completely.
Blocking helps the lace open beautifully.
Step 8: Trim and finish the fringe
Hang the vest from a hanger or dress form.
Allow the fringe to settle naturally.
Trim the ends to the desired length.
For a dramatic appearance, keep the fringe long.
For a more practical everyday accessory, shorten it slightly.
Make sure the beads and tassels are securely attached.
Your Handmade Crochet Fringe Vest is now ready to wear.
Beautiful Color Combinations for the Crochet Fringe Vest Pattern
Burnt Orange: A bold, vibrant shade inspired by the reference image.
Ivory and Natural Cream: A timeless bohemian combination suitable for summer outfits.
Sage Green: A soft botanical shade with a sophisticated vintage appearance.
Terracotta and Caramel: A warm rustic palette that complements denim beautifully.
Dusty Rose: A delicate, romantic color for a feminine handmade accessory.
Emerald Green: A striking shade that creates a luxurious statement piece.
Black and Gold: A dramatic combination suitable for evening outfits and special occasions.
Styling Ideas for the Crochet Fringe Vest
Wear the vest over a fitted white tank top and wide-leg jeans for a casual bohemian outfit.
Pair it with a simple black dress to create a dramatic contrast.
For summer festivals, combine the vest with denim shorts and sandals.
For a vintage-inspired look, choose cream yarn and style it with a flowing maxi skirt.
The triangular design also looks beautiful over a plain long-sleeved blouse.
Helpful Tips for a Perfect Crochet Fringe Vest
Use lightweight yarn. Cotton and cotton blends create a comfortable drape.
Block the circular motifs. This helps maintain consistent sizes.
Arrange the motifs before joining. Planning the layout makes assembly easier.
Keep the mesh flexible. Avoid pulling chain spaces too tightly.
Reinforce the outer border. A firm border provides better support for the fringe.
Trim the fringe after assembly. This creates a more balanced finished appearance.
Frequently Asked Questions About the Crochet Fringe Vest Pattern
1. Is the Crochet Fringe Vest Pattern suitable for beginners?
The project is best suited to confident beginners or intermediate crocheters familiar with circular motifs, chain spaces, and joining techniques.
2. What yarn is best for this vest?
DK-weight cotton or cotton-blend yarn is recommended for a lightweight, comfortable finish.
3. What crochet hook should I use?
A 3.5 mm hook is suitable for the motifs, while a 4.0 mm hook can create a looser mesh.
4. Can I make the vest larger?
Yes. Increase the triangular template dimensions and add additional mesh sections.
5. Can I make the vest smaller?
Yes. Reduce the template size and shorten the fringe.
6. How many circular motifs do I need?
The sample uses three large motifs and one smaller accent motif.
7. Can I use different crochet motifs?
Absolutely. Floral motifs, granny circles, and other decorative shapes can be adapted to the design.
8. Is the fringe necessary?
No. The vest can be worn without fringe for a simpler appearance.
9. Can I add more wooden beads?
Yes. Add beads according to your personal preference, ensuring they are securely attached.
10. Can I make the vest in two colors?
Yes. Use one color for the motifs and another for the mesh and fringe.
11. How do I prevent the mesh from stretching?
Maintain even tension and use a yarn that provides suitable structure.
12. Can I wear this vest over a dress?
Yes. The asymmetric design looks beautiful over fitted dresses and simple tops.
13. How do I wash the finished vest?
Follow the yarn manufacturer’s care instructions. Gentle hand washing and flat drying are recommended for many delicate crochet garments.
14. Can I make matching accessories?
Yes. The same circular motifs can be used to create earrings, bags, belts, and decorative scarves.
15. Can I sell handmade crochet fringe vests?
Handmade garments created from your own work can generally be sold, subject to applicable pattern rights and local regulations.
Conclusion
The Crochet Fringe Vest Pattern is a beautiful handmade fashion project that combines delicate circular motifs, airy mesh stitches, and long decorative fringe. Its asymmetric triangular shape creates a distinctive bohemian appearance that stands out from traditional crochet garments.
One of the greatest advantages of this design is its versatility. You can customize the yarn color, motif arrangement, fringe length, and decorative details to create an accessory that reflects your personal style.
The project also provides an enjoyable opportunity to practice circular crochet, lace construction, motif joining, decorative edging, and fringe-making techniques.
For crocheters who love creative fashion accessories, this Boho Crochet Fringe Vest offers a rewarding way to transform simple yarn into a unique statement piece.
Whether you choose the vibrant orange shade shown in the reference image or experiment with ivory, sage green, terracotta, dusty rose, or emerald green, the finished vest can become a beautiful addition to your handmade wardrobe.
With careful stitching, thoughtful assembly, and attention to the finishing details, your Handmade Crochet Fringe Vest can bring movement, elegance, and timeless bohemian charm to your favorite outfits.