
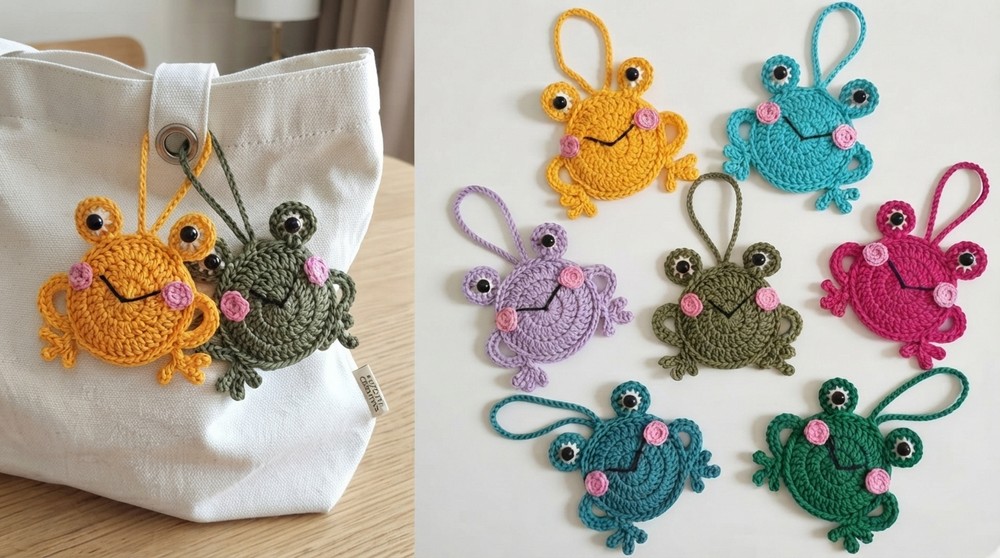
Crochet Frog Keychain Pattern is a cheerful and beginner-friendly crochet project that turns a few basic stitches into an adorable little frog that can decorate keys, handbags, backpacks, craft totes, zipper pulls, or handmade gift packages. Inspired by the colorful frogs in the reference image, this design features a flat circular body, raised eyes, tiny arms and legs, rosy cheeks, an embroidered smile, and a practical crochet hanging loop. Because the finished piece is small, it is also an excellent scrap yarn crochet project for using leftover cotton yarn from larger creations.
One of the most appealing things about this Crochet Frog Keychain Pattern is how much personality can be created with such simple construction. The frog’s body is essentially a compact crochet circle worked in rounds, while small separately formed details transform that basic shape into a recognizable character. Colors such as mustard yellow, turquoise, lavender, olive green, bright pink, and emerald can give each frog a completely different personality. Making several frogs in contrasting colors is a fun way to practice consistent tension while creating a coordinated collection.
This tutorial uses U.S. crochet terminology and focuses on recreating the general appearance of the photographed project rather than claiming exact measurements from the image. A finished frog can measure approximately 3–4 inches (7.5–10 cm) across depending on yarn weight, hook size, tension, and the length of the arms and legs. The hanging loop can be customized for a small key ring or made longer for attaching the frog directly to a bag handle.
Materials, Crochet Stitches, and Preparing the Frog Body
For this crochet frog keychain, choose a smooth cotton or cotton-blend yarn in DK or light worsted weight. Cotton is particularly useful because it creates clear stitch definition and helps the circular body maintain its shape. You will need one main frog color, a small amount of pink for the cheeks, white and black yarn for the eyes, and black embroidery thread or yarn for the mouth.
DISCOVER MORE FREE PATTERNS HERE!
A crochet hook between approximately 3.0 mm and 4.0 mm works well for many yarns in this category. Choose a hook that creates firm stitches without making the fabric excessively stiff. You will also need a yarn needle, scissors, stitch marker, and optional key ring or lobster clasp.
The primary stitches used are chain (ch), slip stitch (sl st), single crochet (sc), half double crochet (hdc), and double crochet (dc). Beginners should become comfortable identifying the first and last stitches of a round because accurate stitch placement helps the frog remain circular.
Start the body with a magic ring. If you prefer not to use a magic ring, chain 4 and join the first chain with a slip stitch to create a small ring. Work 6 single crochet stitches into the center and gently tighten the ring.
For the next round, work 2 sc in every stitch around, increasing the stitch count to 12. In the following round, alternate 1 sc in the next stitch, 2 sc in the following stitch around. This controlled increase begins forming the flat circular shape visible in the photographed frogs.
Continue expanding the circle evenly. A useful progression is to increase the number of ordinary stitches between increases with each new round. For example, work 2 sc, increase around one round, then 3 sc, increase around the next. Stop when the circle reaches approximately 2.5–3 inches (6.5–7.5 cm) across, or when you are satisfied with the body size.
Creating the Eyes, Cheeks, Arms, and Little Frog Legs
The raised eyes are one of the most recognizable features of the Crochet Frog Keychain Pattern. Instead of placing the eyes directly on the circular body, crochet two small rounded eye sections along the upper edge. This gives the frog the playful expression seen in the reference design.
For a simple eye bump, attach the main-color yarn near the top of the body. Chain 3, work several half double or double crochet stitches into the same general area, and secure the small rounded section back to the body with a slip stitch. Repeat on the opposite side, checking that both eyes are positioned symmetrically.
Create the white portion of each eye with a small embroidered circle or tiny crocheted round. Add a black center using embroidery. If the keychain may be handled by young children, embroidered eyes are preferable to detachable plastic components. For an adult accessory, securely attached craft eyes can create the dimensional appearance shown in the photograph.
The rosy cheeks are another important detail. With pink yarn, make two tiny spiral crochet circles or embroider small circular cheeks directly onto the body. Position them below and slightly inward from the eyes. Their placement dramatically changes the expression, so temporarily position them before sewing.
For each arm, attach the main-color yarn near one side of the body and make approximately 5–8 chains. Work back toward the body with slip stitches or single crochet. A tiny loop or picot at the end can suggest a frog’s hand. Repeat on the opposite side.
The legs can be slightly longer and more decorative. Attach yarn near the lower edge, chain approximately 6–10 stitches, and work a combination of slip stitches and chains back toward the body. Add two or three tiny chain loops at the end if you want recognizable webbed toes. Repeat for the second leg while maintaining approximate symmetry.
Adding the Smile, Hanging Loop, and Assembling the Keychain
Once the main crochet pieces are finished, the face brings the crochet frog to life. Thread a yarn needle with black embroidery thread or thin black yarn. Begin near one cheek and embroider a gently curved mouth toward the center, then continue toward the opposite cheek.
Avoid pulling the embroidery too tightly because this can distort the circular crochet body. Small backstitches generally produce a smoother curved smile than one long stitch. The photographed frogs have simple expressions, which is part of their handmade charm.
Next, create the crochet hanging loop. Attach the main-color yarn at the upper edge of the frog, preferably between or slightly behind the eyes. Chain approximately 25–35 stitches, depending on the desired loop size. Bring the chain back to the starting position and join securely with a slip stitch.
For a stronger loop, work slip stitches or single crochet back around the chain before fastening off. This additional row creates a thicker strap that can withstand more handling. If you plan to use a metal key ring, you can make a much shorter loop and crochet directly around the ring.
Weave every yarn end into several stitches on the reverse side. Because a frog keychain may be pulled, twisted, and frequently handled, secure finishing is especially important. After weaving, gently stretch the body and check that no ends become visible.
At this point, inspect the entire frog. Compare the eyes, adjust the cheeks, shape the legs, and straighten the hanging loop. A little steam blocking can help flatten cotton yarn, but avoid pressing a hot iron directly onto the crochet stitches.
Color Variations, Finishing Tips, and Creative Frog Keychain Ideas
Color is one of the easiest ways to personalize this Crochet Frog Keychain Pattern. Traditional greens are always attractive, but there is no reason every handmade frog needs to resemble a real frog. Turquoise, purple, mustard yellow, raspberry pink, mint, coral, and variegated yarn can produce wonderfully playful results.
For a collection inspired by the photograph, make each frog in a different main color while keeping the cheeks consistently pink. Using the same eye and mouth details creates visual unity even when the body colors are completely different.
You can also experiment with the yarn itself. Mercerized cotton produces crisp, slightly shiny stitches, while regular cotton creates a softer handmade appearance. Acrylic yarn can work too, particularly if you already have colorful scraps available.
If your circle begins becoming wavy, you probably have too many increases. If it starts curling into a bowl, there may be too few increases. Adjust the increase frequency before continuing. A relatively flat body is important for achieving the characteristic flat crochet frog keychain appearance.
Consistent tension is especially noticeable in small projects. Try not to tighten your stitches excessively when making the eyes or limbs. Smaller components naturally feel tighter than large crochet pieces, and pulling the yarn too firmly can make them difficult to shape.
Finally, consider creating sets of frogs for handmade gifts. A coordinated collection could include green, turquoise, lavender, yellow, and pink versions. They can decorate craft bags, backpacks, pencil cases, tote bags, or keys, making the Crochet Frog Keychain Pattern an enjoyable project whenever you have small amounts of leftover yarn.
FAQ About the Crochet Frog Keychain Pattern
Is the Crochet Frog Keychain Pattern suitable for beginners?
Yes. The project primarily uses fundamental crochet techniques such as chain, slip stitch, single crochet, increases, and simple embroidery. Beginners who can crochet in the round should be able to complete it comfortably.
What crochet terminology does this tutorial use?
This tutorial uses U.S. crochet terms.
What yarn is best for a crochet frog keychain?
Cotton or cotton-blend yarn is an excellent option because it provides good stitch definition and creates a durable finished accessory.
What hook size should I use?
A hook between approximately 3.0 and 4.0 mm works well with many DK and light worsted yarns. Always adjust the hook to match your chosen yarn and desired tension.
How large should the finished frog be?
A convenient keychain size is approximately 3–4 inches (7.5–10 cm) across, although you can make it larger or smaller.
Can I use leftover yarn?
Absolutely. This is an excellent scrap yarn crochet pattern because each frog requires only a relatively small amount of yarn.
How do I keep the circular body flat?
Increase evenly around each round. If the circle becomes wavy, reduce the number of increases. If it curls upward, add increases more frequently.
Can I make the frog without a magic ring?
Yes. Chain 4 and join with a slip stitch to form a ring, then crochet your first round into that ring.
Do I need to stuff the frog?
Not for the flat style shown in the reference. The flat construction makes it lightweight and particularly suitable for hanging from bags.
Can I make a stuffed version?
Yes. Crochet two matching circles, decorate the front, join the pieces around the edges, and add a small amount of fiberfill before closing.
How are the frog’s cheeks made?
They can be crocheted as tiny pink circles or embroidered directly onto the face.
How should I make the eyes?
Small crocheted or embroidered eyes work beautifully. You can combine white yarn with a black embroidered pupil for a dimensional effect.
Can safety eyes be used?
They can be used for decorative accessories intended for adults, provided they are properly installed. For items accessible to small children, embroidered facial details avoid detachable components.
How do I make the little frog toes?
Create short chains at the ends of the legs. Several tiny chain loops can imitate webbed toes.
How long should the hanging loop be?
Approximately 25–35 chains creates a useful fabric loop for many yarn weights, but you can customize it according to where the frog will hang.
Can I attach a metal key ring?
Yes. Make a shorter crochet loop and secure it around a key ring or small clasp.
Why is cotton yarn recommended?
Cotton tends to hold its shape well and clearly displays small decorative stitches, making it ideal for crochet keychain patterns.
Can I sell finished frogs made from this type of project?
Handmade crochet frogs can be excellent craft-fair items or small gifts. If selling finished pieces, use your own original presentation and follow any applicable local product-safety requirements.
How long does one frog take to make?
The time varies by experience, but the small scale makes it significantly faster than larger amigurumi projects. Once familiar with the construction, multiple frogs can be worked efficiently.
What colors look best for the pattern?
There are no strict rules. Green gives a traditional frog appearance, while yellow, turquoise, lavender, pink, blue, and other bright colors create a playful collection similar to the inspiration image.
Conclusion
The Crochet Frog Keychain Pattern is a small project with plenty of room for creativity. By beginning with a simple circular crochet body and gradually adding eyes, cheeks, arms, legs, a smiling mouth, and a hanging loop, you can transform basic stitches into a colorful handmade character.
The project also provides useful practice with crocheting in the round, controlled increases, small decorative pieces, embroidery, chain loops, and secure finishing. These techniques can later be applied to many other crochet accessories and miniature projects.
One of the biggest advantages of this pattern is that very little yarn is required. Leftover cotton from previous projects can become an entire family of colorful frogs instead of remaining unused in your yarn basket.
The facial details are where each frog develops its own personality. Slight differences in eye placement, the curve of the smile, cheek size, or leg position can make one frog look cheerful while another appears amusingly surprised.
You can keep the traditional green color or follow the colorful approach shown in the inspiration and create frogs in mustard yellow, turquoise, lavender, olive green, raspberry pink, emerald, or teal. Add a crochet loop for a bag hanger or a metal ring for a traditional keychain.
PATTERN VIDEO:
After making your Crochet Frog Keychain Pattern, leave your sincere opinion about the project and share your suggestions. Tell us which color you would choose for your first little frog and what creative detail you would add to make your version completely unique.