
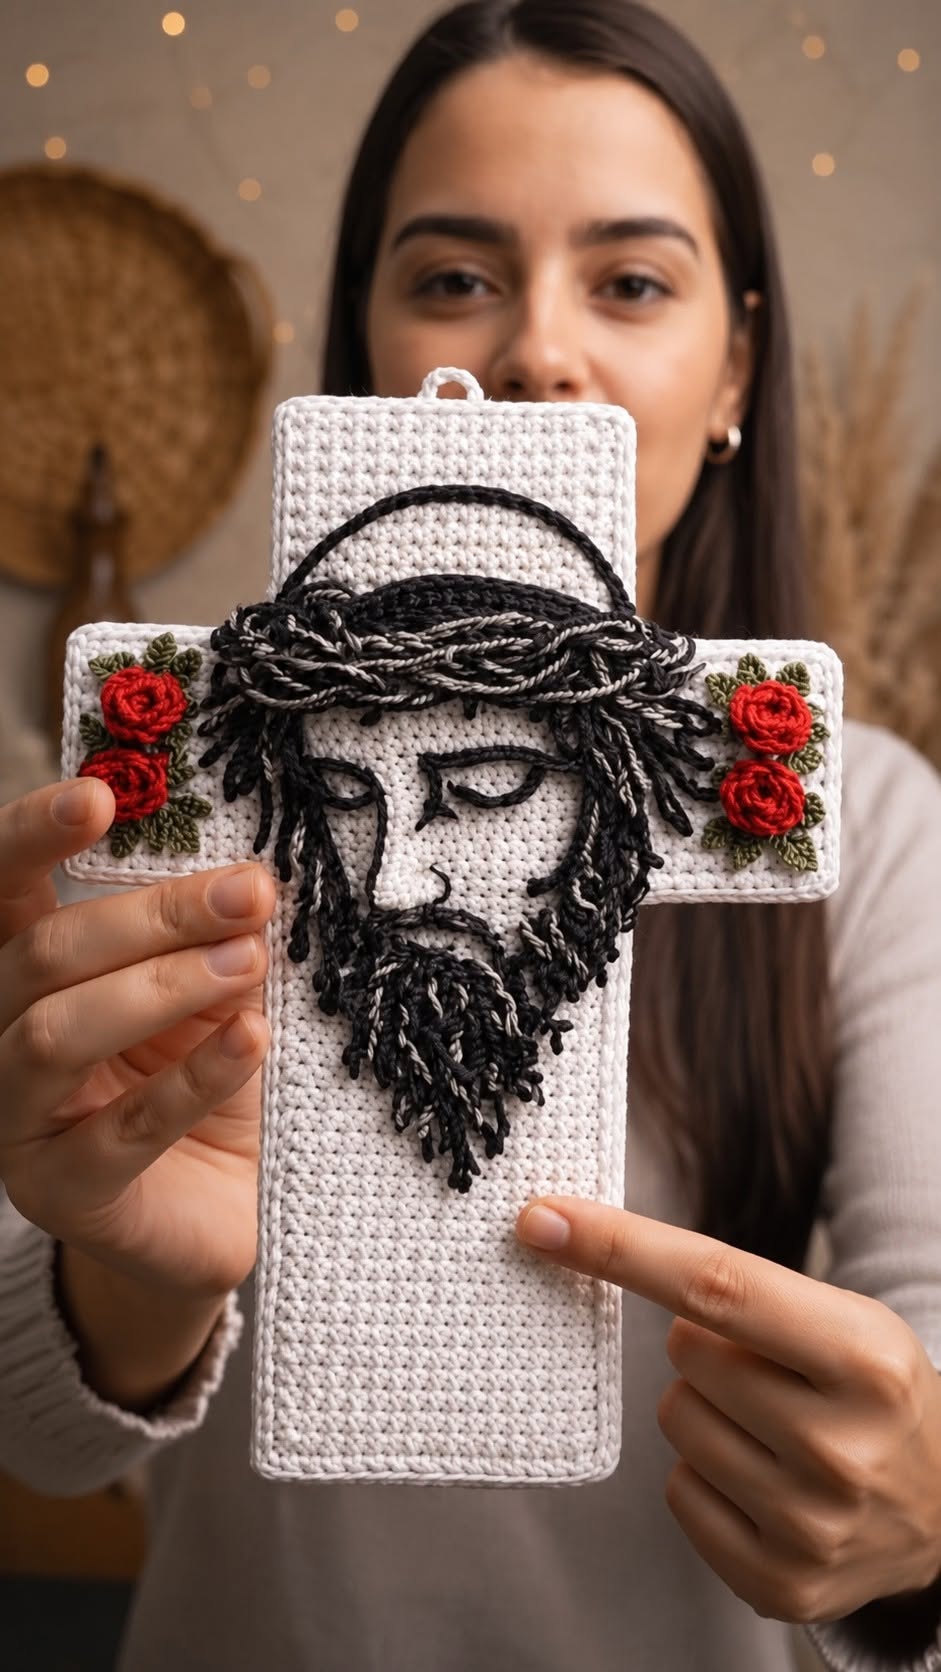
Crochet Jesus Cross is a beautiful and meaningful handmade project that combines traditional crochet techniques with faith-inspired artistry. Whether you are creating a heartfelt gift, decorating your home, preparing items for church events, or adding a unique piece to your handmade collection, the Crochet Jesus Cross is a rewarding project that reflects both creativity and devotion. Featuring a classic cross shape enhanced with an embroidered portrait of Jesus, floral embellishments, and textured yarn details, this project creates a timeless decoration that can be cherished for years.
One of the reasons the Crochet Jesus Cross has become increasingly popular is its versatility. It can be displayed on walls, placed in prayer rooms, gifted for baptisms, confirmations, Easter, Christmas, First Communion, or simply used as a meaningful home décor piece. Because the design combines basic crochet stitches with embroidery and decorative elements, makers of different skill levels can personalize the finished project to reflect their own artistic style.
Although the final design looks intricate, the construction becomes much easier when divided into manageable sections. In this complete guide, you will learn how to choose the right materials, crochet the cross foundation, embroider the facial features, create realistic hair and beard details, add floral embellishments, assemble every element, and finish your Crochet Jesus Cross with a polished, professional appearance using standard US crochet terminology.
Choosing Materials for Your Crochet Jesus Cross
Selecting quality materials is the foundation of a beautiful Crochet Jesus Cross. Since this project is designed to showcase texture and fine details, cotton yarn is highly recommended because it creates clean stitches and excellent stitch definition.
DISCOVER MORE FREE PATTERNS HERE!
Choose a soft white or cream yarn for the cross itself, allowing the embroidered portrait and decorative flowers to stand out beautifully. Neutral tones create an elegant background while highlighting the artistic details.
For the facial features, use black, dark brown, and gray embroidery thread or lightweight yarn. Burgundy or deep red yarn works well for embroidered roses, while olive green creates realistic leaves that complement the floral design.
A crochet hook between 2.5 mm and 3.5 mm is generally ideal, depending on your chosen yarn weight. Maintaining consistent tension ensures the cross remains flat and symmetrical throughout the project.
Additional supplies include tapestry needles, embroidery needles, stitch markers, scissors, blocking pins, polyester stuffing if a padded version is desired, and a wooden dowel or lightweight stabilizer for extra structure if necessary.
Before beginning the full project, crochet a small gauge swatch. Consistent stitches will produce cleaner edges and make embroidery placement easier once the crochet foundation has been completed.
Crocheting the Cross Foundation
Begin your Crochet Jesus Cross by working the vertical center panel. Most patterns start with a foundation chain followed by rows of single crochet or half double crochet to create a dense, stable fabric.
Once the vertical section reaches the desired height, crochet the horizontal arms separately. Working these pieces individually allows greater control over the finished proportions and makes assembly more precise.
After completing each section, join the horizontal and vertical pieces using slip stitches or invisible whip stitching. Carefully align every edge to maintain perfect symmetry.
Many crocheters prefer adding a decorative border around the cross. A simple round of single crochet followed by reverse single crochet or crab stitch creates a polished frame while strengthening the edges.
If additional thickness is desired, crochet two identical cross pieces and lightly stuff or insert interfacing between them before joining the outer edges together.
Finally, block the completed cross to flatten the fabric and create crisp, straight edges before beginning the embroidered portrait.
Creating the Jesus Portrait and Decorative Details
The portrait is the focal point of the Crochet Jesus Cross, making careful embroidery one of the most rewarding stages of the project. Begin by lightly marking the facial placement before stitching the eyes, eyebrows, nose, and mouth.
Use simple embroidery stitches such as backstitch, split stitch, satin stitch, and outline stitch to create expressive facial features while maintaining a soft handcrafted appearance.
For the beard and hair, attach groups of yarn strands using latch-hook techniques or looped fringe methods. Trim the strands gradually to create natural movement and realistic texture.
The crown of thorns can be crocheted separately using chain stitches and twisted cord techniques before being securely attached above the forehead. Small highlights created with contrasting yarn enhance depth and realism.
Crochet miniature roses using spiral techniques and pair them with embroidered or crocheted leaves. Position them symmetrically on both arms of the cross to frame the portrait beautifully.
Take your time with every decorative element. The careful layering of embroidery, fringe, floral motifs, and textured stitches transforms a simple crochet cross into a meaningful work of handmade art.
Finishing Your Crochet Jesus Cross
After all decorative elements have been attached, weave in every loose yarn end using a tapestry needle. Hidden ends provide a clean professional finish while improving durability.
Inspect each embroidered section carefully, reinforcing any loose stitches that may experience handling over time. Secure embroidery greatly extends the lifespan of the finished piece.
If the cross will be displayed on a wall, crochet a sturdy hanging loop at the top center or attach a discreet hanging ring to the back before completing the border.
Light steam blocking may be used if needed, taking care not to flatten the textured beard, hair, or floral details. Proper blocking helps the cross maintain its intended shape.
The completed Crochet Jesus Cross also makes a meaningful handmade gift for family members, church communities, religious celebrations, or seasonal decorations throughout the year.
With thoughtful finishing touches and careful craftsmanship, your project becomes a lasting keepsake that combines faith, creativity, and the timeless beauty of crochet.
FAQ
Is the Crochet Jesus Cross suitable for beginners?
Confident beginners who are familiar with basic crochet stitches and simple embroidery techniques can successfully complete this project by working step by step.
Which yarn works best?
Cotton yarn is the preferred choice because it offers excellent stitch definition, durability, and a smooth surface for embroidery.
What crochet hook size should I use?
Most makers use hooks between 2.5 mm and 3.5 mm depending on the yarn weight and desired fabric density.
Can I customize the colors?
Absolutely. While white, cream, burgundy, olive green, and natural tones are traditional choices, you can personalize the color palette to match your preferences.
How do I make the beard look realistic?
Attach individual yarn strands or small bundles, then carefully trim and shape them to create natural texture and movement.
Can this project be displayed on a wall?
Yes. Simply add a reinforced hanging loop or a decorative ring to the back before completing the final finishing steps.
Is the project suitable as a handmade gift?
Yes. The Crochet Jesus Cross is a thoughtful handmade gift for Easter, Christmas, baptisms, confirmations, First Communion, weddings, anniversaries, and many other meaningful occasions.
How should I clean the finished cross?
Dust gently with a soft cloth or clean carefully by hand if necessary. Avoid machine washing to preserve the embroidered details and textured yarn elements.
Conclusion
The Crochet Jesus Cross is a meaningful crochet project that beautifully combines artistic craftsmanship with timeless religious symbolism. Throughout this guide, you have learned how to choose quality materials, crochet the cross foundation, assemble the individual sections, embroider the portrait of Jesus, create textured hair and beard details, add elegant floral embellishments, and finish the project with professional techniques that ensure both durability and beauty.
Whether you create this project as a personal expression of faith, a decorative wall piece, or a heartfelt handmade gift, the Crochet Jesus Cross offers an enjoyable and rewarding crochet experience. Every carefully placed stitch contributes to a finished piece that reflects patience, creativity, and attention to detail while becoming a treasured keepsake for years to come.
If you enjoyed this Crochet Jesus Cross tutorial, we would love to hear your honest opinion. Share your finished project, tell us about your crochet experience, and leave your suggestions for future crochet patterns. Your feedback helps inspire new ideas and supports our growing community of crochet enthusiasts.