
The Crochet Kitty Ears Headband Tutorial is a charming handmade accessory that combines warmth, comfort, and an adorable cat-inspired design. Featuring a soft ribbed crochet band, two pointed kitty ears, and delicate pink inner-ear details, this beautiful headband is perfect for anyone who enjoys cozy accessories with a playful personality. Its simple yet attractive appearance makes it a wonderful project for everyday wear, handmade gifts, and seasonal fashion.
One of the most appealing features of this Crochet Cat Ear Headband Pattern is the combination of classic crochet texture and whimsical details. The cream-colored headband creates a soft, elegant foundation, while the pink ear centers add a delicate touch of color. The pointed ears sit neatly above the band, creating an adorable kitten-inspired appearance without making the accessory overly bulky.
The design shown in the reference image is especially beautiful because it combines a wide, textured ear warmer with carefully shaped triangular ears. The neutral cream yarn gives the headband a sophisticated appearance, making it easy to coordinate with sweaters, scarves, cardigans, and winter outfits. The dusty pink accents add a gentle contrast that highlights the handmade details.
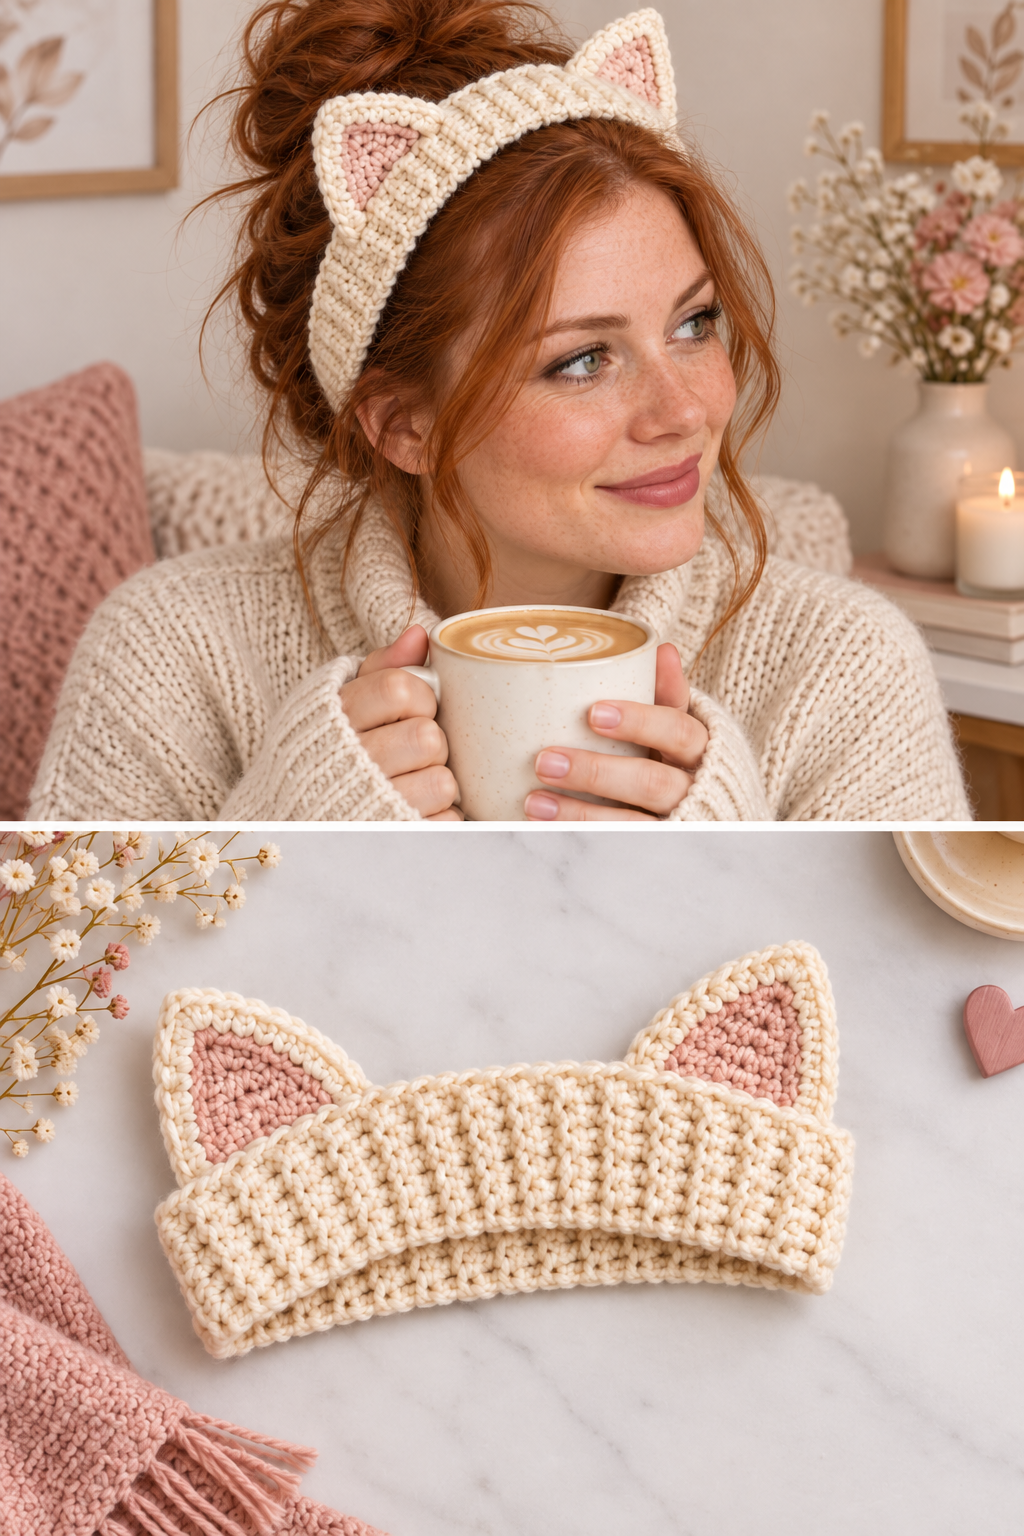
In this complete Crochet Kitty Ears Headband Pattern, you will learn how to select suitable yarn, measure your head, create a comfortable ribbed band, crochet two matching cat ears, add the pink inner-ear sections, and assemble the finished accessory. The tutorial uses US crochet terminology and provides an original, beginner-friendly construction inspired by the reference design.
DISCOVER MORE FREE PATTERNS HERE!
Materials, Crochet Stitches, and Measurements for the Kitty Ears Headband
Before beginning your Crochet Kitty Ears Headband, choosing the right yarn is essential. Since the accessory will be worn around the head, the yarn should feel soft against the skin while providing enough elasticity to remain comfortable.
Worsted-weight acrylic yarn is an excellent option because it is lightweight, affordable, and available in many beautiful colors. Soft wool blends can provide additional warmth, while cotton blends may be preferable for a lighter accessory.
For a design similar to the reference image, choose warm ivory or cream for the main headband. Use soft blush pink for the inner ears. This combination creates a delicate, cozy appearance that works beautifully with casual and winter clothing.
Materials needed
- Approximately 100–150 yards (90–137 meters) of worsted-weight yarn in cream or ivory.
- Approximately 20–30 yards (18–27 meters) of soft pink yarn.
- A 4.5 mm crochet hook.
- A 4.0 mm crochet hook for the ear details, optional.
- Yarn needle.
- Scissors.
- Measuring tape.
- Stitch markers.
- Sewing pins or clips.
- Optional lightweight fabric interfacing for additional ear stability.
Suggested finished measurements
| Size | Head Circumference | Suggested Finished Band Circumference |
|---|---|---|
| Child | 19–20 in (48–51 cm) | 17–18 in (43–46 cm) |
| Teen | 20–21 in (51–53 cm) | 18–19 in (46–48 cm) |
| Adult Small | 21–22 in (53–56 cm) | 19–20 in (48–51 cm) |
| Adult Medium | 22–23 in (56–58 cm) | 20–21 in (51–53 cm) |
| Adult Large | 23–24 in (58–61 cm) | 21–22 in (53–56 cm) |
The headband should generally be slightly smaller than the head circumference so it fits securely without slipping.
However, the ideal amount of negative ease depends on the elasticity of your yarn and stitch pattern.
Recommended headband dimensions
- Headband width: approximately 4–4½ inches (10–11.5 cm).
- Kitty ear height: approximately 2½–3 inches (6.5–7.5 cm).
- Kitty ear base width: approximately 2½–3 inches (6.5–7.5 cm).
- Distance between ears: approximately 3–4 inches (7.5–10 cm).
Crochet abbreviations – US terminology
| Abbreviation | Meaning |
|---|---|
| ch | Chain |
| sc | Single crochet |
| hdc | Half double crochet |
| dc | Double crochet |
| sl st | Slip stitch |
| BLO | Back loop only |
| dec | Single crochet decrease |
| st | Stitch |
| rep | Repeat |
| FO | Fasten off |
Special crochet stitches
Back Loop Only Half Double Crochet: Yarn over, insert the hook into the back loop of the indicated stitch, yarn over and pull up a loop, then yarn over and pull through all three loops.
Single Crochet Decrease: Insert the hook into the next stitch and pull up a loop. Insert the hook into the following stitch and pull up another loop. Yarn over and pull through all three loops.
Slip Stitch Seam: Insert the hook through corresponding stitches of two fabric edges and work slip stitches to join them.
Understanding the headband construction
The Crochet Kitty Ears Headband Pattern consists of three main components.
The first is a wide ribbed crochet band that wraps comfortably around the head.
The second is a pair of cream-colored triangular ears.
The third is a pair of smaller pink inner-ear appliqués.
The ears are assembled separately and sewn securely to the upper edge of the headband.
This method makes it easy to adjust the ear size and position before completing the accessory.
Step-by-Step Crochet Kitty Ears Headband Pattern: Making the Ribbed Ear Warmer
The ribbed band is the foundation of this Crochet Cat Ear Headband Tutorial.
It should be soft, stretchy, and wide enough to cover the ears comfortably.
For this tutorial, we will create a rectangular crochet strip using half double crochet stitches worked in the back loops.
Step 1: Create the foundation chain
Using cream yarn and a 4.5 mm crochet hook, make a slip knot.
Chain 17.
Row 1: Work one half double crochet into the second chain from the hook.
Continue working one half double crochet into each remaining chain.
You should have 16 half double crochet stitches.
Chain 1 and turn.
The turning chain does not count as a stitch.
Step 2: Begin the ribbed texture
Row 2: Work one half double crochet into the back loop only of each stitch across.
You should have 16 stitches.
Chain 1 and turn.
Row 3: Repeat Row 2.
Continue working the same pattern.
The back-loop-only technique creates beautiful raised ridges that resemble knitted ribbing.
Step 3: Continue crocheting the headband
Repeat Row 2 until the strip reaches the desired length.
For an average adult size, begin checking the length when it measures approximately 18 inches.
Gently stretch the strip around your head.
The ends should meet comfortably without excessive tension.
Continue until you achieve the correct fit.
The final length may be approximately 19–21 inches for many adults, depending on yarn elasticity.
Step 4: Check the width and fit
Lay the strip on a flat surface.
Measure the width.
The band should be approximately 4–4½ inches wide.
If it is too narrow, begin again with a slightly longer foundation chain.
If it is too wide, reduce the number of foundation stitches.
Try wrapping the strip around your head before joining the ends.
The band should feel secure but comfortable.
Step 5: Join the headband ends
Fold the crochet strip so the short ends meet.
Make sure the ribbed texture is aligned.
Insert the hook through corresponding stitches along both ends.
Work slip stitches across the seam.
Fasten off, leaving a yarn tail.
Turn the headband so the seam is positioned on the inside.
The ribbed band should now form a continuous circle.
Step 6: Finish the headband edges
Attach cream yarn to one long edge of the headband.
Work one single crochet evenly around the edge.
Join with a slip stitch.
Fasten off.
Repeat along the opposite edge.
This creates a neat finish and helps the headband maintain its shape.
Avoid working the edging too tightly because the band needs to stretch comfortably.
How to Crochet the Kitty Ears and Add the Pink Inner-Ear Details
The pointed ears are the most recognizable feature of the Crochet Kitty Ears Headband.
To achieve a beautiful result, both ears should have similar dimensions and a firm triangular shape.
For this tutorial, each ear is made from two matching cream-colored triangles with a smaller pink triangle attached to the front.
Step 1: Crochet the first cream-colored ear
Using cream yarn and a 4.0 mm crochet hook, chain 13.
Row 1: Work one single crochet into the second chain from the hook and into each remaining chain. (12)
Chain 1 and turn.
Row 2: Work one decrease, then one sc in each of the next 8 stitches, followed by one decrease. (10)
Chain 1 and turn.
Row 3: Work one sc into each stitch across. (10)
Chain 1 and turn.
Row 4: Work one decrease, then one sc in each of the next 6 stitches, followed by one decrease. (8)
Chain 1 and turn.
Row 5: Work one sc into each stitch across. (8)
Chain 1 and turn.
Step 2: Shape the pointed tip
Row 6: Work one decrease, then one sc in each of the next 4 stitches, followed by one decrease. (6)
Chain 1 and turn.
Row 7: Work one sc into each stitch across. (6)
Chain 1 and turn.
Row 8: Work one decrease, then one sc in each of the next 2 stitches, followed by one decrease. (4)
Chain 1 and turn.
Row 9: Work one decrease twice. (2)
Chain 1 and turn.
Row 10: Work one decrease. (1)
Fasten off.
The ear should now have a pointed triangular shape.
Step 3: Make the remaining cream ear pieces
Repeat the same instructions until you have four identical cream triangles.
Two pieces will form the front of the ears.
The remaining two pieces will form the back.
Lay all four pieces flat.
Check that their shapes and dimensions are consistent.
If necessary, gently block the triangles before assembling them.
Step 4: Crochet the pink inner-ear triangles
Using soft pink yarn, chain 9.
Row 1: Work one sc into the second chain from the hook and into each remaining chain. (8)
Chain 1 and turn.
Row 2: Work one decrease, 4 sc, and one decrease. (6)
Chain 1 and turn.
Row 3: Work one sc in each stitch across. (6)
Chain 1 and turn.
Row 4: Work one decrease, 2 sc, and one decrease. (4)
Chain 1 and turn.
Row 5: Work one decrease twice. (2)
Chain 1 and turn.
Row 6: Work one decrease. (1)
Fasten off, leaving a long yarn tail.
Make a second identical pink triangle.
Step 5: Attach the pink inner-ear pieces
Place one pink triangle over the center of a cream ear front.
Position it approximately ¼ inch above the lower edge.
Use sewing pins to hold it in place.
Thread a yarn needle with the pink yarn tail.
Sew around the edges using small, even stitches.
Repeat for the second ear.
The pink triangles should be centered and symmetrical.
Step 6: Assemble the ears
Place one decorated cream triangle over one plain cream triangle, with the pink appliqué facing outward.
Align the edges.
Using cream yarn, work single crochet stitches through both layers along the two sloping sides.
Leave the bottom edge open.
For additional stability, insert a small piece of lightweight interfacing if desired.
Avoid overstuffing the ears.
Repeat for the second ear.
The finished ears should be firm enough to stand upright while remaining soft and comfortable.
Assembling the Crochet Cat Ear Headband, Color Variations, and Finishing Tips
Once the headband and ears are complete, you can begin assembling the final accessory.
Proper ear placement is important because it determines the overall appearance of the Crochet Kitty Ears Headband Pattern.
The ears should sit symmetrically near the upper edge of the band.
Step 1: Position the kitty ears
Lay the headband flat with the front facing upward.
Identify the center front.
Place one ear approximately 1½–2 inches to the left of the center.
Place the second ear the same distance to the right.
The exact spacing depends on the headband size.
Pin the ears in place.
Try on the headband to check the position before sewing.
Step 2: Attach the first ear
Thread a yarn needle with cream yarn.
Position the open bottom edge of the first ear along the upper edge of the headband.
Sew through the ear base and the headband fabric.
Use several small, reinforced stitches.
Make sure the ear stands upright.
Avoid pulling the stitches so tightly that the headband loses its elasticity.
Step 3: Attach the second ear
Repeat the same process with the second ear.
Check that both ears are positioned at similar angles.
The ears should appear balanced when the headband is worn.
If one ear leans outward, add a few extra stitches near its base.
Keep the stitching discreet.
Step 4: Reinforce the ear attachments
Turn the headband inside out.
Inspect the attachment points.
Use matching yarn to add several reinforcing stitches along the inner edge of each ear base.
Weave the yarn tails securely into the headband.
Trim excess yarn.
This helps prevent the ears from becoming loose during regular use.
Step 5: Shape and block the finished headband
Gently dampen the accessory according to the yarn manufacturer’s care instructions.
Lay it flat on a towel.
Shape the ears carefully.
Avoid stretching the ribbed band excessively.
Allow the headband to dry completely.
Blocking helps the ears maintain their shape and gives the finished accessory a polished appearance.
Step 6: Add optional decorative details
You can personalize the headband with small crochet bows, embroidered flowers, or contrasting edging.
For a delicate appearance, add a tiny cream bow between the ears.
For a playful design, use brighter colors for the inner ears.
For a minimalist version, keep the headband entirely cream.
Avoid attaching heavy decorations that could make the ears droop.
Beautiful Color Combinations for the Crochet Kitty Ears Headband
Ivory and Blush Pink: A soft, romantic combination inspired by the reference image. Perfect for a cozy and feminine appearance.
Lavender and White: A delicate pastel pairing that creates a charming spring-inspired accessory.
Sage Green and Cream: A sophisticated botanical palette that looks beautiful with neutral clothing.
Dusty Rose and Champagne: An elegant vintage-inspired combination with a warm handmade feeling.
Black and Pink: A classic playful cat-inspired combination that creates a striking contrast.
Caramel Brown and Ivory: A warm neutral palette that complements autumn and winter outfits.
Baby Blue and White: A fresh, delicate combination suitable for soft pastel fashion.
Helpful Tips for a Perfect Crochet Kitty Ears Headband
Choose soft yarn. The headband should feel comfortable against the forehead and ears.
Maintain consistent tension. Even stitches help the ribbed band stretch uniformly.
Measure before joining. Check the fit around the head before sewing the ends together.
Make matching ears. Count your stitches carefully so both triangles have the same shape.
Use reinforced stitching. Secure ear attachments help the accessory maintain its appearance.
Avoid excessive stuffing. Flat, structured ears usually look neater than heavily stuffed ones.
Frequently Asked Questions About the Crochet Kitty Ears Headband Tutorial
1. Is the Crochet Kitty Ears Headband suitable for beginners?
Yes. The project uses basic crochet stitches, simple decreases, and straightforward sewing techniques.
2. What yarn is best for this headband?
Soft worsted-weight acrylic, wool-blend, or cotton-blend yarn works well.
3. What crochet hook should I use?
A 4.5 mm hook is recommended for the headband, while a 4.0 mm hook can be used for the ears.
4. How wide should the headband be?
Approximately 4–4½ inches is suitable for many adult sizes.
5. Can I make the headband for children?
Yes. Adjust the circumference according to the child’s head measurement and ensure the accessory fits comfortably.
6. Can I make the ears larger?
Yes. Increase the foundation chain and add additional shaping rows.
7. How do I make the ears stand upright?
Use firm stitches, double-layer construction, and reinforced attachment points.
8. Can I use different colors?
Absolutely. You can create classic, pastel, vintage, or vibrant color combinations.
9. Can I make the headband without pink inner ears?
Yes. The ears can be made entirely in one color for a simpler appearance.
10. Is this headband suitable for winter?
Yes. The wide ribbed band provides warmth around the forehead and ears.
11. Can I use cotton yarn?
Yes. Cotton yarn creates a breathable accessory, although it may have less elasticity than some wool or acrylic blends.
12. How do I prevent the headband from stretching too much?
Use a firm ribbed stitch pattern and avoid making the finished circumference larger than necessary.
13. Can I add a bow?
Yes. A small crochet bow can be attached between the ears or near one side.
14. How should I wash the finished headband?
Follow the yarn manufacturer’s care instructions. Gentle washing and flat drying are usually suitable for delicate crochet accessories.
15. Can I sell handmade kitty ears headbands?
Handmade accessories created from your own work can generally be sold, subject to applicable pattern rights, product safety requirements, and local regulations.
Conclusion
The Crochet Kitty Ears Headband Tutorial is a delightful project that combines cozy crochet texture with an adorable cat-inspired design. Its soft ribbed band, pointed ears, and delicate pink accents create a charming handmade accessory that is both practical and stylish.
One of the greatest advantages of this pattern is its flexibility. You can adjust the size, width, ear shape, and color combinations to create a headband that suits different ages and personal preferences.
The project also provides an excellent opportunity to practice back-loop crochet stitches, simple shaping techniques, appliqué, and secure assembly.
For anyone who enjoys making handmade accessories, the Crochet Cat Ear Headband is a wonderful choice. Its playful appearance makes it suitable for everyday wear, cozy winter outfits, handmade gifts, and creative fashion collections.
Whether you choose the elegant cream-and-pink combination shown in the reference image or experiment with lavender, sage green, dusty rose, or classic black, the finished headband can become a unique accessory with plenty of personality.
With careful measurements, even stitches, and attention to the finishing details, your Handmade Kitty Ears Headband can become a beautiful, comfortable, and memorable crochet creation that brings a little extra charm to any outfit.