
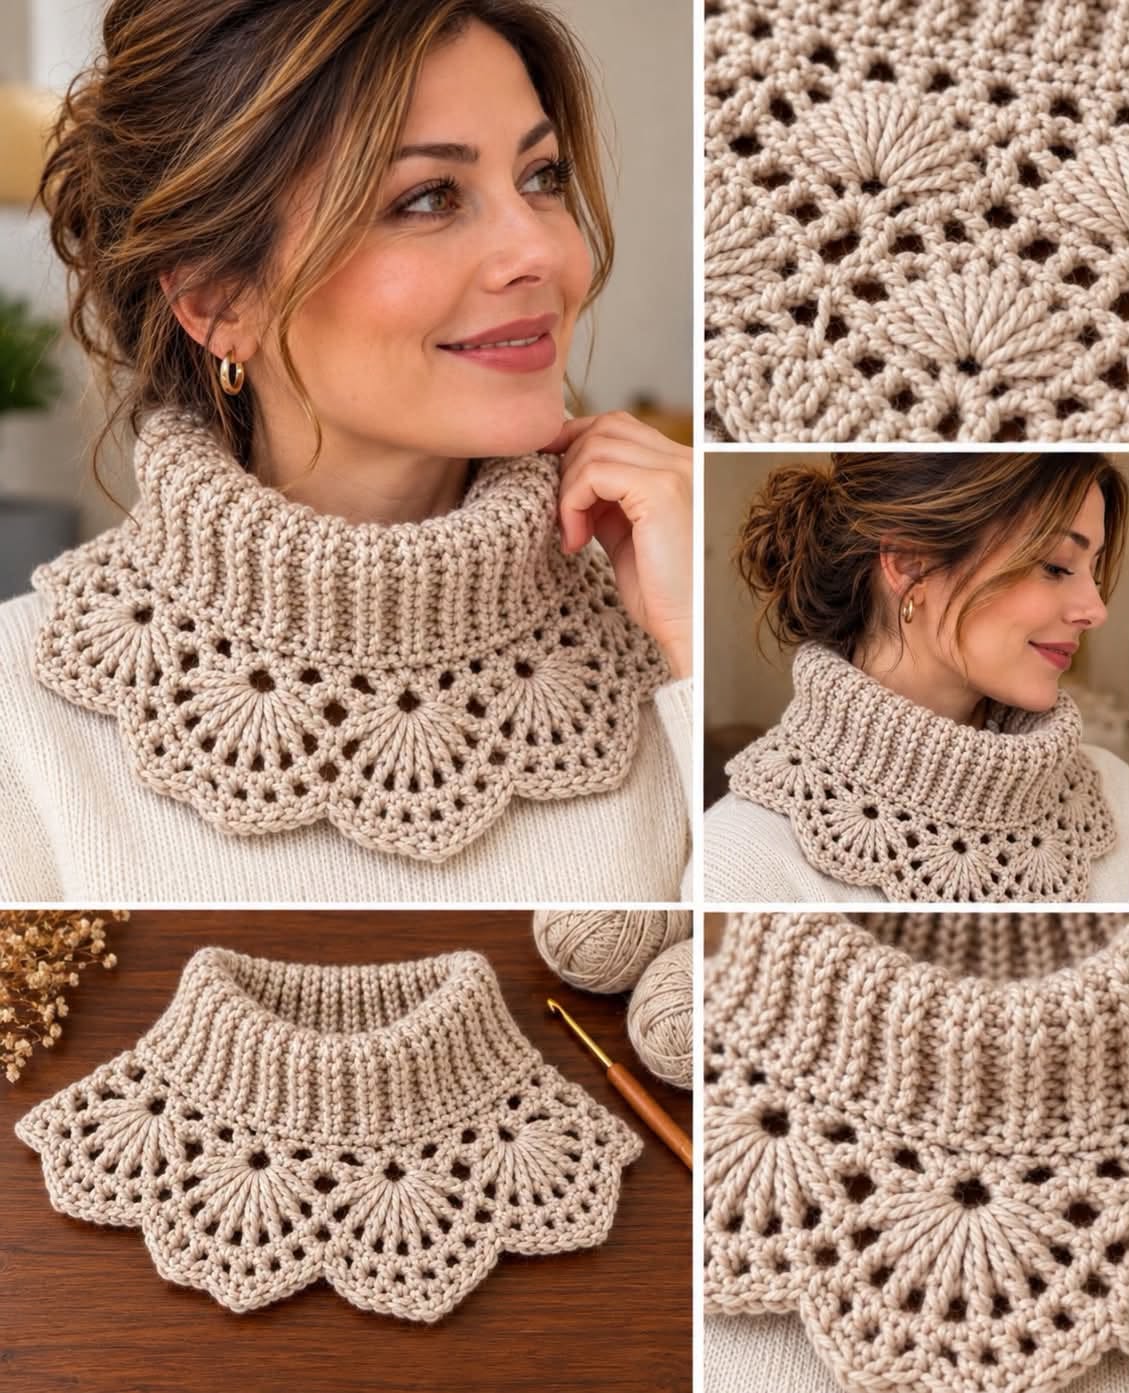
The Crochet Lace Collar Pattern brings a delicate handmade touch to everyday clothing, turning a simple neckline into a beautiful focal point. With open stitches, softly scalloped edges, and lightweight cotton thread, a lace collar can complement everything from a plain blouse to a favorite dress. It is also a satisfying project for crocheters who enjoy small accessories with plenty of decorative detail.
A crochet lace collar offers many opportunities for personalization. Cream creates a vintage appearance, white looks crisp and traditional, and richer colors make the lace stand out against neutral clothing. You can also adjust the length, width, and closure to suit your wardrobe. Because a collar uses relatively little material, it is a practical way to experiment with finer yarns and more intricate stitch combinations.
This tutorial explains how to make an original scalloped crochet collar using U.S. crochet terminology. It is an adaptable design rather than a verified reproduction of the collar in your photograph. The instructions combine a simple foundation with open chain arches and a decorative shell border, giving you a clear starting point for creating a lightweight accessory with an elegant finish.
Materials and Measurements for a Crochet Lace Collar
Choose a smooth fine cotton yarn or crochet thread that allows the individual stitches to remain visible. Size 3 crochet thread is a manageable option for a first lace accessory, while size 10 thread produces a finer result. These materials are not interchangeable at the same gauge, so the amount of yarn, hook size, and finished dimensions will vary. Have approximately 150–250 yards available as a planning allowance.
DISCOVER MORE FREE PATTERNS HERE!
Use a crochet hook suited to your thread, beginning with the range printed on the label. You will also need scissors, a tapestry needle, a flexible measuring tape, stitch markers, and rustproof blocking pins. A blocking mat or a clean towel over a suitable pinning surface is helpful. For the closure, this tutorial uses two separate chain ties, avoiding the need to plan a buttonhole.
Measure around the neckline where you want the collar to sit. A collar worn over a blouse may need a different inner length from one worn directly against the neck. For an adult example, an inner edge of approximately 16–18 inches / 41–46 cm can be a useful starting point, but your own measurement should determine the size. Allow comfortable room and remember that the front opening can remain slightly separated.
Make a small sample before committing to the full foundation. For the stitch sequence below, begin the sample with 25 chains, then follow the same rows used for the collar. Wash and block this sample before measuring it. This helps you judge the openness of the lace, the softness of the fabric, and how much the thread changes after finishing. A starting chain alone does not reliably predict the finished neckline.
The collar foundation uses a multiple of four chains plus one: 4n + 1 chains. After the first row, this gives a multiple of four single crochet stitches. For example, 97 starting chains produce 96 single crochet stitches and 24 arch repeats. This is a stitch-count example, not a guaranteed adult size. Choose the number of repeats using your blocked sample and neckline measurement.
The U.S. abbreviations used here are ch for chain, sc for single crochet, dc for double crochet, and sl st for slip stitch. A chain space is the opening beneath a chain arch. Turning chains do not count as stitches in this pattern. The collar is worked back and forth in rows, leaving two short ends at the front for the ties.
Step-by-Step Foundation and Open Lace Rows
Foundation: Chain the number calculated from your sample, keeping the count at a multiple of four plus one. Work loosely enough that the chain does not feel like a tight cord. If you habitually make tight chains, try a slightly larger hook for the foundation only. Count the chains before continuing and place a marker every 20 chains to make checking a longer foundation easier.
Row 1: Work 1 sc into the second chain from the hook and into every remaining chain. You should finish with a multiple of four single crochet stitches. This row establishes the inner neckline edge, so inspect it carefully for missing stitches or accidentally doubled stitches. If using the 97-chain example, your count at the end of this row must be 96 sc.
Row 2: Ch 1 and turn. Work 1 sc in the first stitch. Repeat [ch 4, skip 3 stitches, sc in the next stitch] until three stitches remain. Ch 4, skip the next two stitches, and sc in the last stitch. The slightly different final spacing keeps both ends anchored. With 96 stitches in Row 1, you will have 24 chain arches.
Row 3: Ch 1 and turn. Work 1 sc in the first sc. Ch 3 and work 1 sc into the first chain arch. Repeat [ch 4, sc in the next chain arch] across the remaining arches. Finish with ch 3 and 1 sc in the last sc. Work beneath each arch rather than into an individual chain, and keep the chains relaxed and consistent.
Row 4: Ch 1 and turn. Work 1 sc in the first sc. Ch 3, skip the first ch-3 space, and work 1 sc in the next sc. Repeat [ch 5, sc in the next sc] across the row, stopping at the sc immediately before the final ch-3 space. Ch 3 and sc in the last sc. The longer interior arches provide additional room along the outer portion.
Lay the work around your intended neckline after completing these rows. The open fabric should begin to accommodate a gentle curve, although the final shape will become clearer after blocking. If it pulls tightly or forms strong ruffles, pause and adjust your hook or chain tension. Blocking can refine a curve, but it cannot reliably correct a substantial sizing or shaping problem.
Creating the Scalloped Border and Front Ties
Row 5: Ch 1 and turn, then work 1 sc in the first sc. Work 5 dc into the first ch-3 space, followed by 1 sc in the next sc. Across the interior arches, repeat [7 dc into the next ch-5 space, sc in the next sc]. Finish with 5 dc in the final ch-3 space and 1 sc in the last sc.
This row forms the scalloped lace border. Each group of double crochet stitches creates a rounded fan, while the single crochet stitches between groups define the dips. Keep all stitches in a shell within the same chain space. Accidentally working a double crochet into an adjacent anchor stitch can distort the fan and make the next repeat appear uneven.
Check the border before fastening off. The scallops should look reasonably consistent, with smaller shells at the two ends and fuller shells across the center. If a shell folds over itself, first check its stitch count and the tension of its supporting arch. If the entire edge is excessively wavy, revise the sample before continuing with a full-size collar.
For a simple finish, fasten off after the shell row and weave the tail through several stitches on the reverse side. Work the starting tail into the neckline row without pulling it tight. Avoid large knots that could create an uncomfortable lump against the skin. Keep the outer shells free so they can open evenly during blocking.
To make the front ties, join the thread securely at one end of the inner neckline edge. Chain until the tie measures approximately 8–10 inches / 20–25 cm, or your preferred length. Slip stitch back along the chain, beginning in the second chain from the hook, then anchor the tie securely at its base. Repeat at the opposite neckline end.
Check that both ties are equal in length and that their bases feel secure. Tie them into a loose bow while trying the collar over your chosen garment. The bow should hold the ends comfortably without drawing the neckline tightly inward. This tie closure is intended for an adult accessory; a child’s version requires a different design assessment and should not simply copy long neck ties.
Blocking, Styling, and Caring for Your Finished Collar
Blocking crochet lace helps the openwork become clearer and the scallops settle into shape. Follow the thread manufacturer’s washing instructions, wet the collar gently, and press out excess moisture without twisting. Roll it in a clean towel to remove more water. Place it on the blocking surface while it is still damp, arranging the inner edge into a smooth neckline curve.
Pin the two neckline ends first, then distribute the collar evenly around the curve. Adjust the outer shells one by one, using light tension to open the lace. Keep the left and right sides balanced rather than stretching one side to match an incorrectly sized section. The inner neckline should retain the measurement established from your sample and fitting.
Allow the collar to dry completely before removing the pins. Depending on the fiber and conditions, drying may take several hours or longer. Avoid applying direct heat unless the yarn label permits it. Metallic blends and synthetic fibers can react differently from cotton, so a finishing method suitable for one thread may be unsuitable for another.
Style your handmade crochet collar over a round-neck blouse, a plain sweater, or a simple dress. A solid background makes the lace structure easier to see. Ivory and soft beige work well for a vintage-inspired look, while navy, burgundy, or forest green can create a stronger accent. Select the color according to the garments you expect to wear most often.
For routine care, wash the collar gently according to its fiber instructions and reshape it while damp. Avoid hanging wet lace from the ties, which may stretch the neckline. Store the collar flat when practical, or fold it loosely with tissue supporting the scalloped edge. If it loses definition after washing, a light repeat blocking usually restores its presentation.
Keep notes on your foundation count, hook size, thread, and blocked dimensions. Those details make the project easier to repeat and help you adapt the design for another neckline. If you want a significantly deeper collar, develop and block a new sample with additional shaping rows. Simply adding more rows without allowing for the wider outer circumference may produce a collar that cups or pulls.
Frequently Asked Questions
Is this crochet lace collar suitable for beginners?
It can suit a confident beginner who already understands chains, single crochet, double crochet, and working into chain spaces. Making the short sample first is especially useful because it lets you practice every row before starting the full collar.
How do I make the collar longer or shorter?
Adjust the foundation by groups of four chains while keeping the total at 4n + 1. Each added group produces one additional arch in Row 2. Use the blocked sample to estimate how much length each repeat contributes.
Can I use thicker yarn?
Yes, but the collar will become thicker and the shells larger. Recalculate the foundation from a new sample rather than following the same chain count. A fine, smooth yarn generally produces a more delicate accessory than a bulky or fuzzy yarn.
Why does my collar curl or ruffle?
Possible causes include tight chains, inconsistent tension, incorrect stitch counts, or a mismatch between the shaping and your chosen material. Check the pattern repeats first. Mild unevenness may improve with blocking; pronounced distortion usually requires an adjustment to the crochet.
Does this pattern reproduce the photographed collar exactly?
No. It provides an original, adaptable lace collar construction. An exact reproduction would require a verified stitch chart or a sufficiently detailed examination of the original piece.
Conclusion
A Crochet Lace Collar Pattern is a lovely way to practice openwork while making an accessory you can use across several outfits. By measuring the neckline, checking a blocked sample, and following the arch-and-shell sequence carefully, you can create a collar with a comfortable inner edge and a decorative scalloped finish. Thoughtful color selection and patient finishing give this small handmade project its character.