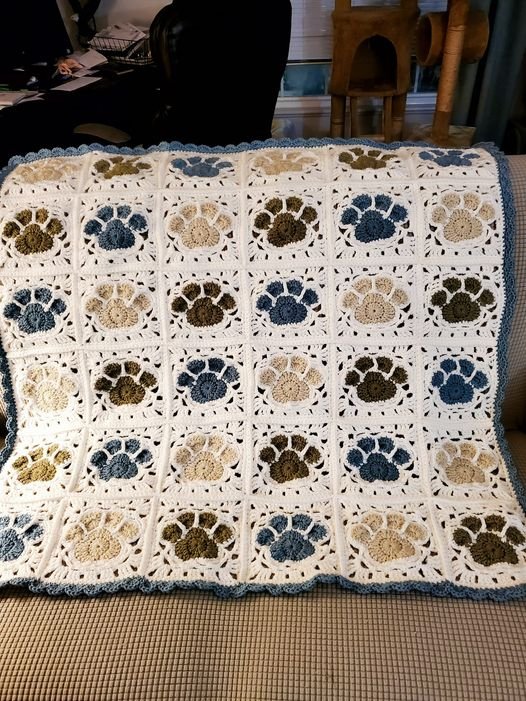
Crochet Paw Square is a delightful project for both beginner and experienced crocheters. Whether you are creating a unique gift, decorating your home, or just enjoying the calming rhythm of crochet, this tutorial will guide you step-by-step through the process of making a charming paw print square. This technique combines the timeless craft of crochet with the playful and endearing image of paw prints, resulting in a fun and meaningful piece of art.
Crochet projects have gained immense popularity in recent years, with many people turning to them as a way to express creativity while also creating something useful. One of the most beloved designs among crocheters is the paw print motif, which can be used for a wide range of items, from blankets and pillows to bags and even wearable accessories. The Crochet Paw Square tutorial is an ideal project to try, whether you’re looking to make a pet-inspired gift or add a personal touch to your crochet collection.
This guide will walk you through everything you need to know to create your very own Crochet Paw Square. From the necessary materials and basic stitches to tips for customizing your design, we will ensure that you have all the tools you need to complete this project with ease and joy. So, let’s dive in and start crocheting the perfect paw print square together!
1. Materials You Will Need
Before starting your Crochet Paw Square, it’s essential to gather all the necessary materials. This will help you avoid interruptions during your crochet session. Here’s a list of everything you will need:
DISCOVER MORE FREE PATTERNS HERE!
- Yarn – Choose a yarn that suits your project. For paw print squares, medium-weight yarn (also known as worsted weight) works well. You can opt for any color, but a classic combination is a beige or cream color for the background with contrasting colors for the paw prints, such as black or brown.
- Crochet Hook – A 4.0mm (G-6) crochet hook is ideal for medium-weight yarn. However, check your yarn label for hook recommendations.
- Scissors – A sharp pair of scissors will make cutting yarn clean and easy.
- Yarn Needle – You will need a yarn needle to weave in ends and attach the paw print pieces to your square.
- Stitch Marker – This is optional but helpful in marking the beginning of your rounds.
Once you have all your materials ready, you’re prepared to begin your Crochet Paw Square project!
Crocheting is an enjoyable hobby, and having the right materials can make the experience even better. Make sure to choose yarn that feels comfortable in your hands. If you’re just starting, you can practice with yarn scraps before beginning your main project to get the feel of the stitches.
2. Basic Crochet Stitches for the Paw Square
The Crochet Paw Square tutorial requires only a few basic crochet stitches. These stitches will help you create a clean and neat paw print design. Here’s a brief explanation of each:
- Chain Stitch (ch) – This is the foundation stitch for most crochet projects. It’s used to create the starting foundation and in many patterns as an easy connector between stitches.
- Slip Stitch (sl st) – A slip stitch is used to move your yarn across stitches without adding height. It’s often used to join rounds or finish off a piece.
- Single Crochet (sc) – Single crochet is a tight, firm stitch that works well for creating solid blocks of color. It’s great for the background of the paw print.
- Double Crochet (dc) – Double crochet is a taller stitch that adds height and texture to your work. It’s used to build the structure of the paw print design.
Once you’re familiar with these basic stitches, you can easily follow along with the paw square pattern. For beginners, practicing these stitches in a small swatch will help you build confidence before starting your main square.
3. How to Create the Paw Print Design
Creating the actual paw print design is the most fun part of this project! The paw print itself is composed of a square with four toes and a larger pad. Here’s how to do it:
- Start by making a foundation chain. The number of chains will depend on the size of your square, but a typical starting point is around 10 chains.
- Work in rounds to form the square. Each round will add a layer of stitches, gradually building your square’s shape.
- Once your square is formed, it’s time to crochet the paw print. The paw print consists of five sections: four toes and the central pad. You can either crochet them individually and sew them onto the square, or you can crochet them directly onto the square for a seamless design.
- For each toe, create small circles or ovals using single and double crochet stitches. The central pad can be made with a larger oval or circle.
- Once you’ve completed your paw print, you can attach it to the square using slip stitches or a yarn needle.
This method gives you flexibility in terms of customization, and you can adjust the size and placement of the paw print to fit your personal style. After completing the paw design, continue with the rest of your square to create a beautiful, cohesive piece.
4. Tips for Customizing Your Crochet Paw Square
While the basic design of the Crochet Paw Square is simple to follow, there are plenty of ways to make your square unique. Here are some tips for customizing your paw print square:
- Use Color Variations – Instead of using traditional colors, feel free to experiment with different color combinations for the background and paw print. You could use a bright color palette for a playful design or more muted tones for a sophisticated look.
- Add Borders – After completing the paw square, you can add a border around the edges to make it stand out. A simple single crochet border works well, or you could try a shell stitch for more texture.
- Create Different Sizes – Adjust the number of rounds or rows to make your paw print square larger or smaller. This is helpful if you’re using the squares to make a blanket or a pillow cover.
- Incorporate Other Motifs – If you want to make a larger project, consider adding other motifs alongside your paw print square, such as hearts or flowers.
- Try Different Shapes – Instead of a square, you can experiment with other shapes like circles or rectangles to create a different effect for your project.
- Make It Three-Dimensional – For a fun twist, add texture by incorporating a three-dimensional effect on the paw print. You can do this by adding a raised surface to the toes or the pad.
By applying some of these customization ideas, you can make your Crochet Paw Square one-of-a-kind and tailored to your taste!
FAQ – Common Questions About Crochet Paw Square
1. Can I use any yarn for this project?
Yes, you can use any type of yarn for your Crochet Paw Square, but medium-weight yarn (worsted weight) is highly recommended for its versatility. Choose colors that match the theme you want for your square.
2. How do I make the paw print appear more realistic?
To make the paw print look more realistic, focus on adding details like slightly rounded edges for the toes and pad. You can also use a different color for each toe and the central pad to give it more depth.
3. Can I use this design for a blanket?
Yes, the Crochet Paw Square is perfect for creating a blanket. You can crochet several paw print squares and join them together to make a large, cozy blanket for yourself or as a gift.
4. What if I don’t know how to make a square?
If you’re unfamiliar with crocheting squares, start by practicing simple square patterns before attempting the paw print square. It’s important to be comfortable with the basic crochet stitches first.
5. Is it hard to crochet the paw print design?
Not at all! The paw print design is easy to follow once you know the basic crochet stitches. If you’re new to crochet, start by practicing the paw print on a small swatch before adding it to your square.
6. Can I add a border around my square?
Yes, adding a border around your Crochet Paw Square will give it a finished look. You can experiment with different border stitches, like shell stitches or picot edges, to suit your design style.
In this Crochet Paw Square – TUTORIAL, we’ve covered everything you need to know to create a beautiful paw print design. From gathering materials to basic crochet stitches, and tips for customizing your square, you’re now equipped to make a unique piece of crochet art. Don’t forget to experiment with colors, borders, and other motifs to add your personal touch to the design.
We hope this tutorial has inspired you to start crocheting your own paw print squares. Whether you’re making a cozy blanket or a fun decorative item, this pattern is sure to bring joy to your crafting sessions. We’d love to hear your thoughts—please leave a sincere opinion or any suggestions for improvement in the comments below! Happy crocheting!

