If you’re looking for a fun and functional way to brighten up your home decor, the Watermelon Crochet Coaster is an excellent choice. This quick and easy crochet project will add a splash of color to your table, while also protecting your surfaces from hot cups and glasses. Whether you’re an experienced crocheter or just starting out, this tutorial will guide you through the process of creating your own watermelon-themed coasters. The vibrant and playful design of the watermelon will instantly bring a fresh and summery vibe to your home.
Crochet is a versatile craft that can be used to make all sorts of items, from clothing to home accessories. The Watermelon Crochet Coaster is perfect for beginners and seasoned crocheters alike, thanks to its straightforward design and simple stitches. In this article, we will walk you through the step-by-step process of crocheting a watermelon coaster, ensuring that you have all the knowledge and tips you need to complete the project.
Before you begin, it’s essential to gather the right materials and tools for the job. Having the correct yarn and hook size is crucial for achieving the perfect watermelon coaster. In this tutorial, we will cover everything from choosing the right materials to completing the final round of your coaster, ensuring a smooth and successful crochet experience.
1. Choosing the Right Materials for Your Watermelon Crochet Coaster
Selecting the right materials is the first step in creating your Watermelon Crochet Coaster. The materials you choose will affect the overall look, texture, and durability of your coasters. Here’s what you’ll need:
DISCOVER MORE FREE PATTERNS HERE!
Start with a cotton yarn, as it is durable and perfect for items that will come in contact with liquids. Cotton yarn is absorbent and holds its shape well, making it an ideal choice for coasters. You can use a medium weight yarn (like worsted weight) for a sturdy coaster.
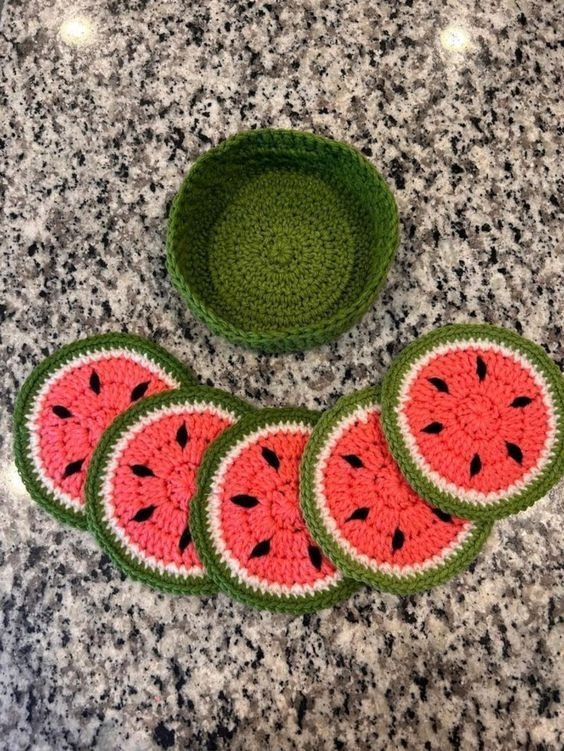
For the colors, you’ll need at least three: a vibrant pink or red for the watermelon flesh, green for the rind, and black for the seeds. You can also add white or cream for the border if you want to make the coaster look more detailed.
When choosing a hook size, consider using a hook that matches your yarn weight. For most medium weight cotton yarns, a 4.0mm (G-6) crochet hook is a great choice. Using the right size hook will help you achieve the right tension and ensure that your coaster is neither too tight nor too loose.
You’ll also need a yarn needle to weave in the ends once your coaster is finished, as well as a scissors to trim any loose threads. Make sure your materials are organized and ready before you begin crocheting.
2. Crocheting the Watermelon Crochet Coaster
Now that you have your materials, it’s time to start crocheting the Watermelon Crochet Coaster. Follow these simple steps to create your coaster:
Begin by creating a magic ring (also known as a magic circle). This will serve as the center of your coaster. If you’re unfamiliar with the magic ring, you can start with a chain of 4 and join it into a circle instead.
Next, work your first round by crocheting 6 single crochet (sc) stitches into the magic ring. Pull the ring tight to close the hole in the center.
For the second round, increase by crocheting 2 single crochet stitches into each stitch around. This will give the coaster its circular shape and increase its size. By the end of this round, you should have 12 stitches.
Continue increasing in the third round by crocheting 2 single crochet stitches into each stitch of the previous round, resulting in 24 stitches.
Once you’ve reached the correct size for the watermelon’s flesh, switch to the green yarn. This will form the outer edge, representing the watermelon rind. To transition smoothly, join the green yarn at the end of the last round with a slip stitch.
Now that you’re working with green yarn, continue crocheting the next few rounds without increasing. This will create the outer ring of the coaster. Depending on the size of your coaster, you may want to crochet 3-4 more rounds using the green yarn.
After completing the green rounds, finish off the green yarn and weave in the ends. You can also add a border in white or cream for a cleaner, finished look.
3. Adding the Watermelon Seeds and Final Touches
The watermelon seeds are the final detail that will make your Watermelon Crochet Coaster come to life. Adding these small touches will give the coaster a realistic and playful appearance. Here’s how you can create and add the seeds:
Start by cutting small pieces of black yarn. You’ll need to make several small seed shapes, which are simply small knots or ovals. The seeds should be placed randomly across the pink center of the coaster, spaced evenly apart.
To attach the seeds, simply thread your yarn needle with the black yarn and sew the seeds onto the pink section of the coaster. Make sure the seeds are secure, but don’t pull too tightly on the yarn, as this could distort the shape of the coaster.
You can add as many or as few seeds as you like, depending on your personal preference. If you’d like a more realistic look, you can even create slightly larger seeds by crocheting small ovals using the black yarn and then attaching them to the coaster.
Once all of the seeds are sewn in, take a moment to admire the look of your watermelon coaster. You should now have a finished, vibrant watermelon design with its iconic pink flesh, green rind, and black seeds. If you’re making a set of coasters, repeat the process until you have as many as you need.
4. Finishing Your Watermelon Crochet Coaster
The final step is to weave in any loose yarn ends and make sure everything is tidy. Here’s how to finish your Watermelon Crochet Coaster:
Using a yarn needle, weave in any loose ends from the yarn. Be sure to tuck the ends securely into the back of the coaster, so they don’t unravel. You can also trim any excess yarn with your scissors to avoid any stray threads.
If you want to give your coaster a more polished finish, consider blocking it. Blocking involves wetting the coaster and gently shaping it to the correct dimensions before letting it dry. This can help the coaster hold its shape and make it look more professional.
Once your coaster is blocked and all ends are woven in, it’s ready to be used! You can place it under your cups, glasses, or mugs to protect your surfaces, or display it as a cute and functional decoration on your coffee table.
You can also experiment with different color combinations, such as using yellow yarn for a lemon coaster or red for a strawberry coaster. The possibilities are endless with this fun and easy crochet project!
FAQ (Frequently Asked Questions)
1. How long does it take to make a Watermelon Crochet Coaster?
The time it takes to make a Watermelon Crochet Coaster depends on your experience level, but on average, it should take about 1-2 hours to complete one coaster.
2. Can I make a coaster with a different fruit design?
Yes, you can easily adapt this pattern to create coasters with other fruit designs. Use yellow yarn for lemons, orange for oranges, or red for strawberries to create a fun set of fruit-themed coasters.
3. Do I need special crochet skills for this project?
No, the Watermelon Crochet Coaster is beginner-friendly and uses basic crochet stitches like single crochet, chain, and slip stitch. Even if you’re new to crochet, this tutorial will guide you through each step.
4. How do I wash my watermelon crochet coaster?
Since cotton yarn is durable and washable, you can wash your Watermelon Crochet Coaster in cold water. Lay it flat to dry to maintain its shape.
5. Can I make a larger watermelon coaster for serving plates or bowls?
Yes! You can adjust the number of rounds to make a larger coaster for plates or bowls. Just increase the number of stitches in each round to match the size you want.
In this Watermelon Crochet Coaster – Tutorial, you’ve learned how to make a bright and cheerful watermelon coaster perfect for any home. We covered everything from selecting the right materials to finishing off your coaster with adorable watermelon seeds. This simple yet fun project is a great way to practice your crochet skills while creating something beautiful and practical for your home.
We hope you enjoyed this tutorial! If you have any feedback, questions, or suggestions for future crochet tutorials, feel free to share your thoughts. Happy crocheting!