If you’re searching for a fun and elegant way to elevate your crochet projects, the Crochet Star Stitch – TUTORIAL is exactly what you need. This versatile stitch combines a beautiful texture with a star-like pattern that adds depth and detail to your work. Whether you’re a beginner or a seasoned crocheter, learning the Crochet Star Stitch – TUTORIAL will open up new possibilities for crafting blankets, scarves, dishcloths, and more.
The Crochet Star Stitch is not only visually impressive but also meditative to work with. Its repetitive sequence offers a calming rhythm that makes it perfect for relaxing crochet sessions. Plus, it looks much more intricate than it actually is, which makes it an ideal choice when you want to impress without overcomplicating your process.
In this comprehensive Crochet Star Stitch – TUTORIAL, we’ll walk you through the steps to master this stitch, provide creative ideas for projects, share helpful tips to avoid common mistakes, and explain how to customize the stitch for your needs. Let’s dive into this starry journey.
1. What Is the Crochet Star Stitch?
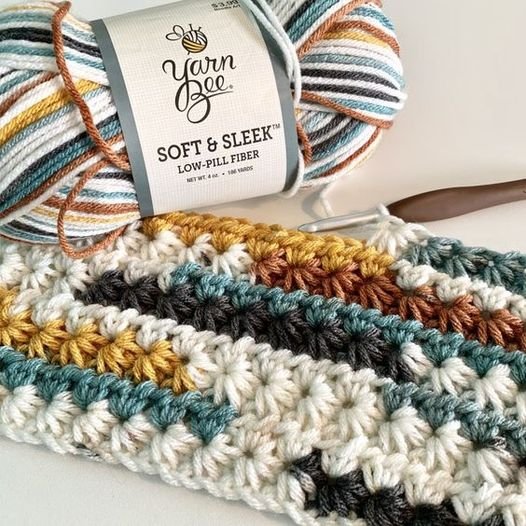
The Crochet Star Stitch is a unique stitch that creates a textured, starburst-like appearance using loops pulled through multiple stitches. It’s also sometimes called the “Marguerite stitch” or “daisy stitch” due to its floral look.
DISCOVER MORE FREE PATTERNS HERE!
This stitch is worked over two rows, with the stars forming in the first row and the second row creating a base for the next layer of stars. It’s an eye-catching design that works well for items where texture and visual interest are key.
Crocheters love this stitch because of its structured texture, which looks sophisticated but is surprisingly easy to master. With a bit of practice, it becomes a go-to favorite for cozy items like baby blankets or winter scarves.
You can work the Crochet Star Stitch with any yarn weight, although worsted or DK weight yarn tends to show the detail best. Pair it with a corresponding hook size for a clean, even finish.
It’s important to start with a foundation chain that is a multiple of 2 + 1, which ensures the stars are spaced evenly across your row. This simple rule helps you calculate stitch counts easily, especially when making larger items.
Even though it looks complex, the Crochet Star Stitch – TUTORIAL is beginner-friendly, especially with clear guidance. You’ll get the hang of it quickly as you move through this tutorial and see the stitch take shape.
2. Step-by-Step Crochet Star Stitch – TUTORIAL
Let’s break down the Crochet Star Stitch – TUTORIAL into easy-to-follow steps that will guide you from start to finish. Get your yarn and hook ready, and let’s begin.
Start by chaining a multiple of 2 plus 1. For beginners, chaining 15 is a good starting point to practice. This ensures a balanced star stitch pattern that’s easy to see and work with.
Insert your hook into the second chain from the hook, yarn over, and pull up a loop. Repeat this into the next four chains so you have six loops on your hook. Yarn over and pull through all six loops. This creates your first star.
After completing the first star, chain 1 to lock it in place. This chain creates the eye of the star and sets you up for the next one.
To make the next star, insert your hook into the eye of the last star, pull up a loop, then into the last loop of the previous star, and into each of the next three chains. This creates six loops again. Yarn over and pull through all six loops. Chain 1 to finish.
Continue across the row in this same pattern. Each new star shares part of the structure with the previous one, giving it a linked, cohesive look.
To begin the return row, chain 2 and turn your work. Make 2 half double crochets (hdc) in each eye of the stars across the row. This helps form a solid base and prepares for the next star row.
3. Common Mistakes and How to Avoid Them
Even with a helpful Crochet Star Stitch – TUTORIAL, beginners might run into a few snags. Let’s cover the most common issues and how to fix them.
One common problem is losing track of how many loops you’ve pulled up. Always count to six loops before pulling through. Missing one will distort the star shape.
Another issue is inconsistent tension. If your loops are too tight, the hook won’t glide through them easily. If they’re too loose, the stars won’t form evenly. Practice makes perfect here.
Many crocheters forget the chain 1 after completing a star. This chain is critical—it anchors the star and forms the foundation for the next one.
Crocheting into the wrong loop during the next row can throw off the alignment. Always make sure you insert the hook into the eye of each star and not between them.
If your project starts to ripple or curl, you might be adding or skipping stitches unintentionally. Count regularly to keep your row consistent and even.
Using the wrong yarn or hook size can make the stitch harder to manage. Stick with medium-weight yarn and a recommended hook (usually H/5.0mm) when learning.
4. Creative Projects Using the Star Stitch
Now that you’ve mastered the Crochet Star Stitch – TUTORIAL, you can start applying it to fun and functional projects that showcase this beautiful texture.
Make a cozy baby blanket using the star stitch with pastel-colored yarn. The soft texture and gentle look make it perfect for nurseries and baby gifts.
Try a stylish infinity scarf in a solid color that highlights the star pattern. It adds flair to winter outfits and is sure to get compliments.
Crochet a table runner with the star stitch for a handmade home décor piece. Use cotton yarn for durability and a clean look that impresses guests.
The stitch also works well in bags and purses. Use a stiffer yarn and add a lining to make a sturdy accessory with star-like detail.
Dishcloths made with this stitch are both beautiful and functional. Use a cotton blend and enjoy the added texture for scrubbing.
If you’re feeling ambitious, combine the Crochet Star Stitch with other techniques like color changes or edging to create complex, one-of-a-kind designs.
FAQ – Crochet Star Stitch – TUTORIAL
What is the best yarn to use for the Crochet Star Stitch?
Worsted or DK weight yarn is ideal for showcasing the texture. Cotton or acrylic blends work best depending on the project.
Is the star stitch beginner-friendly?
Yes! It looks complex but is quite easy with a bit of practice. Just follow the steps closely and count your loops carefully.
Can I use the star stitch in round patterns?
While traditionally used in rows, it can be adapted for the round with some adjustment, especially in blankets or bags.
What does “multiple of 2 + 1” mean for the starting chain?
This means your starting chain should be divisible by 2, then add 1 extra stitch to ensure the pattern aligns correctly.
Does this stitch use a lot of yarn?
Yes, the star stitch is a bit yarn-heavy due to the multiple loops per stitch. Plan accordingly when purchasing yarn.
Can I combine the star stitch with other crochet techniques?
Absolutely! It pairs well with half double crochet, single crochet, and more for varied textures and designs.
Conclusion
Throughout this Crochet Star Stitch – TUTORIAL, you’ve learned how to create one of the most eye-catching crochet textures available. From understanding the stitch structure to applying it in creative projects, this tutorial gives you all the tools you need to succeed.
We hope you found this guide helpful and easy to follow. Try incorporating the star stitch into your next crochet piece and let the compliments roll in. If you enjoyed this tutorial, please share your thoughts or leave a suggestion below—we’d love to hear how your crochet journey is going!

