
Crow Shawl Pattern is a striking crochet project inspired by the dramatic shape, layered feathers, and mysterious beauty of a crow or raven spreading its wings. The design shown in the reference image combines deep charcoal and softer gray tones with long feather-shaped sections, raised textures, openwork details, and a sculptural center. The result is a statement crochet bird shawl that can be worn over the shoulders as a cape, costume accessory, fantasy-inspired wrap, or distinctive handmade garment.
What makes this Crow Shawl Pattern especially interesting is the way ordinary crochet techniques can be combined to imitate plumage. Rather than creating one simple triangular shawl, the project is built around several visual zones. The upper wings need substantial texture and structure, the lower feathers become progressively longer, and the center forms the body of the bird. Strategic increases, decreases, post stitches, textured ridges, and open spaces help produce the layered appearance visible in the photograph. Although the finished piece looks complex, approaching it section by section makes construction much easier to understand.
This tutorial uses U.S. crochet terminology and is intended as an adaptable interpretation of the photographed design rather than an exact reproduction of an existing commercial pattern. Gauge, yarn weight, shoulder width, and desired wingspan can all change the final dimensions. A practical adult size is approximately 55–65 in (140–165 cm) across the wings and 32–40 in (81–102 cm) from the neckline to the longest center feather. Make a gauge swatch before beginning and adjust the foundation when necessary.
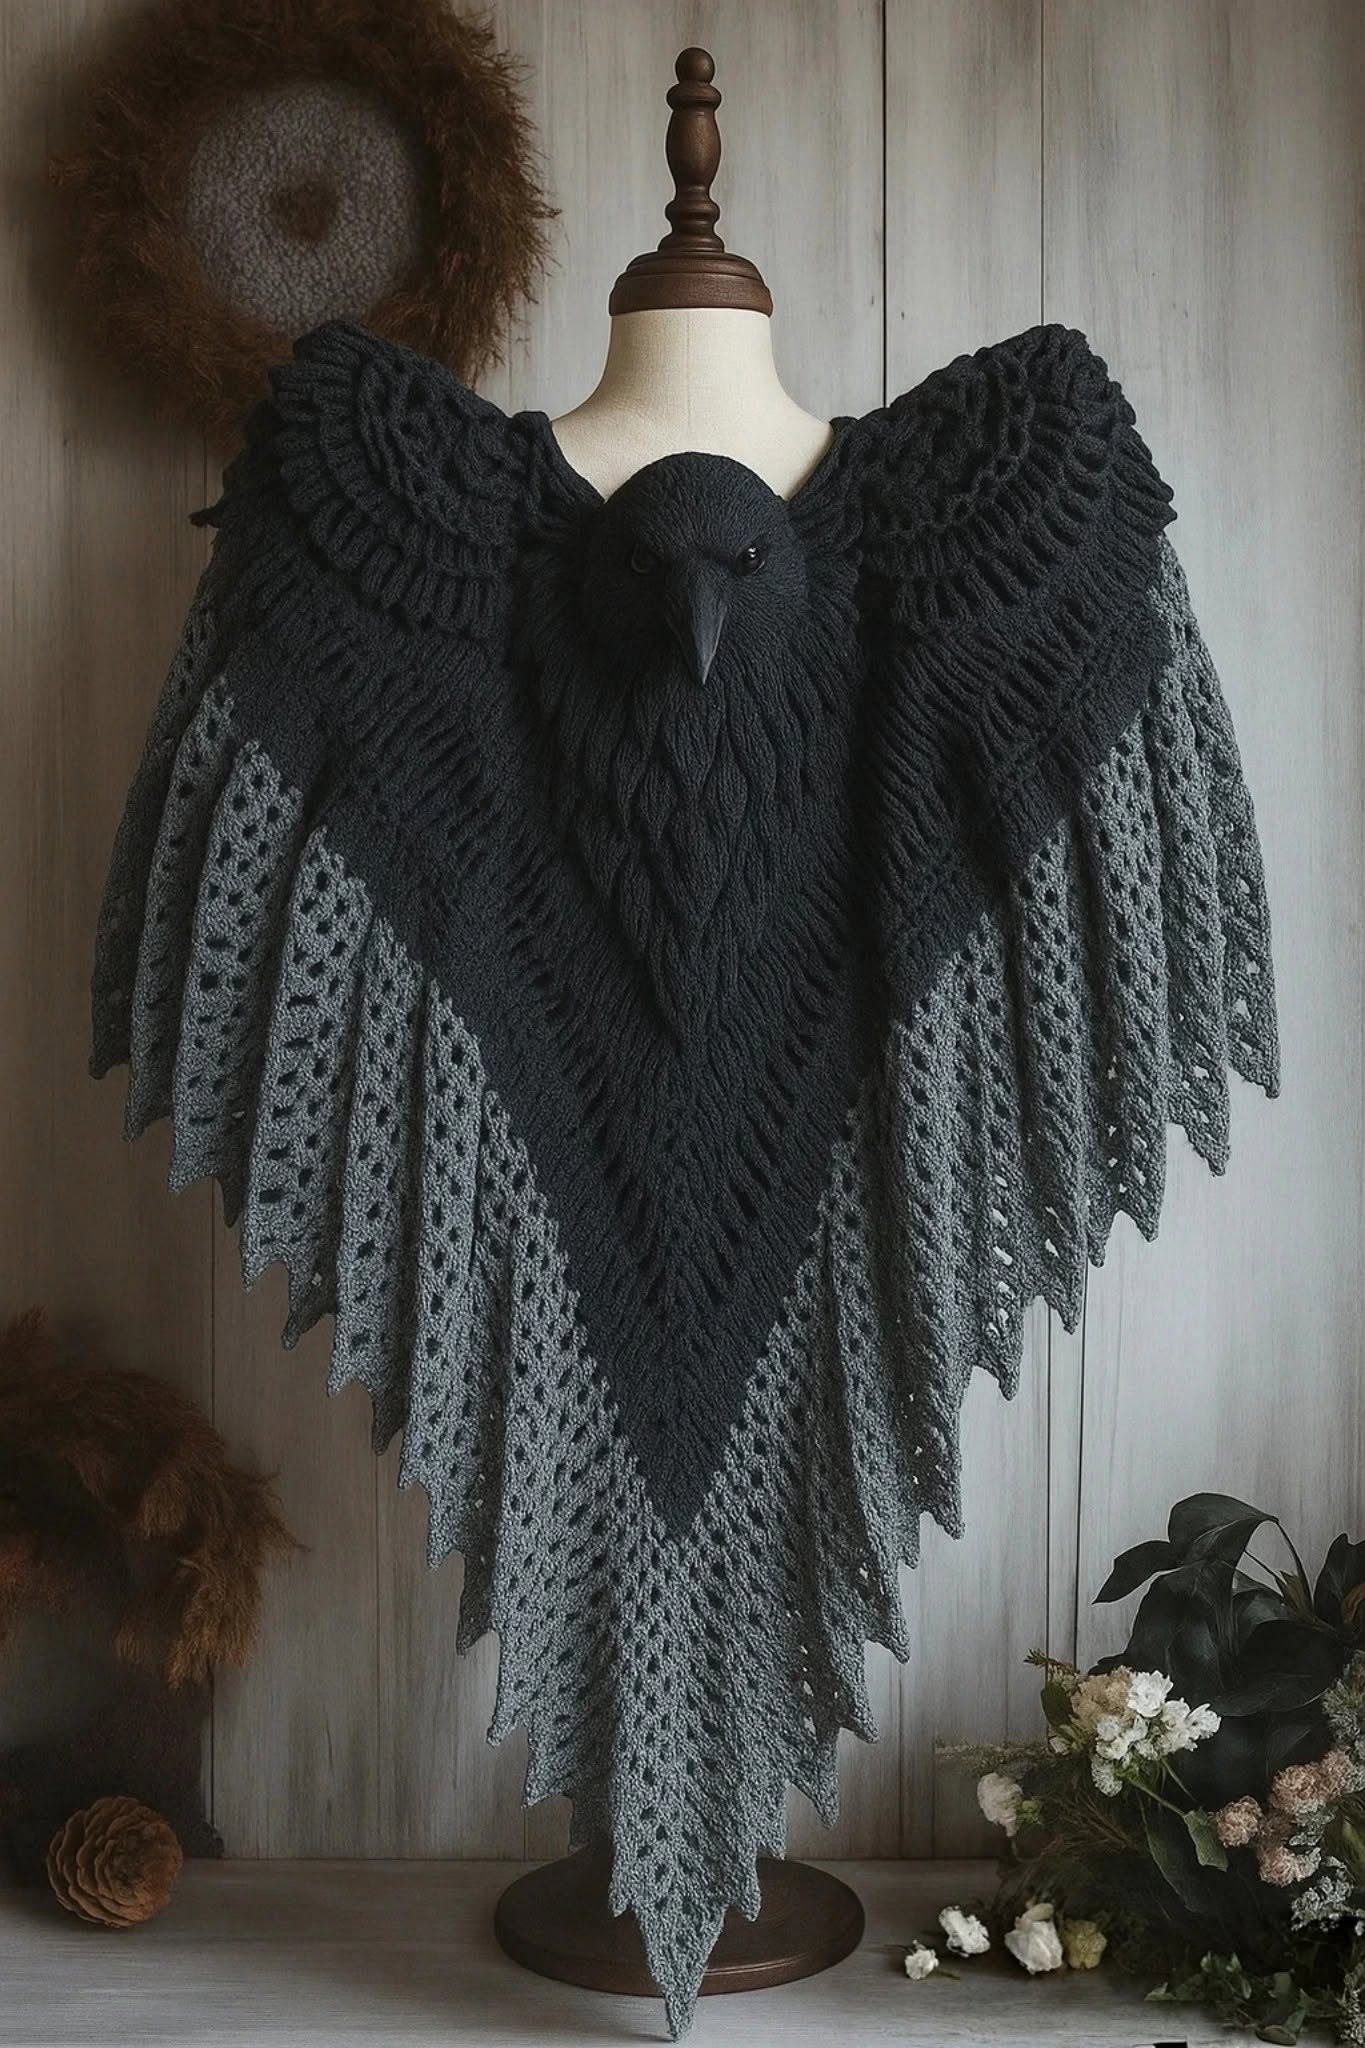
Materials, Crochet Stitches, Gauge, and Shawl Construction
For an adult Crow Shawl Pattern, plan on approximately 1,600–2,200 yards (1,460–2,010 m) of yarn, depending on size, feather density, and yarn weight. A DK or light worsted-weight yarn works particularly well because it provides enough definition for feather textures without making the finished cape excessively heavy.
DISCOVER MORE FREE PATTERNS HERE!
Choose two related shades for the strongest visual effect. The reference suggests charcoal black for the upper wings and central body and medium gray for portions of the lower flight feathers. You can also work the entire shawl in black for a classic crow appearance or use black, graphite, silver, and smoky gray for greater depth.
A 4.0–5.0 mm crochet hook is a useful starting range. You will also need locking stitch markers, scissors, a yarn needle, measuring tape, blocking mats, and rust-resistant blocking pins. Use the hook size that produces a flexible but well-defined fabric.
Important abbreviations used throughout the project are ch (chain), sl st (slip stitch), sc (single crochet), hdc (half double crochet), dc (double crochet), tr (treble crochet), FPdc (front post double crochet), BPdc (back post double crochet), dc2tog (double crochet two together), and st/sts (stitch/stitches).
The raised feather lines can be produced with alternating front post double crochet and ordinary double crochet stitches. Post stitches sit above the fabric and create strong ribs that resemble the central shaft of a feather.
Aim for an approximate gauge of 14–16 dc = 4 in (10 cm) before blocking. Exact gauge is less critical than it would be for a fitted sweater, but maintaining consistent tension is essential because both wings should remain symmetrical.
Crocheting the Neckline, Upper Wings, and Textured Feather Structure
Begin the crochet crow shawl at the upper center neckline. Ch approximately 55–65 sts, or enough to curve comfortably around the back of the wearer’s neck and shoulders. Do not make this foundation tight.
Row 1: Dc in the fourth ch from hook and in each remaining ch. Turn. This creates the structural foundation from which the two wings and central bird section will expand.
Row 2: Ch 3, dc across while placing evenly spaced increases through the row. A useful method is working 2 dc in approximately every fifth or sixth stitch. These increases begin transforming the narrow neckline into a broad cape shape.
For the following rows, divide the work conceptually into left wing – center body – right wing. Place stitch markers around the center 12–18 sts. Keep this middle section relatively stable while adding increases toward the wings.
To produce the deeply ribbed texture seen across the upper wings, alternate groups of FPdc with regular dc. For example, work 3 dc, 1 FPdc repeatedly across each wing. On subsequent rows, work the FPdc around the same raised post whenever possible.
Gradually widen both wings until the upper portion extends approximately 24–30 in (61–76 cm) from the center toward each side. Increase symmetrically so the finished raven wing shawl remains balanced.
Once the upper wings have sufficient width, stop increasing aggressively and begin developing individual feather sections. These should overlap visually rather than looking like perfectly straight rectangular panels. Slight variations in length create a much more natural bird-inspired silhouette.
Creating the Long Crow Feathers and Layered Wing Effect
The most recognizable feature of this Crow Shawl Pattern is the dramatic series of pointed feathers. Each feather can be created as a tapered crochet panel extending from the main wing structure.
For a medium feather, join yarn at the desired position and work approximately 14–20 dc across the selected section. Turn and work back. Continue for several rows while maintaining the width.
Begin tapering with dc2tog at both ends every second row. Continue until approximately 4–6 stitches remain. Change to hdc, then sc, before finishing with a short chain or slip-stitch point. This gradual progression produces a softer feather tip.
For longer flight feathers, begin with approximately 18–24 sts and crochet additional straight rows before starting the decreases. The longest feathers should be concentrated near the center and lower portions of the shawl.
Openwork can be added to the gray feathers using a simple repeat such as dc, ch 1, skip 1, dc. On the next row, work into the stitches and chain spaces. This produces the lace-like openings visible throughout the lower feathers of the reference design.
For stronger feather definition, create a central ridge using FPdc down each feather. Another option is to surface crochet a line of slip stitches after completing the panel. Both techniques visually imitate the shaft running through a real feather.
Alternate charcoal and gray sections as you work downward. Instead of changing color in perfectly horizontal rows, assign complete feathers or groups of feathers to different shades. This creates the layered appearance seen in the photographed crochet crow cape.
Arrange the lower edge so the outside feathers are shorter and the feathers become increasingly long toward the middle. An approximate range of 12–18 in (30–46 cm) for outer feathers and 24–32 in (61–81 cm) for the longest center sections creates an impressive wing silhouette.
Crocheting the Crow Body, Head, Finishing, and Blocking
The center of the Crow Shawl Pattern provides visual balance between the two wings. Begin from the marked center stitches and crochet downward in dense sc, hdc, or dc rather than open lace.
Gradually increase the body during its upper portion, then maintain an even width before decreasing toward the lower section. Raised post stitches can be worked vertically through the body to imitate overlapping breast feathers.
For a more dimensional interpretation like the reference image, crochet several narrow leaf-shaped feather motifs separately. Attach them in overlapping rows beginning at the bottom and working upward. Each new row should partially cover the attachment edge of the previous row.
The bird head can be treated as an optional decorative feature. Create a small oval or rounded panel using sc worked in continuous rounds, lightly shape it, and attach it near the neckline. A triangular crocheted beak can then be added. If the shawl is intended for regular clothing rather than costume use, you may prefer a flatter center motif for easier wear.
Avoid small detachable decorations when making the garment for young children. For adult decorative versions, securely embroidered details are generally more practical than loose embellishments.
After every feather has been attached, weave in all yarn tails securely. Examine both wings by laying the crochet raven shawl completely flat. Minor differences are natural, but the major feather groups should appear visually balanced.
Finish by wet blocking or steam blocking according to the yarn manufacturer’s care instructions. Arrange every feather individually, straighten the center ridges, and gently pin the tips into the desired silhouette. Blocking is particularly important because it transforms uneven-looking crochet sections into crisp, elegant feathers.
FAQ About the Crow Shawl Pattern
Is the Crow Shawl Pattern suitable for beginners?
It is best for confident beginners or intermediate crocheters. Basic stitches are straightforward, but shaping many symmetrical feathers requires patience.
What yarn is best for a crochet crow shawl?
A DK or light worsted-weight yarn with good stitch definition is an excellent option. Wool blends and quality acrylic yarns can both work well.
How much yarn will I need?
Approximately 1,600–2,200 yards (1,460–2,010 m) is a useful estimate for an adult-sized version, although large or heavily textured designs can require more.
Can I crochet the entire shawl in black?
Absolutely. Solid black creates a classic crow crochet shawl, while charcoal and gray make individual feather details easier to see.
What is the difference between a crow shawl and raven shawl?
In crochet projects, these names are often used stylistically for similar dark bird-inspired designs. The construction can be adapted to represent either bird.
How wide should the finished shawl be?
Approximately 55–65 in (140–165 cm) across is practical for many adult sizes. A larger dramatic cape can exceed this measurement.
How do I make the feather texture stand out?
Use front post stitches, surface crochet, raised ribs, and careful blocking.
Can the feather sections be crocheted separately?
Yes. Individual feathers can be made separately and sewn onto a simpler shawl foundation. This approach can actually make color placement and sizing easier.
How can I create the holes visible in some feathers?
Use chain spaces combined with skipped stitches, such as dc, ch 1, skip 1, dc.
How do I make pointed feather ends?
Gradually decrease the number of stitches toward the tip, then transition from dc to hdc and sc.
Can I make the shawl shorter?
Yes. Simply reduce the number and length of the lower feather panels.
Could this pattern be made in other bird colors?
Certainly. Brown and cream can suggest an owl or hawk, while blue, turquoise, and green can create a fantasy bird design.
Why are my wings curling?
Curling usually results from excessive increases, tight tension, or insufficient blocking. Check your stitch count and block the finished sections carefully.
Should both sides be perfectly identical?
The structural dimensions should be reasonably symmetrical, but slight differences in individual feathers can actually make the wings appear more organic.
How do I care for the finished shawl?
Follow the yarn label. Hand washing in cool water and drying flat is often the safest method for a heavily shaped crochet garment.
Conclusion
The Crow Shawl Pattern transforms traditional crochet techniques into a dramatic wearable piece inspired by outstretched bird wings. Its combination of textured crochet stitches, long pointed feathers, dark charcoal colors, openwork sections, and a sculptural center makes it very different from an ordinary triangular shawl.
The easiest way to approach the project is to divide it into manageable sections: first establish the neckline, then expand the crochet wings, create the upper feather texture, add progressively longer flight feathers, develop the center body, and finally complete all decorative details.
Color selection also plays an important role. Deep black creates the strongest crow-inspired appearance, while the combination of black, charcoal, graphite, and gray yarn shown in the reference style reveals considerably more stitch definition. A subtle gradient can make each layer of feathers stand apart.
Most importantly, take time with the finishing process. Carefully weaving the ends, arranging the feather layers, and blocking every pointed section will dramatically improve the final silhouette. With patient construction and thoughtful shaping, this Crow Shawl Pattern can become an impressive crochet cape with the sweeping appearance of a bird opening its wings.