
The Floral Toilet Paper Holder Pattern is a charming crochet project that transforms an everyday bathroom essential into an elegant handmade decoration. Featuring delicate openwork crochet, colorful cylindrical covers, scalloped borders, and beautiful three-dimensional flowers, this design combines functionality with creativity. It is an excellent choice for crocheters who enjoy making decorative accessories that bring personality and warmth to their homes.
The beautiful examples shown in the image feature four attractive color combinations: royal blue with a light blue flower, coral pink with a soft pink flower, mint green with a pale mint flower, and lavender with a matching floral decoration. Each holder has an open lattice body, a decorative circular top, white scalloped edging, and a handmade crochet rose surrounded by small green leaves. The toilet paper dispenses through a vertical opening in the front, making the design both practical and visually appealing.
One of the most interesting features of this Crochet Floral Toilet Paper Holder is its versatility. The project can be customized to match almost any bathroom color scheme, from romantic pastel interiors to bright, colorful spaces. It also offers an enjoyable opportunity to practice several crochet techniques, including filet-style mesh, circular crochet, scalloped borders, decorative flowers, and leaf appliqués. With the right materials and careful attention to measurements, you can create a beautiful bathroom accessory that looks professionally finished.
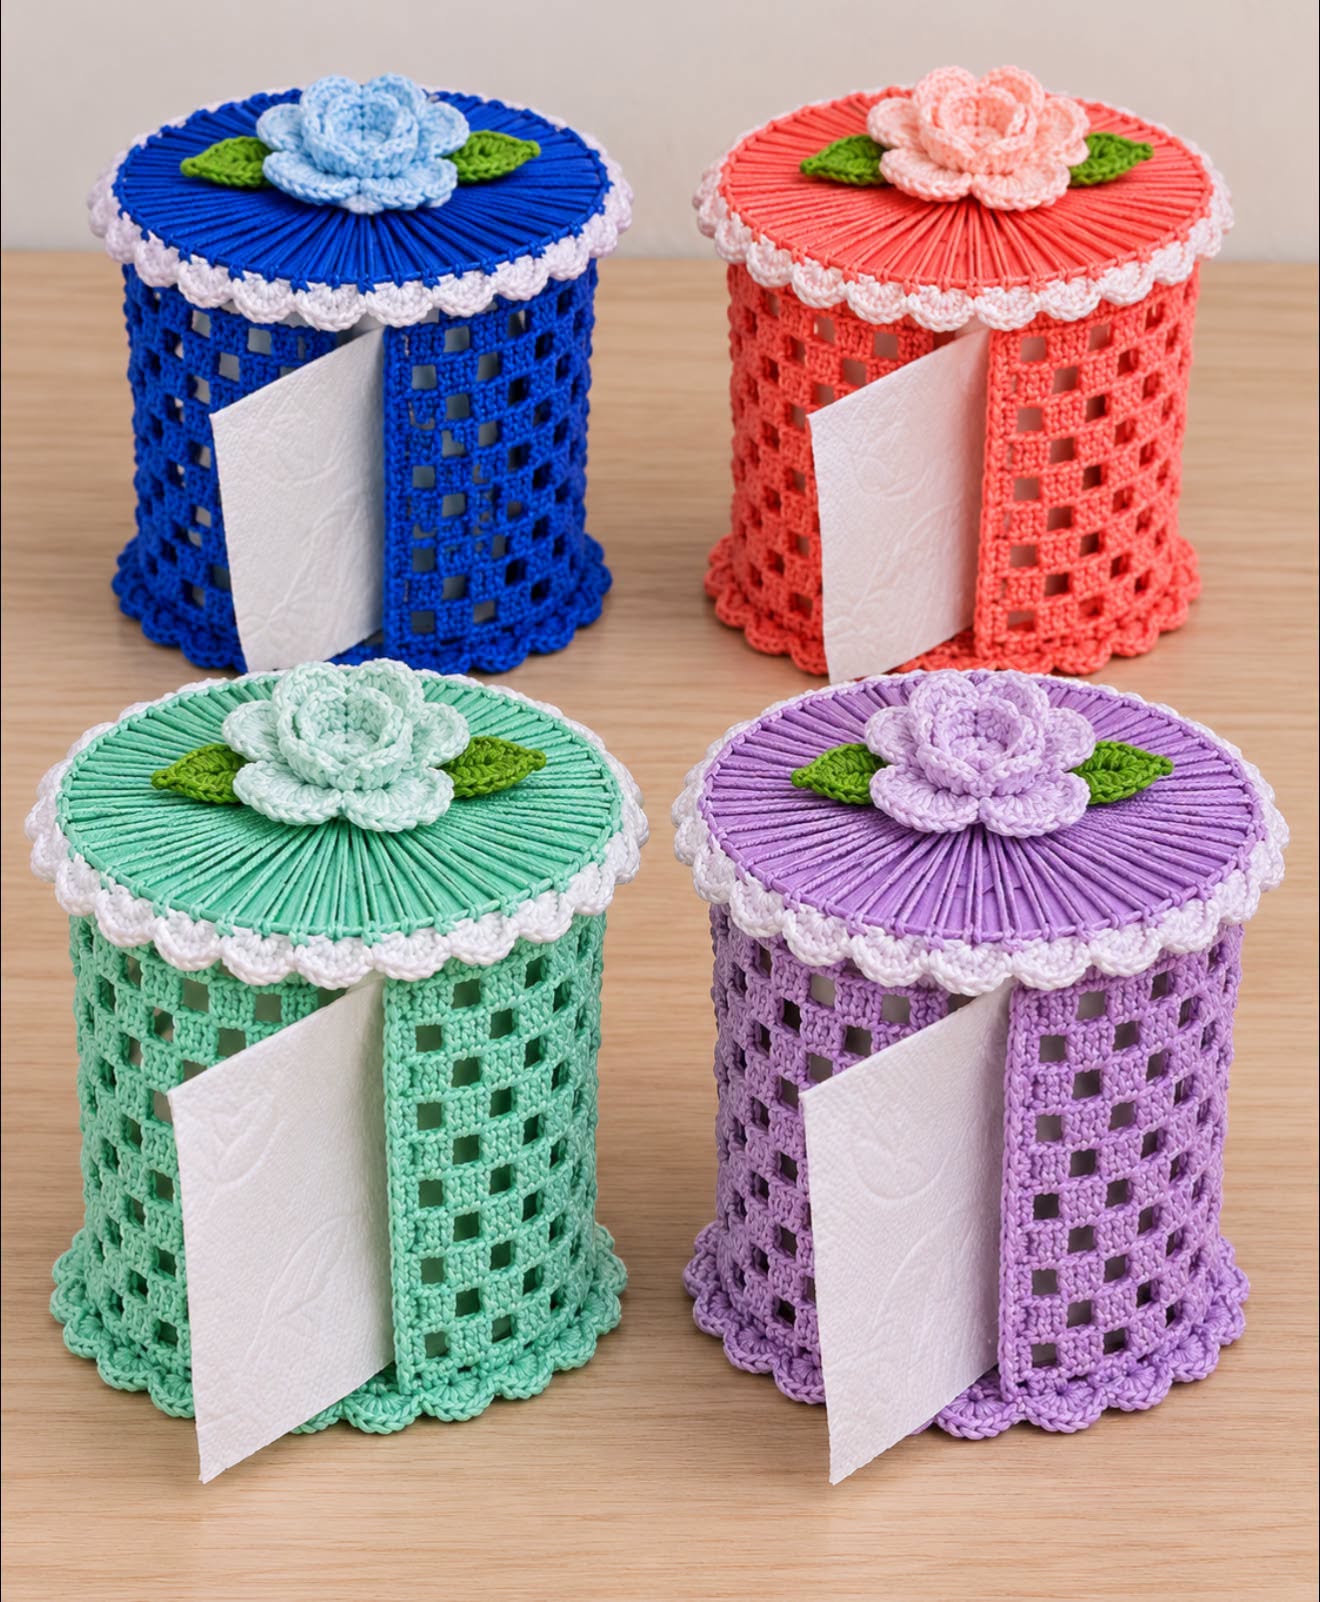
This complete tutorial explains how to make an original version inspired by the pictured holders. The instructions include materials, measurements, US crochet terminology, construction techniques, flower-making instructions, and finishing details. The design is intended for a standard toilet paper roll, but it can be adjusted for different sizes.
DISCOVER MORE FREE PATTERNS HERE!
Materials, Measurements, and Crochet Stitches for the Floral Toilet Paper Holder
Before beginning your Floral Toilet Paper Holder Crochet Pattern, it is important to select the correct yarn and tools. Because the design includes an openwork body and decorative elements, a smooth cotton yarn is recommended. Cotton helps the crochet stitches remain defined and creates a neat appearance.
The reference design uses a relatively fine yarn that produces delicate mesh squares. For a similar appearance, choose DK-weight cotton yarn with a 3.0 mm or 3.5 mm crochet hook. A slightly larger hook can be used if you prefer a softer and more flexible cover.
The circular lid in the image has a firm, radiating texture. To recreate this appearance, you can crochet a solid circular lid and add decorative surface stitches. For a particularly structured finish, place a lightweight plastic canvas circle inside a crocheted lid cover. This reinforcement is optional but helps maintain the round shape.
Materials needed
- 100–150 yards (91–137 meters) of DK-weight cotton yarn in the main color.
- 25–40 yards (23–37 meters) of matching or contrasting yarn for the flower.
- 15–25 yards (14–23 meters) of white cotton yarn for scalloped edging.
- Small amount of green cotton yarn for leaves.
- 3.0 mm or 3.5 mm crochet hook.
- Yarn needle.
- Sharp scissors.
- Stitch markers.
- Measuring tape.
- One standard toilet paper roll for fitting.
- Optional lightweight plastic canvas for the lid.
- Optional fabric-safe stiffener for decorative flower petals.
Suggested finished measurements
| Component | Approximate Size |
|---|---|
| Holder height | 5–5½ in (12.5–14 cm) |
| Holder diameter | 5–5½ in (12.5–14 cm) |
| Circular lid diameter | 5½–6 in (14–15 cm) |
| Front dispensing opening | 1½–2 in (4–5 cm) |
| Crochet flower diameter | 2½–3 in (6.5–7.5 cm) |
| Decorative leaf length | 1½–2 in (4–5 cm) |
| Scalloped border width | ¼–½ in (0.5–1.3 cm) |
These measurements are guidelines. Always measure the toilet paper roll before beginning, especially if using larger or jumbo rolls.
Crochet abbreviations – US terminology
| Abbreviation | Meaning |
|---|---|
| MR | Magic ring |
| ch | Chain |
| sc | Single crochet |
| hdc | Half double crochet |
| dc | Double crochet |
| tr | Treble crochet |
| sl st | Slip stitch |
| st | Stitch |
| sp | Space |
| rnd | Round |
| rep | Repeat |
| BLO | Back loop only |
| FO | Fasten off |
Special crochet techniques
Filet Crochet Mesh: A decorative pattern created using double crochet stitches and chain spaces.
Scalloped Border: A rounded edging made with groups of crochet stitches.
Crochet Rose: A layered flower created from a long crocheted strip that is rolled into a spiral.
Crochet Leaf: A small shaped appliqué made using single, half double, and double crochet stitches.
Circular Crochet: Crochet worked in rounds to create the lid.
Surface Crochet: Decorative stitches added to the surface of completed crochet fabric.
Choosing the perfect color combination
The colors in the image are especially attractive because each holder combines a vivid main color with softer floral details.
Royal Blue and Baby Blue: A bright, elegant combination that creates beautiful contrast.
Coral Pink and Blush Pink: A cheerful and romantic design.
Mint Green and Pale Mint: A fresh, delicate palette suitable for soft bathroom interiors.
Lavender and Lilac: A feminine, calming combination.
Other beautiful options include dusty rose and cream, sage green and ivory, navy blue and white, peach and champagne, or burgundy and pale pink.
Step-by-Step Crochet Pattern: Making the Openwork Toilet Paper Holder Body
The body is the foundation of the Crochet Toilet Paper Cover Pattern. It forms a cylindrical sleeve around the toilet paper roll, with a vertical opening that allows the paper to be pulled out.
Unlike a completely closed cylinder, this version is crocheted as a flat mesh rectangle and then shaped into a tube. This method makes it easier to create the front dispensing opening.
Step 1: Measure the toilet paper roll
Measure the circumference of your toilet paper roll.
Add approximately ½ inch (1.3 cm) for a comfortable fit.
For example, if the roll measures 15 inches around, aim for a crocheted body approximately 15½ inches wide before joining.
Next, measure the height of the roll.
Add approximately ¼–½ inch (0.5–1.3 cm).
This allows the crochet cover to fit comfortably without compressing the paper.
Step 2: Create a mesh gauge sample
Using your main yarn color, chain 25.
Row 1: Work 1 double crochet into the fourth chain from the hook. Chain 2, skip 2 chains, and work 1 double crochet into the next chain. Repeat the chain-2 mesh pattern across, adjusting the final stitches as needed.
Row 2: Chain 3 and turn. Work double crochet stitches above the previous double crochet posts, with chain-2 spaces between them.
Continue for several rows.
Measure the width and height of the sample.
Use these measurements to calculate the number of mesh squares needed for your toilet paper holder.
Step 3: Crochet the foundation row
For the full holder, make a foundation chain based on your gauge.
Use a multiple of 3, plus 4 turning chains.
For example, chain 61.
Row 1: Work 1 double crochet into the eighth chain from the hook.
Chain 2, skip 2 chains, work 1 double crochet into the next chain.
Repeat across the foundation chain.
You will create a row of evenly spaced square openings.
Step 4: Build the openwork mesh
Row 2: Chain 5 and turn.
Work 1 double crochet into the next double crochet post.
Chain 2, work 1 double crochet into the next double crochet post.
Repeat across.
Continue working the same mesh pattern.
The square openings should remain uniform.
This creates the delicate lattice texture visible in the image.
Step 5: Crochet the required height
Continue working mesh rows until the rectangle measures approximately 5 inches (12.5 cm) high.
Check the measurements against your toilet paper roll.
If the roll is taller, add more rows.
If the roll is shorter, stop earlier.
The finished rectangle should wrap around the roll without excessive stretching.
Step 6: Create the dispensing opening
Lay the crochet rectangle flat.
Bring the short ends together to form a cylinder.
Instead of sewing the entire seam closed, leave a vertical opening approximately 1½–2 inches wide.
The simplest construction is to attach a narrow crochet edging to each short end.
This creates two finished vertical edges.
The edges should remain separated at the front.
Step 7: Reinforce the vertical edges
Attach the main yarn to one short edge.
Work single crochet stitches evenly along the entire edge.
Fasten off.
Repeat on the opposite edge.
This reinforces the opening and helps prevent stretching.
Step 8: Shape the cylinder
Wrap the mesh rectangle around a toilet paper roll.
Adjust the overlap or spacing.
The cover should sit comfortably around the roll.
If necessary, add a narrow crocheted strip at the back to connect the sides while leaving the front opening accessible.
Step 9: Create the lower border
Attach the main yarn to the bottom edge.
Work one round of single crochet around the base, joining the mesh into a circular shape while preserving the front dispensing slit above the bottom border.
Join with a slip stitch.
Work one additional round of single crochet.
This creates a neat lower foundation.
Step 10: Crochet the scalloped base
Attach the main color yarn.
Work 5 double crochet stitches into one suitable stitch or space.
Skip 2 stitches.
Work 1 single crochet into the next stitch.
Skip 2 stitches.
Repeat around, adjusting the spacing to distribute the scallops evenly.
The scalloped border adds a delicate decorative finish.
How to Crochet the Circular Lid, Decorative Rose, and Green Leaves
The lid and flower are the most eye-catching parts of the Floral Toilet Paper Holder Pattern.
The reference image features a circular lid decorated with fine radial lines, white scalloped edging, and a three-dimensional crochet rose.
These details give the project its elegant handmade appearance.
Step 1: Start the circular lid
Using the main color yarn, create a magic ring.
Round 1: Work 12 double crochet stitches into the ring.
Pull the ring closed.
Join with a slip stitch.
You should have 12 stitches.
Step 2: Increase the circle
Round 2: Work 2 double crochet stitches into each stitch around. (24)
Round 3: Repeat 1 double crochet, 2 double crochet in the next stitch around. (36)
Round 4: Repeat 1 double crochet in each of the next 2 stitches, 2 double crochet in the next stitch around. (48)
Round 5: Repeat 1 double crochet in each of the next 3 stitches, 2 double crochet in the next stitch around. (60)
Continue increasing by adding one additional double crochet between increases in each new round.
Stop when the lid measures approximately 5½–6 inches in diameter.
The circle should lie flat.
Step 3: Add the radiating texture
To imitate the radial appearance in the reference image, use surface slip stitches.
Attach a matching strand of yarn near the center.
Work decorative lines outward toward the edge.
Space the lines evenly.
These lines create a sunburst effect.
Alternatively, use front-post stitches in selected rounds to create raised texture.
Step 4: Reinforce the lid
For a firmer lid, cut a lightweight plastic canvas circle slightly smaller than the crocheted lid.
Crochet a second plain circle.
Place the plastic canvas between the two circles.
Join the crochet layers with single crochet stitches.
The finished lid will be more structured.
Step 5: Crochet the white scalloped border
Attach white yarn to the outer edge.
Work one round of single crochet.
For the scallops, work 5 double crochet stitches into one stitch.
Skip 2 stitches.
Work 1 single crochet into the next stitch.
Skip 2 stitches.
Repeat around, adjusting spacing if necessary.
The white scallops should create a delicate lace-like frame around the lid.
Step 6: Crochet the rose foundation
Using the flower color, chain 51.
Row 1: Work 1 single crochet into the second chain from the hook.
Continue with single crochet stitches across.
Chain 3 and turn.
Step 7: Create the rose petals
Work 5 double crochet stitches into the first stitch.
Skip 1 stitch.
Work 1 single crochet into the next stitch.
Skip 1 stitch.
Work 5 double crochet stitches into the next stitch.
Repeat across.
This creates a long strip of rounded petals.
Step 8: Shape the rose
Roll the crocheted strip into a spiral.
Start with a tight center.
Allow the outer petals to spread slightly.
Use a yarn needle to sew through the bottom layers.
Secure the flower firmly.
The completed rose should have a full, three-dimensional appearance.
Step 9: Crochet the first leaf
Using green yarn, chain 11.
Work 1 single crochet into the second chain from the hook.
Work 1 half double crochet into the next stitch.
Work 1 double crochet into each of the next 5 stitches.
Work 1 half double crochet into the next stitch.
Work 1 single crochet into the next stitch.
Work 3 single crochet stitches into the final chain.
Continue along the opposite side of the foundation chain, mirroring the stitches.
Join with a slip stitch.
Fasten off.
Step 10: Make the second leaf
Repeat the leaf pattern.
Make two matching leaves.
For additional detail, embroider a simple central vein using a lighter green yarn.
The leaves should be slightly longer than the rose’s outer petals.
Step 11: Assemble the floral decoration
Position the two green leaves near the center of the lid.
Angle them in opposite directions.
Sew them securely.
Place the crochet rose over the center where the leaves meet.
Sew the flower in place.
Make sure the rose is centered.
Step 12: Check the finished lid
Lay the lid on a flat surface.
Check the shape.
Straighten the scalloped edging.
Adjust the rose petals.
Make sure the lid sits evenly over the crochet body.
Final Assembly, Decorating Ideas, and Helpful Tips for a Beautiful Crochet Toilet Paper Holder
The final assembly brings together the openwork cylinder, circular lid, decorative rose, and scalloped edging.
Careful finishing will help your Handmade Crochet Toilet Paper Holder look polished and attractive.
Step 1: Position the lid
Place the circular lid over the top of the crocheted cylinder.
Center it carefully.
The lid should extend slightly beyond the body.
This creates the decorative overhang visible in the reference image.
Step 2: Attach the lid
Use a yarn needle and matching yarn.
Sew the back half of the lid to the upper edge of the body.
Leave the front half unattached.
This allows the lid to lift for replacing the toilet paper roll.
Make several small, secure stitches.
Step 3: Add a closure if desired
For additional stability, add a small crochet loop near the front of the lid.
Sew a small button to the body.
The loop can fasten over the button.
This optional closure keeps the lid in position.
Step 4: Insert the toilet paper roll
Lift the lid.
Place the toilet paper roll inside the cover.
Position the loose end of the paper near the vertical opening.
Pull a small section through the front slit.
Lower the lid.
The holder is now ready to use.
Step 5: Check the dispensing opening
Pull the paper gently.
Make sure it moves freely.
If the opening is too narrow, widen it slightly.
If the paper catches on the crochet stitches, smooth the vertical edges.
Avoid attaching decorations near the dispensing opening.
Step 6: Shape the flower
Gently spread the rose petals.
Arrange the leaves.
Check the scalloped edging.
The floral decoration should appear full and balanced.
Step 7: Weave in all yarn tails
Use a yarn needle to hide the remaining yarn ends.
Secure the stitches carefully.
Trim excess yarn.
Check the inside of the cover for loose threads.
Step 8: Display your finished project
Place the completed holder on a bathroom shelf, vanity, or countertop.
Choose a dry location away from direct splashes.
The decorative flower should face forward.
Your Floral Crochet Toilet Paper Holder is complete.
Creative color combinations
Royal Blue with Baby Blue Rose: A vibrant design that creates a striking decorative accent.
Coral Pink with Blush Rose: A cheerful combination for bright interiors.
Mint Green with Pale Mint Rose: A fresh and relaxing palette.
Lavender with Lilac Rose: A soft romantic design.
Sage Green with Cream Rose: A sophisticated farmhouse-inspired combination.
Burgundy with Champagne Rose: An elegant option for traditional interiors.
Dusty Blue with White Rose: A timeless combination.
Peach with Ivory Rose: A warm and delicate design.
Tips for a professional finish
Use consistent tension. Even stitches create a smooth mesh pattern.
Measure before crocheting. Toilet paper roll sizes vary.
Choose cotton yarn. It provides stitch definition and durability.
Reinforce the lid. A lightweight insert helps the circular top maintain its shape.
Keep the mesh openings even. Uniform squares create a polished appearance.
Secure the flower carefully. A firmly attached rose will hold its shape better.
Maintain a smooth dispensing opening. The paper should pull out without snagging.
Avoid excessive stiffener. The body should remain flexible enough to accommodate the roll.
Use washable materials. Bathroom accessories benefit from easy cleaning.
Make matching sets. Coordinated holders create a beautiful decorative collection.
Frequently Asked Questions About the Floral Toilet Paper Holder Pattern
1. Is this Floral Toilet Paper Holder Pattern suitable for beginners?
Yes. Beginners familiar with basic crochet stitches can complete the project, although the circular lid and decorative rose may require extra practice.
2. What type of yarn works best?
DK-weight cotton yarn is recommended because it creates defined stitches and a neat openwork texture.
3. What crochet hook should I use?
A 3.0 mm or 3.5 mm hook works well with many DK-weight cotton yarns.
4. Can I make the holder larger?
Yes. Adjust the foundation chain, mesh rows, and lid diameter according to the size of your toilet paper roll.
5. Can I use acrylic yarn?
Yes, although cotton generally provides better stitch definition and shape retention.
6. How do I keep the lid flat?
Use evenly spaced increases and check the circle frequently while crocheting.
7. Can I make a different flower?
Absolutely. You can replace the rose with a daisy, sunflower, peony, or another decorative crochet flower.
8. Can I make the holder without a flower?
Yes. A plain lid with scalloped edging also looks beautiful.
9. How do I prevent the mesh from stretching?
Use firm tension, choose a stable cotton yarn, and reinforce the vertical opening.
10. Can I wash the finished holder?
Yes, if the materials are washable. Remove any plastic canvas insert that is not suitable for laundering and follow the yarn care instructions.
11. Can I use different colors for the lid and body?
Yes. Contrasting colors can create a unique and attractive design.
12. Can I make a matching bathroom set?
Yes. You can create coordinating crochet baskets, tissue box covers, and decorative accessories.
13. Can I make this project as a gift?
Absolutely. Handmade floral bathroom accessories make thoughtful gifts for housewarmings, birthdays, and other occasions.
14. Is the holder suitable for jumbo toilet paper rolls?
Yes, provided the body and lid are adjusted to fit the larger dimensions.
15. Can I sell finished floral crochet toilet paper holders?
Generally, you can sell handmade items made from your own work, subject to applicable pattern rights and local business requirements.
Conclusion
The Floral Toilet Paper Holder Pattern is a wonderful crochet project that combines decorative beauty with everyday practicality. Its delicate mesh body, circular lid, scalloped borders, and three-dimensional crochet rose create an elegant accessory that can transform a simple bathroom essential into a charming handmade decoration.
The four color combinations shown in the reference image demonstrate how versatile this design can be. From royal blue and coral pink to mint green and lavender, each version has its own personality while maintaining the same beautiful floral style.
This project also provides an enjoyable opportunity to practice several useful crochet techniques, including openwork mesh, circular crochet, decorative edging, and flower appliqués.
Whether you are making a single holder for your own bathroom, creating a coordinated decorative set, or preparing handmade gifts, the Crochet Floral Toilet Paper Holder offers endless possibilities for personalization.
With carefully chosen yarn, accurate measurements, consistent stitches, and thoughtful finishing details, you can create a practical and attractive bathroom accessory that reflects your creativity and love of crochet.
The finished project is a beautiful reminder that even the simplest household items can become something special when made by hand.