
The Crochet Hooded Cowl Pattern is a beautiful and practical handmade accessory that combines the warmth of a winter hood with the comfort of a cozy neck warmer. This versatile crochet project is perfect for chilly mornings, autumn walks, winter outings, and anyone who enjoys creating stylish accessories with yarn. Its comfortable design provides gentle coverage around the head, neck, and shoulders while maintaining an elegant handmade appearance.
One of the most attractive features of a Crochet Hooded Cowl is its combination of simplicity and functionality. Unlike a traditional scarf that must be wrapped around the neck, a hooded cowl stays comfortably in place. The attached hood provides additional warmth when needed, while the cowl section creates a soft, textured collar. You can wear the hood up for extra protection against the cold or lower it for a relaxed, fashionable look.
This Easy Crochet Hooded Cowl Tutorial is designed for crocheters who enjoy projects that are both beautiful and useful. The pattern uses basic crochet stitches, simple rectangular construction, and straightforward assembly techniques. You can customize the finished accessory with different yarn colors, decorative borders, and stitch textures. Whether you choose elegant cream, sophisticated burgundy, forest green, or classic charcoal gray, the finished hooded cowl can become a favorite addition to your winter wardrobe.
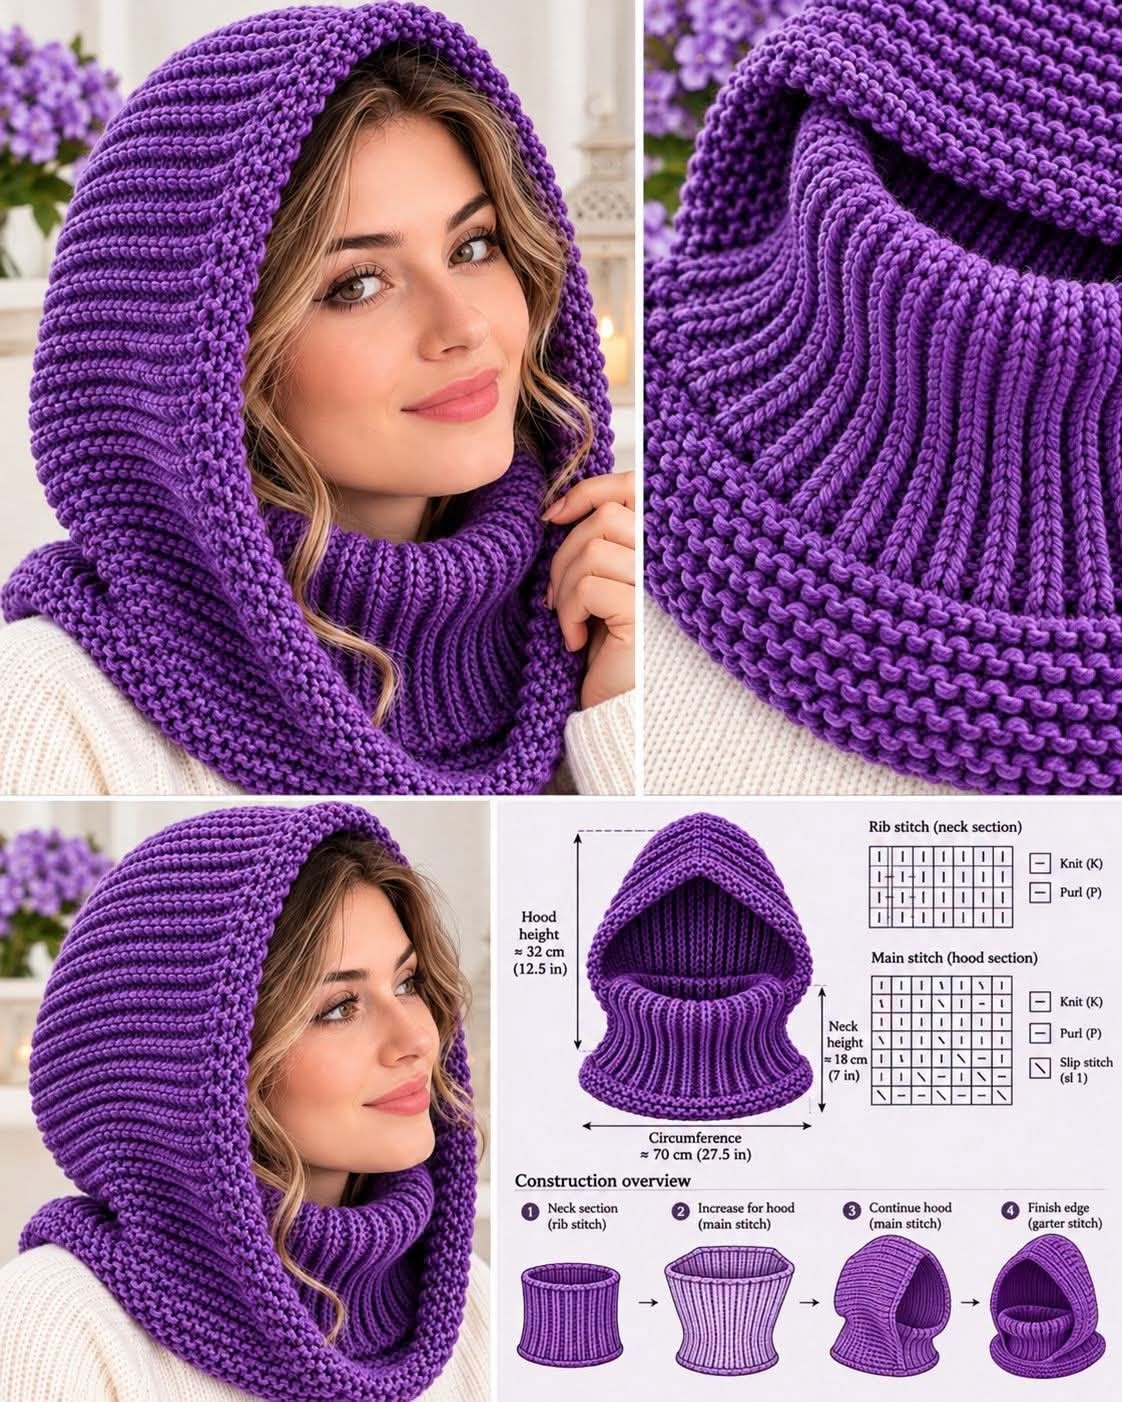
In this detailed tutorial, you will learn how to select the best yarn, measure the hood and neck section, crochet the individual pieces, assemble the garment, and add professional finishing details. All instructions use US crochet terminology, with measurements in inches and centimeters. The pattern is an original, beginner-friendly design that can be adjusted for different sizes and personal preferences.
DISCOVER MORE FREE PATTERNS HERE!
1. Materials, Measurements, and Crochet Stitches for the Hooded Cowl Pattern
Before beginning your Crochet Hooded Cowl Pattern, gather your materials and choose a yarn that feels soft against the skin. Because this accessory will be worn around the face and neck, comfort is especially important.
A medium-weight or bulky yarn works beautifully for this project. Worsted-weight yarn produces a flexible accessory with clear stitch definition, while bulky yarn creates a thicker, warmer appearance. For the sample pattern, medium-weight yarn is recommended because it is easy to work with and suitable for beginners.
Soft acrylic yarn, merino wool blends, and washable wool blends are popular choices for winter accessories. If you have sensitive skin, select a yarn that feels comfortable against your neck before beginning the project.
Materials Needed
- 450–650 yards (410–595 meters) of medium-weight yarn, Category 4.
- 5.5 mm crochet hook (US I/9), or size needed to obtain gauge.
- Yarn needle for sewing and weaving in ends.
- Sharp scissors.
- Measuring tape.
- Stitch markers.
- Optional decorative buttons.
- Optional contrasting yarn for edging.
- Blocking mat and rustproof pins, if desired.
The amount of yarn required depends on your gauge, the finished dimensions, and the yarn you select.
Recommended Finished Measurements
This sample is designed for an average adult.
| Component | Approximate Measurement |
|---|---|
| Hood height | 13 inches (33 cm) |
| Hood depth | 11 inches (28 cm) |
| Cowl circumference | 28 inches (71 cm) |
| Cowl height | 9 inches (23 cm) |
| Neck opening | Adjustable through construction |
| Recommended hook | 5.5 mm |
| Yarn weight | Medium, Category 4 |
The finished hood should provide enough room to cover the head comfortably without pulling tightly around the face.
For a looser fit, increase the hood depth or the cowl circumference.
Crochet Abbreviations – US Terms
| Abbreviation | Meaning |
|---|---|
| ch | Chain |
| sc | Single crochet |
| hdc | Half double crochet |
| dc | Double crochet |
| sl st | Slip stitch |
| st | Stitch |
| sts | Stitches |
| BLO | Back loop only |
| rep | Repeat |
| FO | Fasten off |
Recommended Gauge
Using a 5.5 mm hook and medium-weight yarn:
13 half double crochet stitches = 4 inches (10 cm).
10 half double crochet rows = 4 inches (10 cm).
Make a small gauge swatch before beginning.
If your stitches are too tight, try a larger hook.
If your stitches are too loose, try a smaller hook.
The most important goal is to create a soft, flexible fabric that drapes comfortably around the head and neck.
Beautiful Color Combinations
Cream and Beige: Elegant, timeless, and easy to coordinate with winter clothing.
Burgundy and Ivory: Rich and sophisticated.
Forest Green: Beautiful for autumn and winter.
Charcoal Gray: Modern and versatile.
Dusty Rose: Soft and feminine.
Navy Blue: Classic and stylish.
Mustard Yellow: Warm and vintage-inspired.
Emerald Green: Vibrant and eye-catching.
Chocolate Brown: Cozy and natural.
For a simple design, use one color throughout. For a more decorative appearance, add a contrasting border around the hood opening.
2. Step-by-Step Crochet Hooded Cowl Pattern: Making the Neck Warmer
The first part of this Crochet Hooded Scarf Pattern is the cowl section.
The cowl is crocheted as a rectangular panel and then joined into a circular neck warmer. This method is beginner-friendly and allows you to adjust the circumference before completing the project.
The sample cowl measures approximately 28 inches (71 cm) around and 9 inches (23 cm) tall.
Step 1: Create the Foundation Chain
Using your main yarn color and a 5.5 mm crochet hook:
Foundation: Ch 31.
Row 1: Hdc in the third chain from the hook and in each remaining chain across.
You should have 29 hdc.
Ch 2 and turn.
The turning chain does not count as a stitch throughout this pattern.
Step 2: Crochet the Second Row
Row 2: Hdc in each stitch across.
You should have 29 hdc.
Ch 2 and turn.
Maintain even tension.
Step 3: Continue the Cowl Panel
Rows 3–70: Repeat Row 2.
Continue until the panel measures approximately 28 inches (71 cm) long.
The width should measure approximately 9 inches (23 cm).
Your exact number of rows may vary according to your gauge.
Step 4: Check the Measurements
Lay the panel flat on a table.
Measure the length and width.
Wrap it loosely around your neck to check the fit.
The fabric should feel comfortable and should not press tightly against the throat.
If you prefer a larger cowl, add more rows.
Step 5: Join the Short Ends
Fold the rectangular panel in half, bringing the two short ends together.
Make sure the edges are aligned.
Using a yarn needle and matching yarn, sew the short ends together.
You can use a whipstitch or mattress stitch.
This creates a circular cowl.
Step 6: Reinforce the Seam
Sew a second line of stitches along the seam if necessary.
Weave in the yarn ends securely.
Turn the cowl right side out.
Check that the seam lies flat.
Step 7: Add a Decorative Lower Border
Attach yarn to the lower edge of the cowl.
Work one round of single crochet evenly around the opening.
Join with a slip stitch.
For a more decorative appearance, add a second round of single crochet in a contrasting color.
This creates a neat and durable edge.
Step 8: Prepare the Upper Edge
Place the cowl flat with the seam at the center back.
Mark the center front and center back using stitch markers.
These markers will help position the hood during assembly.
The cowl section of your Handmade Crochet Hooded Cowl is now complete.
3. How to Crochet the Hood and Attach It to the Cowl
The hood is the most distinctive feature of this Crochet Hooded Cowl Pattern.
For this beginner-friendly version, the hood is made from a rectangular crochet panel that is folded and sewn along one edge.
This construction creates a comfortable hood with a slightly structured shape.
The finished hood can be adjusted to provide more or less coverage around the face.
Step 1: Begin the Hood Panel
Using the same yarn and crochet hook:
Foundation: Ch 38.
Row 1: Hdc in the third chain from the hook and in each remaining chain across.
You should have 36 hdc.
Ch 2 and turn.
Step 2: Crochet the Hood Body
Row 2: Hdc in each stitch across.
Ch 2 and turn.
Rows 3–65: Repeat Row 2.
Continue until the panel measures approximately 26 inches (66 cm) long.
The panel should measure approximately 11 inches (28 cm) wide.
Step 3: Check the Hood Size
Lay the panel flat.
Fold it in half across its length.
The folded piece should measure approximately 13 inches (33 cm) from the top fold to the lower edge and 11 inches (28 cm) from front to back.
Place it gently over your head to check the dimensions.
The fabric should cover the back of the head comfortably.
Step 4: Sew the Back Hood Seam
Keep the panel folded with the right sides facing each other.
Choose one of the 13-inch edges to become the back seam.
Sew this edge together using a yarn needle and matching yarn.
Leave the opposite edge open to frame the face.
The 26-inch lower edge will become the attachment edge for the cowl.
Step 5: Turn the Hood Right Side Out
Turn the hood right side out.
Gently shape the upper corners.
Check that the back seam lies flat.
The hood should now have a recognizable three-dimensional shape.
Step 6: Prepare the Hood Opening
Attach yarn to the lower corner of the face opening.
Work single crochet stitches evenly around the front edge.
At the upper corners, avoid pulling the stitches too tightly.
Join or fasten off as appropriate.
This creates a clean, professional-looking border.
Step 7: Add a Second Border Round
For a thicker decorative edge, work another round of single crochet.
You can use the same yarn color or a contrasting shade.
A cream-colored border looks beautiful on burgundy, forest green, or navy blue hoods.
Keep the stitches relaxed so the opening remains comfortable.
Step 8: Position the Hood on the Cowl
Lay the cowl flat with the back seam centered.
Find the midpoint of the hood’s back seam.
Align this point with the center back of the cowl.
Position the two front ends of the hood near the center front of the cowl.
Use stitch markers to hold the pieces together.
Step 9: Attach the Hood
Using a yarn needle and matching yarn, sew the lower edge of the hood to the upper edge of the cowl.
Distribute the hood fabric evenly.
Because the hood attachment edge measures approximately 26 inches (66 cm) and the cowl circumference measures approximately 28 inches (71 cm), leave a small section of the cowl’s upper edge free at the front.
This creates a comfortable front opening.
Step 10: Reinforce the Attachment Seam
Sew carefully along the joining seam.
Make sure the hood is securely attached.
Avoid pulling the yarn too tightly.
The finished seam should remain flexible.
Step 11: Try On the Hooded Cowl
Place the cowl over your head.
Adjust the hood around your face.
Check the neckline.
The accessory should fit comfortably without restricting movement.
If necessary, make small adjustments to the front opening or hood attachment.
Step 12: Weave in the Ends
Use a yarn needle to hide all loose yarn tails.
Weave the ends through several stitches.
Trim any excess yarn.
Inspect the seams carefully.
Your Crochet Hooded Cowl is now assembled.
4. Creative Variations, Finishing Tips, and Styling Ideas
One of the greatest advantages of the Easy Crochet Hooded Cowl Pattern is the opportunity to personalize the finished accessory.
You can change the yarn weight, stitch texture, color combination, or decorative details to create a completely different style.
The basic construction remains the same, making it easy to experiment with new designs.
Elegant Winter Hooded Cowl
Use cream, beige, or soft gray yarn.
Add a matching single crochet border.
Keep the design simple and sophisticated.
This version pairs beautifully with winter coats and neutral clothing.
Vintage-Inspired Hooded Cowl
Choose burgundy, mustard yellow, or chocolate brown yarn.
Use a textured stitch pattern for the cowl.
Add a contrasting cream border around the hood opening.
This creates a warm, nostalgic appearance.
Chunky Crochet Hooded Cowl
Use bulky yarn and a larger crochet hook.
Adjust the foundation chains and row counts to match the desired measurements.
A chunky version creates a thicker, warmer accessory.
It is especially attractive in charcoal gray, forest green, or ivory.
Two-Color Hooded Cowl
Crochet the cowl in one color and the hood in another.
For example, combine navy blue with cream.
You can also make the hood in emerald green and the cowl in white.
Choose colors that complement each other for a coordinated finish.
Decorative Crochet Edging
For a feminine appearance, add a simple scalloped border around the hood opening.
Use small shell stitches to create a delicate decorative effect.
Keep the edging lightweight so it does not pull the hood out of shape.
Adding Buttons
Decorative buttons can be added near the front of the cowl.
Choose buttons that coordinate with the yarn color.
If you want functional buttons, reinforce the attachment points carefully.
Avoid placing buttons where they may press against the neck or chin.
How to Make the Hooded Cowl Larger
Increase the width of the hood panel.
Add more rows to increase its height.
Make the cowl circumference larger if necessary.
Always check the fit before final assembly.
How to Make the Hooded Cowl Smaller
Reduce the foundation chains.
Work fewer rows.
Adjust the hood attachment edge to match the cowl.
Make sure the finished accessory remains comfortable.
Professional Crochet Tips
Maintain consistent tension. Even stitches create a smoother appearance.
Use soft yarn. The accessory will rest against the face and neck.
Check your gauge. Accurate measurements improve the fit.
Avoid tight seams. Flexible seams make the hood more comfortable.
Block gently. Light blocking can improve the shape.
Choose suitable colors. Coordinating shades create a polished finish.
Reinforce attachment points. Strong seams improve durability.
Try on the accessory during construction. Small adjustments are easier before final assembly.
How to Care for Your Hooded Cowl
Follow the yarn manufacturer’s washing instructions.
For delicate yarns, hand washing is recommended.
Use cool water and a mild detergent.
Avoid twisting or wringing the fabric.
Gently squeeze out excess water using a clean towel.
Lay the hooded cowl flat to dry.
Reshape the hood and neckline while damp.
Store the finished accessory folded rather than hanging it for long periods, especially if the yarn stretches easily.
Frequently Asked Questions About the Crochet Hooded Cowl Pattern
Is this pattern suitable for beginners?
Yes. The design uses basic half double crochet stitches and simple rectangular construction.
Beginners should be comfortable with chains, turning rows, and sewing crochet pieces together.
What is the best yarn for a crochet hooded cowl?
Soft acrylic yarn, merino wool blends, and washable wool blends are excellent options.
Choose a yarn that feels comfortable against your skin.
Can I make this hooded cowl with bulky yarn?
Yes.
Use a larger crochet hook and adjust the stitch counts to achieve the correct measurements.
How much yarn do I need?
Approximately 450–650 yards (410–595 meters) of medium-weight yarn is a reasonable estimate for an adult-size hooded cowl.
The exact amount depends on the yarn, gauge, and finished size.
Can I make the hood detachable?
Yes.
You can attach the hood with buttons or another suitable fastening method instead of sewing it permanently to the cowl.
Can I add pockets?
Yes.
Small decorative pockets can be added to an extended scarf-style version.
For a compact neck cowl, pockets may be less practical.
Is this pattern suitable for men and women?
Absolutely.
The design can be customized with different sizes, colors, and textures to suit a wide range of personal styles.
Can I use different crochet stitches?
Yes.
Single crochet, moss stitch, and textured half double crochet are all suitable options.
Remember that changing the stitch pattern may affect the gauge.
How long does it take to make?
The project may take approximately six to ten hours, depending on your crochet experience and the yarn used.
Can I sell finished hooded cowls?
You can generally sell handmade accessories created from this original tutorial, subject to applicable local regulations.
Is the hooded cowl suitable for winter?
Yes.
A hooded cowl can provide additional warmth around the head and neck.
However, its warmth depends on the yarn, stitch density, and weather conditions.
Can I make a matching set?
Absolutely.
Use the same yarn to create matching fingerless gloves, wrist warmers, or a winter headband.
Conclusion
The Crochet Hooded Cowl Pattern is a beautiful and practical project that combines the comfort of a cozy neck warmer with the warmth of a handmade hood.
With basic crochet stitches, simple rectangular construction, and careful assembly, you can create a stylish winter accessory that is both functional and attractive.
The design is easy to customize with different yarn colors, stitch textures, decorative borders, and measurements.
Whether you prefer elegant cream, sophisticated burgundy, forest green, or classic charcoal gray, your finished Handmade Crochet Hooded Cowl can become a favorite accessory for colder days.
Gather your favorite soft yarn, prepare your crochet hook, and enjoy creating a comfortable and beautiful hooded cowl that showcases your crochet skills and personal style.