
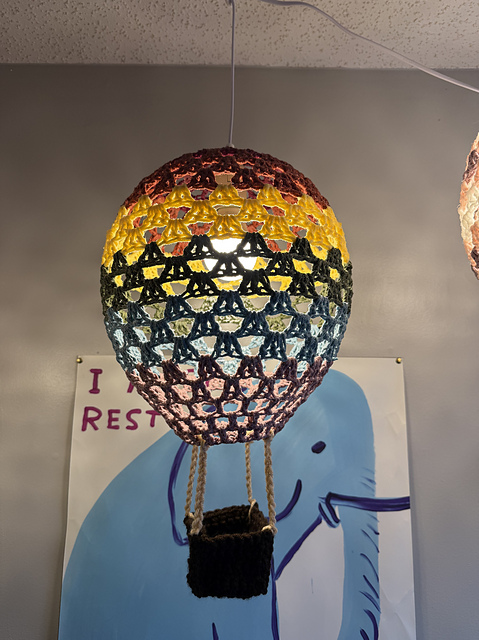
Hot Air Balloon Lamp is a creative and eye-catching crochet project that transforms an ordinary hanging light into a whimsical hot air balloon-inspired decoration. Combining delicate openwork stitches with colorful yarn and a charming miniature basket, this Hot Air Balloon Lamp adds warmth, personality, and handmade elegance to nurseries, craft rooms, living spaces, reading corners, or children’s bedrooms. In this complete tutorial, you’ll learn step by step how to crochet the balloon cover, shape the basket, attach the suspension cords, and assemble the entire decorative lamp safely while creating a stunning statement piece.
One of the most appealing aspects of the Hot Air Balloon Lamp is its versatility. The balloon can be worked in rainbow stripes, soft pastel gradients, modern neutral colors, or seasonal palettes. The open crochet stitches allow light to shine beautifully through the design, creating delicate shadows that enhance the cozy atmosphere of any room. Because the project is highly customizable, you can easily adapt the size, colors, and decorative details to match your home décor.
Although the finished lamp appears intricate, the Hot Air Balloon Lamp is built using familiar crochet stitches arranged in repeating rounds. Crocheters with basic knowledge of working in the round and following stitch counts can complete this project successfully by following the construction sequence carefully. Throughout this tutorial, you’ll learn how to choose suitable yarn, select the proper lamp frame, crochet the balloon cover, shape the basket, assemble all components, and finish the project professionally.
Choosing Materials for Your Hot Air Balloon Lamp
The success of your Hot Air Balloon Lamp begins with selecting the right materials. Cotton yarn is one of the best choices because it offers excellent stitch definition, durability, and minimal stretching over time. Mercerized cotton produces crisp stitches that beautifully highlight the decorative lace pattern while allowing light to filter through evenly.
DISCOVER MORE FREE PATTERNS HERE!
Choose colors that complement your decorating style. Rainbow stripes create a playful children’s room accessory, while soft neutrals such as cream, beige, sage green, dusty blue, or blush pink produce an elegant modern appearance. Ombre yarns also work beautifully, creating smooth color transitions across the balloon.
Select a crochet hook that matches your yarn weight while maintaining firm tension. A slightly tighter fabric helps the balloon hold its shape while preventing excessive stretching once installed over the light fixture.
Additional supplies include stitch markers, scissors, tapestry needle, measuring tape, cotton cord, lightweight wooden or crochet basket, metal ring (if required by your design), LED light fixture, and blocking supplies. Always use cool-running LED bulbs to ensure safe operation of your finished Hot Air Balloon Lamp.
Before beginning, carefully measure the diameter and height of your existing light fixture. These measurements determine the starting circumference, increase rounds, and overall dimensions of the balloon cover. Accurate measurements help ensure a snug but not overly tight fit.
Finally, prepare your workspace with good lighting and organize all materials before beginning. Since the project is worked continuously in rounds, careful preparation helps maintain consistent stitch counts and smooth construction.
Crocheting the Balloon Shape
Begin the Hot Air Balloon Lamp by creating a magic ring and working the first round of single crochet stitches. Place a stitch marker at the beginning of each round to help track your progress throughout the project.
Gradually increase each round according to your stitch pattern until reaching the widest circumference of the balloon. Evenly spaced increases ensure the cover maintains a smooth, rounded shape without visible angles or distortion.
Once the widest section has been completed, begin introducing the decorative openwork stitch pattern. Chain spaces, shells, clusters, or fan stitches create the beautiful lace effect that allows light to shine through the finished lamp while maintaining structural stability.
As you continue upward, periodically place the crochet cover over the light frame to check the fit. Minor adjustments to stitch tension or occasional increase rounds can help achieve the perfect shape if needed.
After reaching the upper section of the balloon, begin gradual decreases to close the opening neatly around the top suspension point. The final rounds should fit securely while leaving adequate space for the electrical cord to pass through comfortably.
Fasten off the yarn securely and weave in all loose ends. The completed balloon should display symmetrical shaping, balanced stitch tension, and smooth transitions between color changes if multiple colors are used.
Making the Basket and Assembling the Lamp
The miniature basket completes the distinctive appearance of the Hot Air Balloon Lamp. Begin by crocheting a small rectangular or square base using tight single crochet stitches. Firm stitches help the basket maintain its shape while supporting the decorative suspension cords.
Build the basket sides by working evenly around the perimeter without increases. Continue until the desired height is reached, then finish the upper edge with a clean round of slip stitches or crab stitch for added stability.
If preferred, insert a lightweight cardboard or plastic base inside the basket to help it retain its shape over time. This reinforcement is especially useful if decorative accessories will be placed inside the basket.
Attach four evenly spaced cotton cords to the basket corners. These cords should be equal in length to ensure the basket hangs level beneath the balloon. Secure each cord firmly with reinforced knots or stitched attachments.
Next, attach the upper ends of the cords to evenly spaced points around the lower edge of the balloon cover. Double-check that the basket hangs centered beneath the balloon before permanently securing every attachment point.
Finally, carefully install the crochet balloon over the LED light fixture and suspend the basket beneath it. Your completed Hot Air Balloon Lamp should now display the charming appearance of a floating hot air balloon while remaining lightweight, balanced, and visually striking.
Decorating Ideas and Care Tips
One of the greatest advantages of the Hot Air Balloon Lamp is its endless customization potential. Create seasonal versions using autumn colors, holiday palettes, pastel spring shades, nautical themes, or elegant monochromatic combinations that coordinate beautifully with your home’s décor.
Children’s rooms are especially well suited for this project. Soft rainbow colors, clouds, stars, moons, animals, or small crocheted decorations attached to the basket can create an imaginative nursery centerpiece that encourages creativity and wonder.
For modern interiors, choose neutral colors such as ivory, taupe, gray, sage green, or dusty blue. Simple color palettes emphasize the lace texture while blending naturally into contemporary decorating styles.
Always use LED bulbs with low heat output when displaying the Hot Air Balloon Lamp. Crochet yarn should never come into contact with high-temperature light sources. Maintaining proper clearance between the bulb and the crochet cover ensures safe everyday use.
Dust the lamp regularly using a soft microfiber cloth or handheld air blower. If washing becomes necessary, remove the crochet cover carefully, hand wash with mild detergent, reshape while damp, and allow it to dry completely before reinstalling.
Most importantly, enjoy the creative process. Every completed Hot Air Balloon Lamp combines craftsmanship, imagination, and practical decoration into a unique handmade piece that brings warmth and personality to any space.
Frequently Asked Questions
Is the Hot Air Balloon Lamp suitable for beginners?
Confident beginners who are familiar with crocheting in the round, increasing, decreasing, and following stitch patterns can complete this project successfully.
What yarn works best?
Mercerized cotton or high-quality cotton yarn provides excellent stitch definition, durability, and stability for decorative lighting projects.
Can I use acrylic yarn?
Cotton is strongly recommended because it stretches less and generally performs better for decorative lamp covers. Always ensure the project is used only with cool LED lighting.
What type of light bulb should I use?
Always use a cool-running LED bulb. Avoid incandescent or halogen bulbs that generate significant heat.
Can I change the size?
Yes. Simply adjust the increase rounds to match the diameter of your chosen light fixture while maintaining the stitch pattern.
How do I keep the basket hanging straight?
Measure all suspension cords carefully and attach them evenly around both the basket and balloon to maintain perfect balance.
Can I add decorations?
Absolutely. Small crochet flowers, stars, bows, tassels, clouds, or miniature flags make beautiful decorative additions.
How do I clean the finished lamp?
Remove the crochet cover if possible, hand wash gently with mild detergent, reshape while damp, and air dry completely before reinstalling.
Conclusion
The Hot Air Balloon Lamp is a delightful crochet project that transforms an ordinary ceiling light into a charming decorative centerpiece. Throughout this tutorial, you learned how to choose appropriate materials, crochet the balloon cover, shape the basket, assemble every component, install the suspension cords, customize the design, and care for your finished project safely.
Whether you’re decorating a nursery, creating a whimsical reading corner, adding handmade charm to a craft room, or making a thoughtful gift, this project combines creativity, functionality, and elegant crochet techniques into one unforgettable piece. The beautiful lace texture, colorful design, and playful hot air balloon shape make it a project that will be admired for years to come.
If you enjoyed this Hot Air Balloon Lamp tutorial, we would truly love to hear from you. Please leave your honest opinion, share your crochet experience, and let us know your suggestions for future crochet patterns and home décor projects. Your sincere feedback helps inspire new ideas and supports a growing community of passionate crochet enthusiasts.