
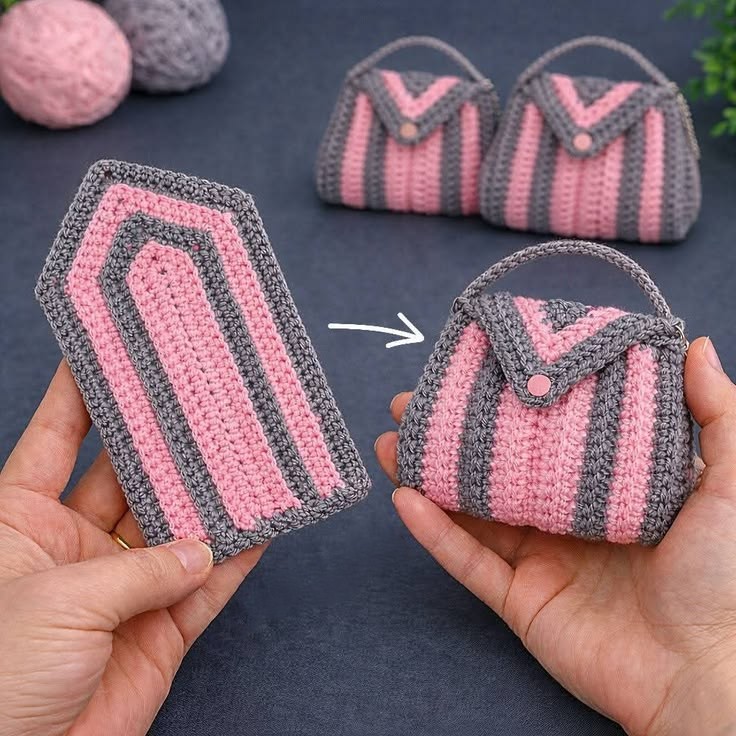
The Little Bag Pattern is a charming crochet project that turns a simple rectangular piece of crochet into a structured miniature handbag with contrasting stripes, a decorative flap, and a small handle. Inspired by the pink-and-gray bags shown in the reference image, this project is an excellent way to practice basic crochet construction while creating something decorative and useful. The finished mini bag can be used for small accessories, coins, stitch markers, tiny gifts, or simply as a handmade decoration.
One of the most attractive details of this crochet little bag is the combination of simple stitches and clever folding. Instead of requiring complicated shaping from the beginning, the main body can be crocheted as a flat panel. Contrasting stripes create the visual structure, and the panel is later folded and joined along the sides. A small triangular or V-shaped flap completes the handbag appearance, while a crocheted cord forms the handle. The result looks much more detailed than the actual construction process.
This project is also ideal for using leftover yarn. Only small amounts of each color are required, so you can experiment with pink and gray like the sample or create completely different combinations. Cotton yarn provides excellent stitch definition and a firm structure, while acrylic yarn can produce a softer little bag. The instructions below use U.S. crochet terminology and can easily be adjusted if you want to make the bag larger or smaller.
Materials, Crochet Stitches, and Finished Measurements
For this Little Bag Pattern, choose a DK or light worsted-weight yarn that holds its shape well. Cotton or a cotton-blend yarn is particularly suitable because the finished stitches remain defined and the bag does not stretch excessively. For a design similar to the image, use approximately 40–55 yards (37–50 m) of pink yarn and 25–35 yards (23–32 m) of gray yarn.
DISCOVER MORE FREE PATTERNS HERE!
A 3.5 mm (E/4) or 4 mm (G/6) crochet hook is a practical starting point. Select the hook that creates a relatively dense fabric with your chosen yarn. You will also need scissors, a yarn needle, stitch markers, and one small button or snap for the front closure. Optional materials include lightweight fabric for lining and a small piece of plastic canvas if you want a particularly firm base.
The main stitches are beginner-friendly. ch means chain, sc means single crochet, sl st means slip stitch, st/sts means stitch/stitches, inc means increase, and dec means decrease. Most of the body is worked in single crochet, giving the miniature handbag the compact texture visible in the reference design.
A useful finished size is approximately 4½ inches (11.5 cm) wide, 3½ inches (9 cm) high, and 1½ inches (4 cm) deep, excluding the handle. These measurements are approximate because yarn weight, hook size, and individual tension affect the final dimensions.
Gauge is not critical for a decorative mini bag, but consistency matters. A useful target is approximately 18–20 single crochet stitches per 4 inches (10 cm). If your fabric feels loose, switch to a smaller hook. If it becomes excessively stiff and difficult to work, increase the hook size slightly.
For the striped effect, choose two colors with enough contrast to make the vertical sections visible after folding. Pink and charcoal gray create a soft but distinctive combination. Other attractive combinations include cream and sage, lavender and white, turquoise and navy, red and cream, or pastel pink with chocolate brown.
Crocheting the Striped Main Panel
Begin the crochet mini handbag with the main rectangular panel. Using pink, chain approximately 25 stitches, or enough chains to create a piece around 5 inches (12.5 cm) wide. The exact stitch count is less important than creating a rectangle that can later be folded into the desired bag dimensions.
For Row 1, work one single crochet (sc) into the second chain from the hook and continue with one sc in every chain across. Chain 1 and turn. For the following rows, work one sc in each stitch. Keep the edges straight by counting the stitches regularly.
Continue with pink until the first stripe measures approximately ¾ inch (2 cm). Change to gray at the end of the final pink row. To create a neat color transition, complete the last yarn-over of the final stitch using the new color.
Crochet the next section in gray, followed by another pink section. Continue alternating colors until you have created the striped arrangement needed for the bag. Because the panel will be folded, visualize where each stripe will appear on the finished front and back before deciding how wide each section should be.
For a design similar to the photograph, make pink the dominant color and use narrower gray stripes as accents. The contrast can continue around the outer edge later, helping the entire little crochet purse look coordinated and professionally finished.
Continue until the rectangular panel measures approximately 10–11 inches (25–28 cm) long. Lay the piece flat and fold the lower portion upward. You should immediately begin to see the handbag shape. Adjust the amount of folding until the body measures approximately 3½ inches (9 cm) high.
Folding, Joining, and Creating the Decorative Flap
Place the crocheted rectangle with the preferred side facing outward. Fold the bottom upward to create the front and back of the handbag. Leave enough fabric at the upper end to form or support the closure area. Use stitch markers to temporarily secure both sides before sewing anything permanently.
Join the side edges using gray yarn and single crochet. Working through both layers, insert the hook into corresponding stitches and crochet evenly from the bottom toward the top. This creates the raised contrasting edges visible in the inspiration. Repeat along the opposite side.
To create additional depth, do not flatten the bottom corners completely. Instead, gently shape each lower corner outward before securing it. A small boxed base approximately 1–1½ inches (2.5–4 cm) deep gives the finished bag a more realistic handbag silhouette.
The decorative front flap can be crocheted separately. With gray yarn, chain enough stitches to span approximately half to two-thirds of the bag width. Work several rows of sc, then begin decreasing one stitch near each end on alternate rows. Continue until the piece forms a shallow triangle or V-shaped crochet flap.
Add a contrasting pink section inside the gray flap if you want to reproduce the layered appearance shown in the image. One easy method is to crochet a smaller pink triangle separately and sew it onto the gray flap. Another option is to change colors while working the flap itself.
Sew the straight upper edge of the completed flap securely to the back upper edge of the bag. Bring the pointed section forward and determine where it naturally rests. Sew a small button to the front of the bag and create a tiny chain loop on the flap if you want a functional closure. For purely decorative use, the button can simply be sewn through both layers.
Making the Handle and Finishing the Little Bag
For the handle, crochet a chain approximately 8–10 inches (20–25 cm) long using gray yarn. Because a simple chain can stretch, work a row of slip stitches or single crochet back along the chain. This produces a stronger crochet bag handle while keeping it thin enough for the miniature proportions.
Attach one end of the handle securely to each upper side of the handbag. Use the yarn needle and several reinforced stitches rather than attaching it with only one or two loops. Even though the bag is small, repeated handling can place considerable tension on these attachment points.
Now add a finishing border wherever necessary. Gray slip stitches or single crochet around exposed edges can help define the shape. Keep your tension relaxed around curves and corners; pulling the border too tightly can distort the body of the bag.
Weave in every yarn tail carefully using a tapestry needle. Pass each tail through several stitches in one direction and then back through nearby stitches. Trim only after you are confident that the ends are secure. This is especially important around the handle and flap.
If you want the Little Bag Pattern to function as a real storage pouch, consider adding a cotton lining. Cut two small fabric pieces slightly larger than the interior dimensions, sew them together with a narrow seam allowance, turn the upper raw edge inward, and hand-sew the lining just below the crocheted opening.
Give the completed bag its final shape with gentle blocking. For cotton yarn, lightly dampen the piece and arrange it into the desired shape. Allow it to dry completely before using it. Avoid excessive heat, particularly when working with synthetic fibers.
FAQ About the Little Bag Pattern
Is the Little Bag Pattern suitable for beginners?
Yes. The project primarily uses chain stitches, single crochet, slip stitches, simple color changes, and basic decreases. The assembly requires a little attention, but the individual techniques are approachable for beginners.
What yarn is best for a crochet mini bag?
Cotton, cotton-blend, or another relatively firm yarn works especially well. A yarn with good stitch definition helps the bag maintain its structured shape.
What hook size should I use?
A 3.5–4 mm crochet hook is a useful starting range for DK or light worsted yarn. Always adjust the hook according to your yarn and tension.
How large is the finished little bag?
Using the suggested materials, expect approximately 4½ x 3½ inches (11.5 x 9 cm) for the main body, although dimensions can easily be customized.
Can I make the bag larger?
Yes. Increase the starting chain and crochet a proportionally longer rectangle. Remember to enlarge the flap and handle so they remain balanced with the new dimensions.
How do I keep the bag from becoming floppy?
Use cotton yarn, work at a reasonably tight gauge, and add a fabric lining if necessary. A small piece of plastic canvas can also be placed inside the bottom for extra stability.
Can I use more than two colors?
Absolutely. The striped construction makes this an excellent scrap yarn crochet project. Three, four, or even more coordinating colors can create a completely different appearance.
Does the button need to function?
No. The button can be decorative. If you want the bag to open and close securely, add a chain loop, snap, magnetic closure, or another suitable fastening method.
What can I put inside a mini crochet bag?
Depending on its size, it can hold coins, stitch markers, jewelry, small sewing notions, wrapped gifts, or other lightweight items.
Can this pattern be turned into a keychain?
Yes. Make a smaller version and attach a suitable key ring or clasp securely to the upper edge. This creates a cute miniature handbag accessory.
Conclusion
The Little Bag Pattern demonstrates how basic crochet stitches can be transformed into an adorable three-dimensional accessory. Starting with a simple striped rectangle keeps the construction approachable, while the contrasting side seams, V-shaped flap, button, and crocheted handle give the finished piece the appearance of a tiny structured handbag.
It is also an excellent project for experimenting with color. The pink and gray combination creates a soft modern look, but virtually any palette can work. Leftover yarn from larger projects can be transformed into multiple mini crochet bags, making this a practical stash-busting idea as well as an enjoyable crochet project.
VIDEO PATTERN
Once you understand the basic construction, the pattern becomes easy to personalize. Change the dimensions, add a lining, experiment with striped arrangements, use decorative buttons, or embellish the front with a tiny crochet flower. With careful stitching and neat finishing, this Little Bag Pattern can become a charming handmade accessory, a small gift, or a delightful addition to your collection of crochet projects.