If you’re searching for a fun, practical, and beginner-friendly project, this Mini Macaroon Pouch – TUTORIAL is exactly what you need. Perfect as a small coin purse, earbud case, or gift idea, this little pouch is as functional as it is cute. Whether you’re new to crafting or an experienced maker looking for a quick and satisfying project, this tutorial offers all the guidance you need.
The Mini Macaroon Pouch – TUTORIAL is based on a circular design inspired by the shape of a real French macaron. With a zipper closure and soft inner lining, it’s ideal for storing small items in a stylish way. Its compact size makes it perfect for on-the-go essentials and easy to carry in any handbag or backpack.
With clear steps and simple techniques, you’ll learn how to make your own Mini Macaroon Pouch from start to finish. We’ll walk you through materials, assembly, and finishing touches. By the end of this tutorial, you’ll have a cute and useful accessory to keep or gift.
1. Materials You’ll Need for the Mini Macaroon Pouch – TUTORIAL
Before diving into the project, let’s go over the tools and materials you’ll need to complete your Mini Macaroon Pouch – TUTORIAL. Since the pouch is small, it requires minimal supplies—making it budget-friendly as well as beginner-friendly.
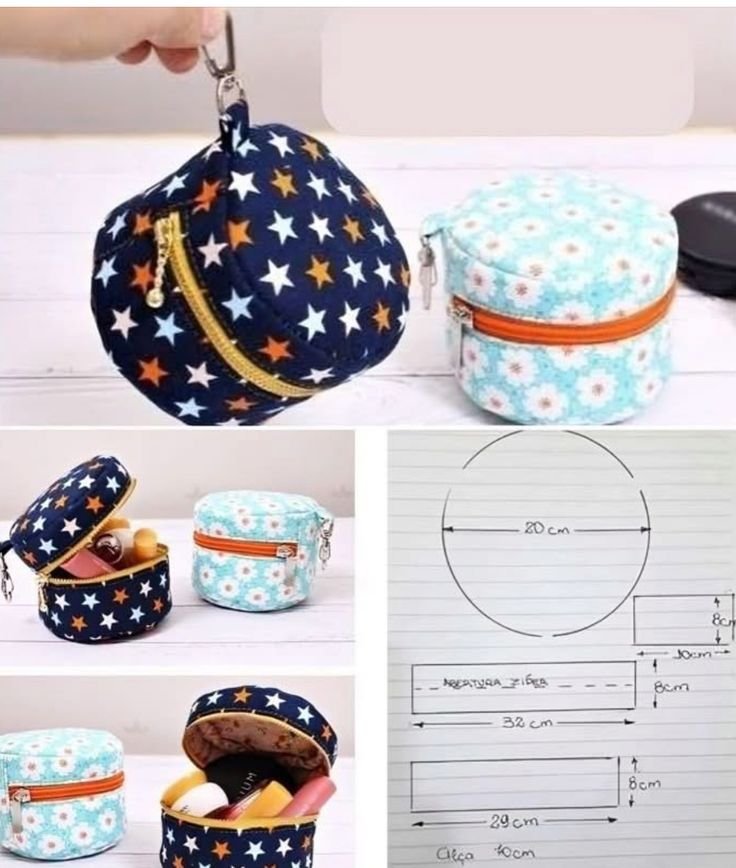
SEE OTHER FACE PATTERNS HERE!
You’ll need two fabric circles for the outer part. Cotton or linen fabrics work great. Choose two complementary patterns or solid colors for a chic and cohesive look.
For structure, use interfacing or felt cut into slightly smaller circles than the fabric. This adds body and helps the pouch keep its rounded shape.
A zipper (ideally 10-12 cm or 4-5 inches long) is essential. You can use a regular zipper or opt for a colorful one to add personality. Make sure it’s a closed-end zipper.
You’ll also need thread matching your fabric, sewing needles (or a sewing machine), scissors, and fabric glue. Optional tools include a rotary cutter and cutting mat for precision.
If you want to line the pouch, soft felt or thin quilt batting works great as an inner layer. This protects the contents and gives the pouch a plush feel.
Finally, consider adding a keychain ring or small loop to make the pouch attachable to bags, wallets, or lanyards. It enhances portability and makes it extra functional.
2. Cutting and Preparing the Pieces
This part of the Mini Macaroon Pouch – TUTORIAL focuses on cutting and prepping the fabric and structural layers. Accuracy is important here to ensure a smooth and symmetrical final product.
Begin by using a template or circular object (like a cup or lid) to trace and cut two identical fabric circles. They should be between 8 and 10 cm in diameter. You’ll need two outer pieces and two lining pieces if you’re adding lining.
Cut your interfacing or felt slightly smaller than your fabric circles. About 0.5 cm smaller all around is ideal to prevent bulk in the seams.
Iron your interfacing onto the wrong side of each fabric circle (if you’re using fusible interfacing). This step stabilizes the fabric and gives the pouch its shape.
Once attached, center your felt or interfacing on the fabric if you’re not using fusible type. Secure it with fabric glue or a few hand stitches to hold it in place temporarily.
Repeat these steps for the second set of circles. You should now have two padded fabric circles that will form the outer “shells” of your Mini Macaroon Pouch.
If using lining, attach your felt or soft fabric layer to the inside pieces now. Make sure everything is centered and neatly cut to maintain the shape of the finished pouch.
3. Assembling the Mini Macaroon Pouch – TUTORIAL
Now that your pieces are prepped, it’s time for the most exciting part of the Mini Macaroon Pouch – TUTORIAL—putting everything together. Take your time with this step to ensure neatness and functionality.
Start by folding each fabric circle in half and lightly creasing it to find the center. Mark the sides where your zipper will be attached.
Place the zipper between the two outer circles, with the zipper teeth aligned to where the fabric edges will meet. Use clips or pins to secure it in place.
Carefully stitch each side of the zipper to the fabric. If you’re hand-sewing, use backstitching for strength. If using a sewing machine, a zipper foot will help you sew close to the teeth.
After attaching the zipper, open and close it a few times to test the alignment. The two circles should now be joined in the middle by the zipper.
Now stitch around the remaining outer edges of the pouch. Sew the front and back pieces together using an overcast stitch (hand) or zigzag stitch (machine) for a clean finish.
Before turning the pouch right-side out, trim any excess fabric or thread. Open the zipper halfway to make turning easier, then flip the pouch inside out to reveal the final shape.
4. Final Touches and Creative Additions
With the base complete, the final phase of the Mini Macaroon Pouch – TUTORIAL is all about polishing the look and adding creative flair. This is where you can make your pouch truly unique.
Use a warm iron (if your materials allow) to gently flatten the seams and smooth the fabric. This gives the pouch a clean, professional appearance.
For extra charm, consider sewing a small bow, lace trim, or patch to the front. These details turn a simple pouch into a personalized gift or fashion accessory.
Attach a keychain loop, lobster clasp, or ribbon to one end of the zipper. This allows you to clip the pouch to keys, backpacks, or purses for easy access.
You can also label your creation using fabric markers or add a small brand tag if you’re selling or gifting the pouches.
Want to go further? Try using novelty fabrics, adding embroidery, or making themed pouches (like holiday or character-based designs). The small size makes experimentation easy and low-cost.
Finally, double-check the stitching and functionality. Make sure the zipper runs smoothly, the interior is clean, and all layers are securely attached. Your Mini Macaroon Pouch is now ready to use or share!
🌟Join our exclusive Quilt broadcast list on Messenger! Receive the best patterns, tips, and updates directly in your inbox. Our team is ready to send you delightful content that will inspire your projects. Don’t miss this opportunity to stay updated and create amazing pieces. Join now and be part of this passionate quilt community!✨📩
FAQ – Mini Macaroon Pouch – TUTORIAL
Q1: What size should my fabric circles be for the mini macaroon pouch?
A: A diameter of 8–10 cm works best. It’s small enough to be cute and portable, but still roomy for essentials like coins, earbuds, or lip balm.
Q2: Do I need a sewing machine for this project?
A: No, you can sew the entire pouch by hand using strong stitches like backstitch or overcast stitch. A sewing machine just makes it faster.
Q3: Can I use different fabrics for each side?
A: Absolutely! Mixing prints or textures adds visual interest and gives your pouch a unique, custom look.
Q4: Is this pouch suitable for beginners?
A: Yes, it’s a perfect beginner project. The steps are simple, and the small size makes it manageable even for first-time sewists.
Q5: How can I clean the mini macaroon pouch?
A: Hand wash in cold water and air dry. Avoid machine washing unless all materials used are machine-safe and pre-shrunk.
Q6: Can I sell pouches made from this tutorial?
A: Yes! Handmade Mini Macaroon Pouches are great items for craft fairs, online shops, or personalized gifts—as long as the design is your own interpretation.
PATTERN VIDEO:
Conclusion
We hope this Mini Macaroon Pouch – TUTORIAL has inspired you to start crafting something both adorable and useful. With simple materials, clear steps, and room for creativity, it’s the kind of project that’s both satisfying and rewarding. You’ve learned how to select materials, assemble the pouch, and personalize it with your own touch.
If you tried this tutorial, please leave your honest opinion and share suggestions for future projects. Your feedback helps make tutorials better and inspires other makers. Happy crafting!


