
The Rose Pattern Scarf is a beautiful crochet accessory that combines elegance, warmth, and delicate handmade details. Featuring a soft rose-pink body, contrasting gray edging, decorative looped trim, and a charming crocheted flower, this scarf is an excellent choice for anyone who enjoys creating fashionable accessories with yarn.
Unlike traditional long scarves, this crochet neck warmer has a compact design that wraps comfortably around the neck. Its slightly overlapping front creates a sophisticated collar effect, while the decorative flower adds a romantic finishing touch. The result is an accessory that looks lovely with sweaters, cardigans, dresses, and winter coats.
One of the most appealing features of this Rose Pattern Scarf is its versatility. You can create the scarf using soft cotton yarn for a lightweight accessory or choose acrylic and wool blends for additional warmth. The combination of simple crochet stitches and decorative embellishments makes this project approachable for beginners who already understand basic crochet techniques.
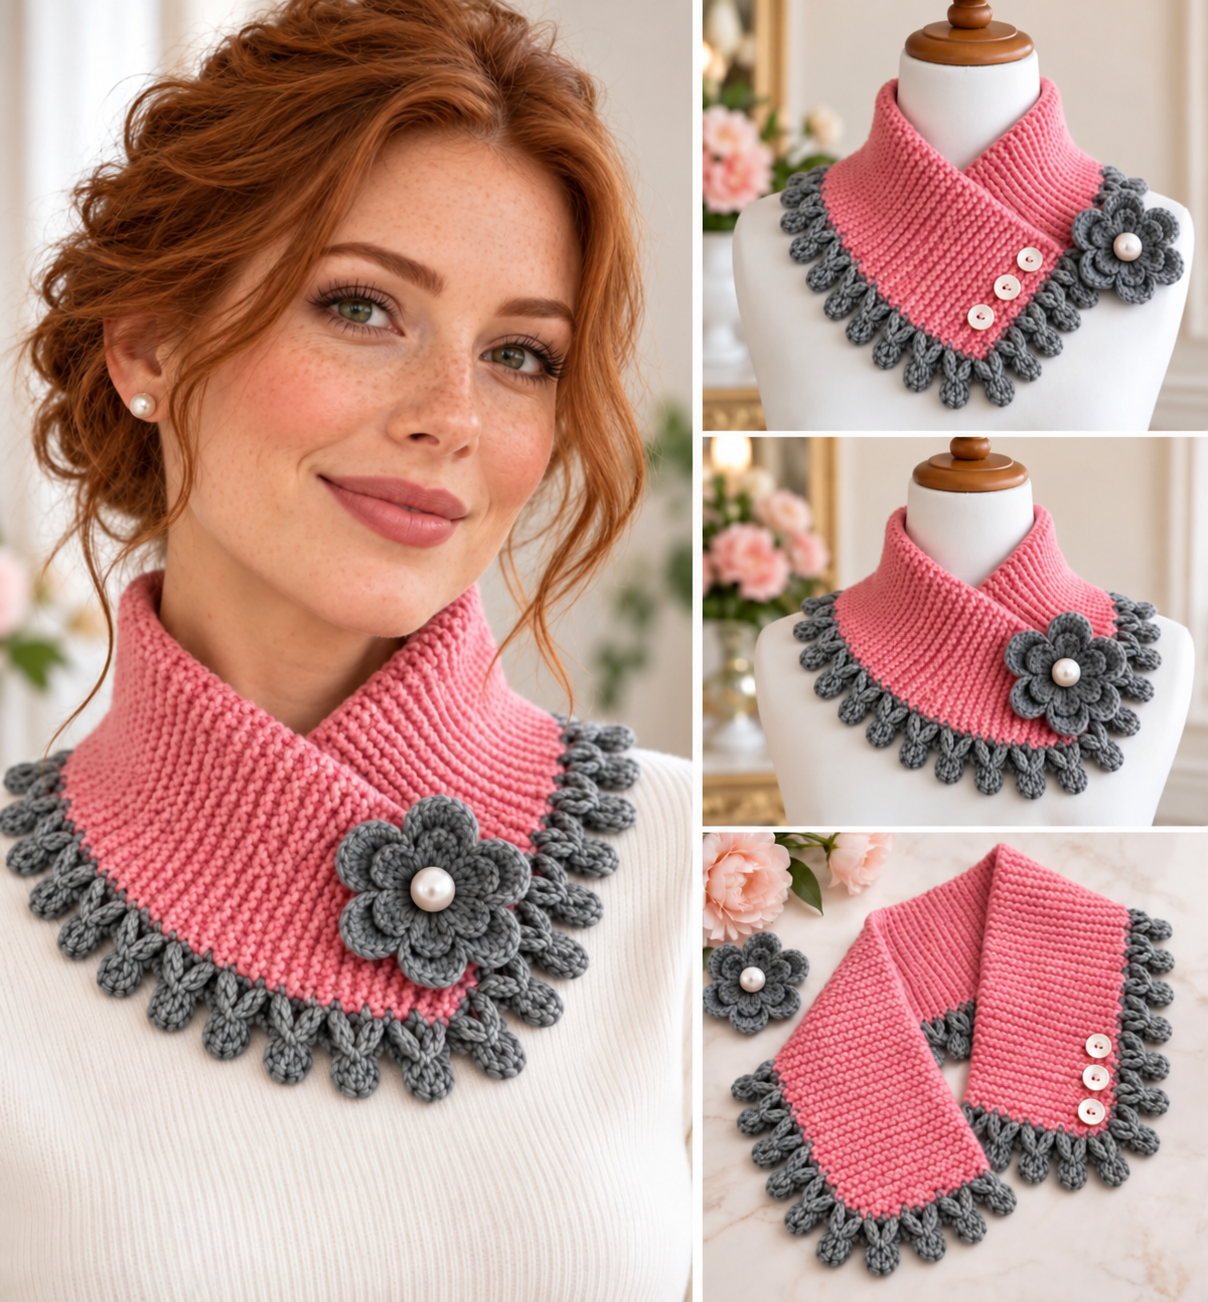
In this complete Rose Pattern Scarf Crochet Tutorial, you will learn how to select materials, measure your scarf, crochet the main body, create the contrasting border, make a layered flower, and attach the finishing details. The instructions use US crochet terminology and include practical measurements, stitch explanations, customization ideas, and helpful tips for achieving a beautiful handmade result.
DISCOVER MORE FREE PATTERNS HERE!
Materials, Crochet Stitches, and Measurements for the Rose Pattern Scarf
Before beginning your Rose Pattern Scarf, gather your yarn, crochet hook, and finishing accessories. Choosing the correct materials is important because the scarf should feel soft against the skin while maintaining enough structure to create its elegant collar shape.
The design shown features a warm rose-pink body with charcoal-gray edging and a matching gray flower. This combination creates a lovely balance between feminine softness and sophisticated contrast.
A medium-weight yarn works especially well because it produces a comfortable fabric without making the scarf excessively bulky. However, you can experiment with lighter yarn for a more delicate appearance.
For the main body, this tutorial uses a simple single-crochet texture. The decorative edging is worked separately using small chain loops and rounded crochet motifs.
Materials needed
- Approximately 150 yards (137 meters) of rose-pink worsted-weight yarn.
- Approximately 60 yards (55 meters) of medium-gray worsted-weight yarn.
- A 4.5 mm crochet hook, or the size needed to obtain gauge.
- Yarn needle.
- Stitch markers.
- Scissors.
- Measuring tape.
- Three small decorative buttons, approximately ½ inch (12 mm).
- One optional pearl-style bead or button for the flower center.
- Sewing needle and matching thread if needed.
- Blocking mat and rustproof pins, optional.
Choose a yarn that is comfortable against sensitive skin. A soft acrylic blend, cotton blend, or washable wool blend is suitable for this accessory.
Suggested finished measurements
| Measurement | Approximate Size |
|---|---|
| Main scarf length | 28 inches (71 cm) |
| Main scarf width | 5 inches (12.7 cm) |
| Decorative edging depth | ¾–1 inch (2–2.5 cm) |
| Crochet flower diameter | 3 inches (7.6 cm) |
| Recommended overlap | 3–4 inches (7.6–10 cm) |
| Skill level | Confident beginner |
These are suggested dimensions for an adult-sized scarf. Adjust the length according to your neck measurement and preferred fit.
The scarf should rest comfortably around the neck without feeling tight or restrictive.
Crochet abbreviations – US terms
| Abbreviation | Meaning |
|---|---|
| ch | Chain |
| sc | Single crochet |
| hdc | Half double crochet |
| dc | Double crochet |
| sl st | Slip stitch |
| st | Stitch |
| sts | Stitches |
| BLO | Back loop only |
| rep | Repeat |
| FO | Fasten off |
Recommended gauge
For the main scarf body:
16 single crochet stitches × 18 rows = approximately 4 × 4 inches (10 × 10 cm) using the recommended hook and yarn.
Gauge can vary depending on yarn thickness and individual tension.
Make a small sample before beginning the full project.
If your sample is too wide, use a smaller hook. If it is too narrow, use a larger hook.
The finished measurements in this tutorial are based on this approximate gauge.
Step-by-Step Rose Pattern Scarf Crochet Tutorial
The main body of the Rose Pattern Scarf is worked as a long rectangular strip. Once completed, it is decorated with a contrasting border and a handmade flower.
The body uses back-loop-only single crochet to create subtle horizontal ridges. This stitch pattern gives the scarf an attractive texture while keeping the fabric flexible.
The rectangular construction is especially convenient because you can easily adjust the finished length without changing the overall pattern.
Step 1: Create the foundation chain
Using rose-pink yarn and a 4.5 mm crochet hook, make a slip knot.
Chain 21 stitches.
This foundation will create a scarf approximately 5 inches (12.7 cm) wide at the suggested gauge.
Work one single crochet into the second chain from the hook.
Continue making one single crochet in each remaining chain.
You should have 20 single crochet stitches.
Chain 1 and turn.
Step 2: Crochet the textured scarf body
For Row 2, work one single crochet into the back loop only of each stitch across.
You should still have 20 stitches.
Chain 1 and turn.
Repeat this row throughout the main scarf body.
Working through the back loop creates raised ridges that give the scarf a beautiful knitted appearance.
Maintain even tension to keep the edges straight.
Step 3: Continue until the scarf reaches the desired length
Continue repeating the textured row until the scarf measures approximately 28 inches (71 cm) long.
At the suggested gauge, this will require approximately 126 rows in total, including the foundation row.
Measure the fabric rather than relying only on the row count.
The scarf should be long enough to wrap around the neck with a comfortable overlap at the front.
For a smaller scarf, reduce the length to approximately 24 inches (61 cm).
For a larger adult size, increase it to approximately 30–32 inches (76–81 cm).
Step 4: Finish the main rectangular panel
After reaching the desired length, fasten off the rose-pink yarn.
Leave a tail approximately 6 inches (15 cm) long.
Use a yarn needle to weave the tail securely through several stitches.
Lay the scarf flat and check that both long edges are reasonably straight.
If necessary, gently block the scarf to improve its shape.
Do not stretch the fabric excessively.
Step 5: Prepare the contrasting gray border
Attach the gray yarn at one corner of the scarf.
Work a round of single crochet around the entire rectangle.
Place one single crochet in each stitch along the short ends.
Along the long sides, distribute stitches evenly through the row ends, working approximately three single crochets for every four rows and adjusting as needed to keep the edge flat.
At each corner, work three single crochets into the corner space.
Join the round with a slip stitch.
This foundation round creates a neat base for the decorative edging.
Step 6: Check the shape before adding decorations
Lay the scarf flat on a table.
Check that the gray border does not pull the fabric inward.
If the edge feels too tight, add a few evenly spaced stitches.
If the border ripples excessively, remove some stitches.
A flat foundation border will make the decorative loops look more uniform.
Once the shape is correct, you are ready to create the ornamental trim.
How to Crochet the Decorative Gray Border and Layered Rose Flower
The decorative details give the Rose Pattern Scarf its distinctive appearance. The contrasting gray trim creates a delicate finish, while the layered flower adds an elegant focal point.
The image features small rounded loops along the lower edge of the scarf. These details can be recreated using chain stitches and simple crochet clusters.
The flower is made separately and sewn onto the overlapping front section.
Step 1: Crochet the looped border
With gray yarn attached to the completed foundation border, begin along one long edge.
Work the following repeat:
- Slip stitch into the next border stitch.
- Chain 6.
- Work 3 single crochets into the second chain from the hook.
- Slip stitch into the same border stitch where the loop began.
- Slip stitch into each of the next 2 border stitches.
Repeat this sequence across the selected long edge.
The small chain loops create a decorative fringe with rounded ends.
If the loops appear too close together, increase the number of slip stitches between motifs.
Step 2: Finish the remaining scarf edges
Continue working a simple slip-stitch edging around the remaining sides.
You may add decorative loops to both long edges if you prefer a more elaborate scarf.
For a design similar to the reference image, concentrate the looped trim along the lower visible edge.
Keep the upper edge relatively smooth for comfort against the neck.
Fasten off and weave in the gray yarn ends.
Step 3: Crochet the flower center
Using gray yarn, create a magic ring.
Chain 1.
Work 10 single crochets into the ring.
Pull the ring closed.
Join with a slip stitch to the first single crochet.
This small circle will form the center of the decorative flower.
If you prefer not to use a magic ring, chain 4 and join into a ring before working the first round.
Step 4: Create the first layer of petals
For Round 2, repeat the following sequence five times:
- Slip stitch into the next stitch.
- Chain 2.
- Work 3 double crochets into the next stitch.
- Chain 2.
- Slip stitch into the same stitch.
This creates five rounded petals around the flower center.
Fasten off or continue with the same yarn if you want the second layer in the same color.
Gently shape the petals with your fingers.
Step 5: Add a second layer of petals
Attach gray yarn behind the first petal layer.
Create five chain-4 arches behind the petals, securing each arch with a slip stitch near the base of the next petal.
Work into each chain-4 arch:
- 1 single crochet.
- 1 half double crochet.
- 5 double crochets.
- 1 half double crochet.
- 1 single crochet.
Repeat for all five arches.
The second layer should sit slightly behind the first, creating a fuller flower.
Fasten off and leave a long yarn tail for sewing.
Step 6: Attach the flower and pearl center
Position the flower on the front overlapping section of the scarf.
The flower should sit near one side of the neck rather than directly under the chin.
Use the long yarn tail to sew the flower securely onto the scarf.
Make several stitches through the flower base and the main fabric.
If desired, sew a pearl-style button into the center.
For an accessory intended for a young child, omit detachable beads and other small decorations.
The completed flower becomes the main decorative feature of the Rose Pattern Scarf.
Creative Rose Pattern Scarf Designs, Button Closures, and Professional Finishing Tips
The final stage of this Rose Pattern Scarf Crochet Tutorial focuses on the closure, shaping, and decorative finishing.
A compact neck warmer should be comfortable, easy to put on, and secure enough to stay in position.
The scarf shown has an overlapping front that creates a stylish collar shape.
You can recreate this appearance using small buttons, a hidden snap, or a decorative flower that conceals the fastening.
Step 1: Position the scarf around the neck
Wrap the scarf loosely around the neck or place it on a dress form.
Bring one end across the front.
Overlap the other end by approximately 3–4 inches (7.6–10 cm).
Adjust the position until the scarf forms a comfortable V-shaped collar.
Use stitch markers to indicate where the ends overlap.
Remove the scarf before sewing the closure.
Step 2: Add the button closure
Choose three small buttons that coordinate with the rose-pink yarn.
Position the buttons along one overlapping end.
Space them approximately ¾ inch (2 cm) apart.
Sew them securely using strong thread.
On the opposite end, create corresponding button loops using short chains of yarn.
Test each loop before securing it permanently.
The buttons should pass through the loops without stretching them excessively.
Step 3: Hide the closure beneath the flower
Position the decorative flower near the buttoned overlap.
The flower can conceal part of the fastening while adding visual interest.
Sew the flower to one scarf end only.
Avoid sewing through both overlapping layers, since this would prevent the scarf from opening.
Check that the scarf can still be fastened and removed easily.
Step 4: Block the finished scarf
Lay the completed scarf on a blocking mat.
Lightly dampen the fabric if the yarn care instructions allow it.
Shape the rectangle into an even width.
Arrange the decorative loops so they hang uniformly.
Flatten the flower petals gently.
Allow the scarf to dry completely before wearing.
Step 5: Inspect the finished details
Check all yarn ends and finishing stitches.
Make sure the buttons are securely attached.
Inspect the flower center and decorative trim.
Trim any loose threads.
Try on the scarf and adjust the closure if necessary.
A well-finished neck warmer should sit comfortably without pulling or twisting.
Step 6: Personalize your Rose Pattern Scarf
Once you understand the basic construction, experiment with different colors and decorative elements.
You can make the flower larger, use a different border style, or replace the pearl center with a crocheted button.
For a simpler version, omit the flower and use three decorative buttons as the main feature.
For a more romantic appearance, add a second smaller flower beside the first.
The possibilities make this Rose Pattern Scarf a wonderful accessory for personal use or handmade gifting.
Beautiful Color Combinations for the Rose Pattern Scarf
Dusty Rose and Charcoal Gray: A sophisticated combination that creates a beautiful balance between soft pink and darker neutral tones.
Blush Pink and Ivory: Perfect for a delicate, romantic scarf with a timeless appearance.
Lavender and Cream: A gentle color palette that works beautifully for spring and early autumn accessories.
Burgundy and Antique Gold: An elegant combination for festive occasions and winter outfits.
Sage Green and Soft Beige: A vintage-inspired palette that complements neutral clothing.
Navy Blue and Pearl White: A classic combination that creates a polished and versatile accessory.
Helpful Tips for a Beautiful Crochet Neck Warmer
Choose soft yarn. Since the scarf rests directly against the neck, comfort should be a priority.
Maintain consistent tension. Even stitches help the scarf keep its rectangular shape.
Measure before fastening off. Adjust the scarf length according to your preferred overlap.
Keep the upper edge smooth. Avoid placing bulky decorative loops against the neck.
Secure the flower carefully. Sew through the flower base several times so it remains firmly attached.
Use lightweight embellishments. Heavy buttons and beads can pull the scarf out of shape.
Frequently Asked Questions About the Rose Pattern Scarf
1. What is the Rose Pattern Scarf?
It is a handmade crochet neck warmer featuring a textured body, decorative edging, and a crocheted flower.
2. Is this crochet pattern suitable for beginners?
Yes. Confident beginners who understand basic stitches can complete the scarf.
3. What yarn works best for this project?
Soft worsted-weight acrylic, cotton blends, and washable wool blends are suitable choices.
4. What crochet hook size should I use?
A 4.5 mm crochet hook is recommended for the suggested yarn and gauge.
5. How long should the scarf be?
The suggested length is approximately 28 inches (71 cm), but it can be adjusted.
6. Can I make the scarf wider?
Yes. Increase the foundation chain by adding more stitches.
7. Can I make the scarf longer?
Yes. Continue crocheting additional rows until you reach the desired length.
8. Do I need to crochet the flower separately?
Yes. The flower is made separately and sewn onto the completed scarf.
9. Can I use different colors for the flower?
Absolutely. Contrasting colors can make the flower more noticeable.
10. Are the decorative buttons necessary?
No. You can use a hidden snap, a single button, or another suitable closure.
11. Can I make this scarf without the gray border?
Yes. A simple single-crochet edging creates a cleaner, more minimalist appearance.
12. How do I keep the scarf from curling?
Maintain even tension, use an appropriate hook size, and gently block the finished piece.
13. Can I wash the finished scarf?
Yes, provided you follow the care instructions for the yarn and any decorative materials.
14. Is this pattern suitable for handmade gifts?
Yes. The scarf makes a thoughtful gift for birthdays, holidays, and special occasions.
15. Can I sell scarves made from this pattern?
You can generally sell handmade items you create using these original instructions, subject to any applicable rules for your materials and embellishments.
Conclusion
The Rose Pattern Scarf is a lovely crochet project that combines simple stitches with elegant decorative details. Its soft textured body, contrasting looped edging, and layered flower create a beautiful accessory that can complement many different outfits.
One of the greatest advantages of this pattern is its flexibility. You can adjust the length, width, yarn colors, and decorative features to create a scarf that reflects your personal style.
The step-by-step instructions make it possible to complete the main scarf using basic crochet techniques before adding the more decorative finishing elements.
The rose-pink and gray combination is especially attractive, but the design can also be recreated in neutral, vintage, pastel, or festive colors.
Whether you are crocheting for yourself, creating a special handmade gift, or exploring new accessory patterns, this Rose Pattern Scarf Crochet Tutorial offers a rewarding opportunity to make something beautiful and practical.
With careful stitching, thoughtful color choices, and a little creativity, your finished crochet floral neck warmer can become a favorite handmade accessory for cooler days.