
The Shell Stitch Pattern is one of the most beautiful and versatile techniques in crochet, combining delicate fan-shaped stitches with elegant openwork spaces. This charming design creates a textured fabric that resembles small seashells arranged in repeating rows, making it a wonderful choice for blankets, shawls, scarves, table runners, cushion covers, and decorative crochet projects.
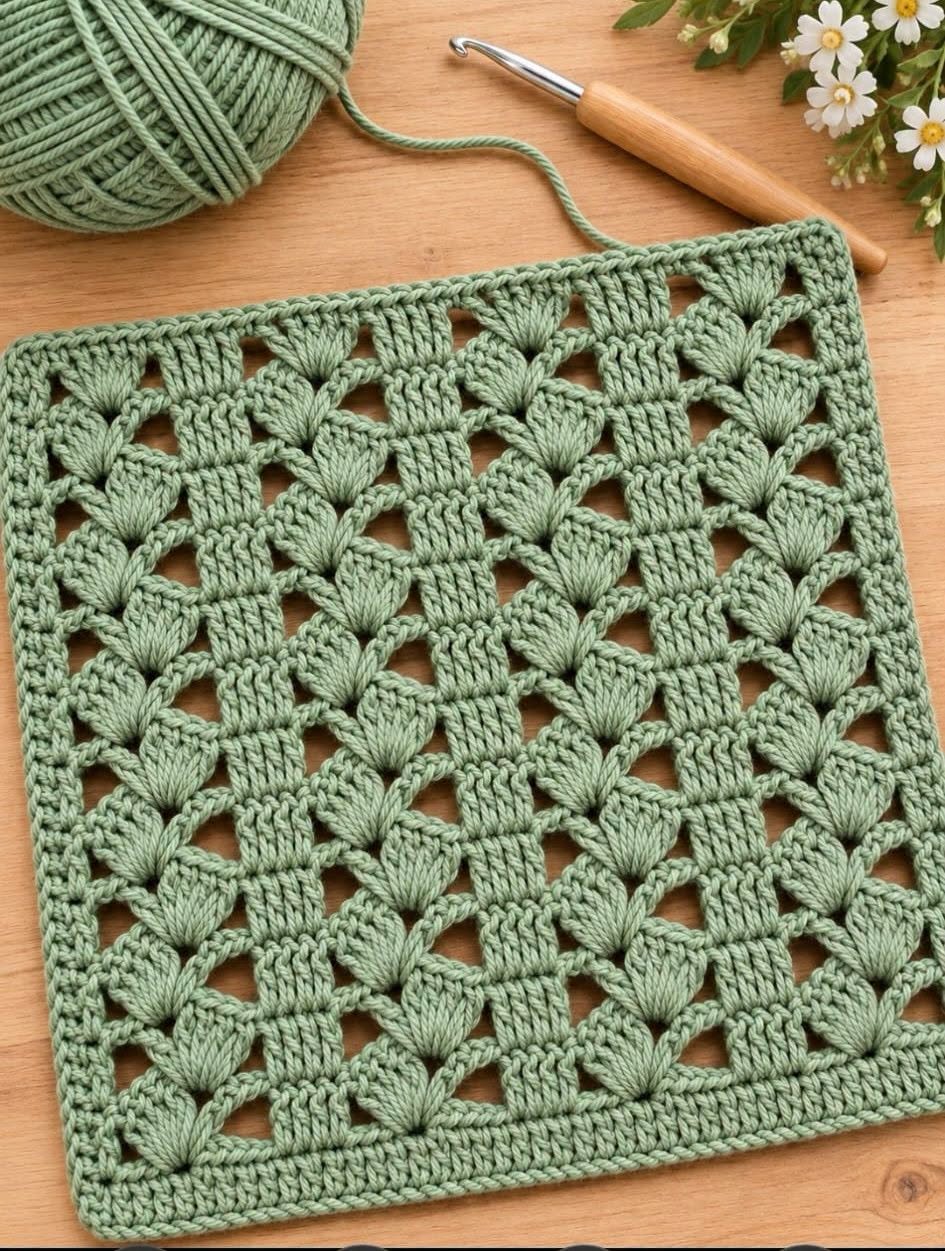
The pattern featured here has a particularly attractive appearance, with soft sage-green yarn forming a series of raised shell motifs connected by delicate chain arches. The repeating arrangement creates a beautiful geometric texture, while the open spaces between the shells give the fabric a light, airy, and sophisticated finish. A neat crocheted border completes the design and helps define its shape.
One of the greatest advantages of the Crochet Shell Stitch Pattern is its adaptability. Although the finished design looks intricate, the basic technique relies on familiar crochet stitches, including chains, single crochet, and double crochet. Once you understand how to create a shell and connect it to the next motif, you can repeat the pattern to produce fabric in many different sizes.
In this complete Shell Stitch Crochet Tutorial, you will learn how to select the right yarn, understand the stitch abbreviations, crochet a beautiful shell pattern, create an attractive openwork effect, and finish your project with a professional border. The tutorial includes practical measurements, detailed instructions, creative ideas, frequently asked questions, and useful tips for achieving consistent, beautiful results.
DISCOVER MORE FREE PATTERNS HERE!
Materials, Crochet Stitches, and Measurements for the Shell Stitch Pattern
Before beginning your Shell Stitch Pattern, it is important to choose materials that will highlight the shape and texture of the crochet shells. The yarn should have enough definition to make the individual stitches visible while remaining soft and flexible.
Cotton yarn is an excellent choice for decorative projects because it produces well-defined stitches and holds its shape beautifully. Acrylic yarn is suitable for blankets and accessories, while lightweight cotton blends can create delicate scarves and summer garments.
The sage-green color shown in the reference design is especially attractive because it emphasizes the natural, botanical appearance of the shell motifs. However, this pattern also looks beautiful in cream, lavender, dusty rose, ivory, and other soft vintage shades.
For beginners, a medium-weight yarn and a comfortable crochet hook make it easier to see the stitch placement and maintain consistent tension.
Materials needed
- Approximately 150–200 yards (137–183 meters) of worsted-weight yarn for a small practice panel.
- A 5.0 mm crochet hook, or the size recommended for your yarn.
- Yarn needle for weaving in ends.
- Scissors.
- Measuring tape.
- Stitch markers.
- Blocking mat, optional.
- Rustproof blocking pins, optional.
- A notebook or row counter, optional.
For a larger project, increase the yarn quantity according to the desired dimensions.
Suggested project measurements
| Project | Approximate Finished Size |
|---|---|
| Small practice swatch | 8 × 8 in (20 × 20 cm) |
| Decorative square panel | 12 × 12 in (30 × 30 cm) |
| Table runner | 14 × 48 in (35.5 × 122 cm) |
| Scarf | 8 × 60 in (20 × 152 cm) |
| Baby blanket | 30 × 36 in (76 × 91 cm) |
| Throw blanket | 48 × 60 in (122 × 152 cm) |
The measurements above are suggested project sizes rather than fixed dimensions for the stitch pattern.
The number of stitches and rows required will depend on the yarn, hook size, and individual crochet tension.
Crochet abbreviations – US terminology
| Abbreviation | Meaning |
|---|---|
| ch | Chain |
| sc | Single crochet |
| dc | Double crochet |
| sl st | Slip stitch |
| st | Stitch |
| sts | Stitches |
| sp | Space |
| rep | Repeat |
| FO | Fasten off |
Understanding the shell stitch
A traditional crochet shell is created by working several double crochet stitches into the same stitch or chain space.
For example, a five-double-crochet shell consists of five double crochet stitches worked into one location.
This creates a fan-shaped motif that spreads outward from a single point.
The openwork spaces between shells are created using chains and carefully positioned single crochet stitches.
The photograph features a more elaborate interlocking lace arrangement. The written instructions below teach a simplified, repeatable shell-and-arch variation inspired by its texture, rather than an exact stitch-for-stitch reconstruction of the photographed fabric.
Step-by-Step Shell Stitch Pattern: Creating the Foundation and First Crochet Shells
The easiest way to learn the Shell Stitch Pattern is to begin with a small rectangular practice swatch.
This allows you to become familiar with the stitch placement before starting a larger project.
The following pattern uses a six-stitch repeat with an additional three chains.
It produces rows of five-double-crochet shells separated by open spaces.
Step 1: Create the foundation chain
Using your chosen yarn and crochet hook, make a slip knot.
Chain 27 stitches.
This provides enough foundation stitches for four shell repeats.
If you want to make a wider project, use the following formula:
Foundation chain = multiple of 6 + 3.
For example:
- 27 chains for 4 repeats.
- 39 chains for 6 repeats.
- 51 chains for 8 repeats.
- 63 chains for 10 repeats.
Make the chains loosely enough that the bottom edge does not become tight.
Step 2: Crochet the foundation row
Work one single crochet into the second chain from the hook.
Continue working one single crochet into each chain across.
You should have 26 single crochet stitches.
Chain 1 and turn.
This foundation row provides a stable base for the decorative shells.
It also makes the first row easier to work.
Step 3: Create the first shell row
Work one single crochet into the first stitch.
Skip the next two stitches.
Work five double crochet stitches into the following stitch.
Skip the next two stitches.
Work one single crochet into the next stitch.
Repeat this sequence across the row.
You should create four complete shells, finishing with a single crochet at the end.
The five double crochet stitches in each group will spread into a rounded fan.
Step 4: Create the openwork transition row
Chain 3 and turn.
Work two double crochet stitches into the first single crochet.
Chain 2.
Work one single crochet into the center double crochet of the next shell.
Chain 2.
Work five double crochet stitches into the single crochet between shells.
Repeat the chain-2, single-crochet, chain-2, and five-double-crochet sequence across the interior of the row.
At the final single crochet, work three double crochet stitches.
This produces half-shells at the edges and full shells between them.
Step 5: Continue the shell pattern
Chain 1 and turn.
Work one single crochet into the first double crochet.
Chain 2.
Work five double crochet stitches into the next single crochet.
Chain 2.
Work one single crochet into the center double crochet of the following shell.
Repeat this arrangement across the row.
At the opposite edge, work one single crochet into the top of the turning chain.
This creates alternating rows of shells.
Step 6: Repeat the pattern to your desired length
Continue alternating the two decorative shell rows.
The shells will gradually form a repeating textured pattern.
Check your stitch placement after every row.
Each new shell should sit between the shells from the previous row.
Continue until the fabric reaches the desired length.
For a small practice panel, approximately 8–12 decorative rows may be sufficient, depending on your gauge.
How to Create Beautiful Openwork Shell Stitch Texture and Decorative Crochet Borders
The beauty of the Shell Stitch Pattern comes from the contrast between solid crochet shells and open chain spaces.
The shell groups create texture, while the chain arches allow light to pass through the fabric.
This combination makes the pattern suitable for projects that need both visual interest and flexibility.
A decorative border can help the finished fabric maintain a neat rectangular or square shape.
Step 1: Maintain consistent shell spacing
As you work, make sure every shell contains the same number of double crochet stitches.
For this tutorial, each complete shell contains five double crochets.
Count the stitches if necessary.
Uneven shell sizes can make the pattern appear irregular.
Consistent stitch counts help create a balanced fabric.
Step 2: Keep the chain arches even
The chain-2 spaces between shell groups should remain relatively loose.
Avoid pulling the yarn too tightly.
Tight chains can cause the openwork spaces to shrink.
If your chain arches appear smaller than expected, relax your tension slightly.
The open spaces should be visible without creating excessive gaps.
Step 3: Check the edges regularly
Lay your crochet panel flat after completing several rows.
Check that the sides remain reasonably straight.
If one side begins to slope, inspect the first and last stitches of each row.
Missing edge stitches are a common cause of uneven crochet fabric.
Use stitch markers to identify the turning chains and edge stitches.
Step 4: Create a simple single crochet border
After completing the main pattern, fasten off the yarn.
Attach the same yarn or a contrasting color at one corner.
Work single crochet stitches evenly around the entire panel.
Along the top and bottom, work into the available stitches and chain spaces.
Along the sides, distribute stitches evenly through the row ends.
Work three single crochets into each corner.
Join with a slip stitch.
This creates a neat foundation border.
Step 5: Add a decorative shell edging
For a more elaborate finish, work a second border round.
Skip two border stitches.
Work five double crochet stitches into the next stitch.
Skip two stitches.
Work one single crochet into the following stitch.
Repeat around the edges, adjusting the spacing near corners as needed.
The resulting border creates small scallops that complement the main shell pattern.
For a flatter edge, use simple single crochet instead.
Step 6: Block the completed crochet fabric
Once the border is finished, weave in all yarn ends.
Lightly dampen the project if permitted by the yarn care instructions.
Lay it flat on a blocking mat.
Gently shape the edges and corners.
Secure with rustproof pins if necessary.
Allow the fabric to dry completely.
Blocking helps the shell motifs open evenly and gives the project a more polished appearance.
Creative Shell Stitch Pattern Projects, Color Combinations, and Professional Crochet Tips
The Crochet Shell Stitch Pattern can be used in many different handmade projects.
Its combination of texture and openwork makes it suitable for both decorative and wearable items.
The same basic stitch pattern can produce completely different results depending on the yarn thickness, color, and finished dimensions.
A soft cotton yarn creates elegant home accessories, while a warm wool blend makes beautiful scarves and blankets.
Step 1: Make a shell stitch baby blanket
Choose a soft, washable yarn suitable for baby items.
Create a foundation chain wide enough for approximately 30 inches (76 cm).
Work the shell stitch pattern until the blanket reaches approximately 36 inches (91 cm) long.
Finish with a simple border.
Avoid adding loose beads, buttons, or long fringe to baby blankets.
Step 2: Create a decorative table runner
Use cotton yarn in cream, sage green, or dusty rose.
Crochet a long rectangular panel.
Continue until it reaches your desired table-runner length.
Add a delicate scalloped border.
Block the runner carefully to emphasize the openwork details.
Step 3: Crochet a beautiful shell stitch scarf
Choose lightweight yarn for a soft, flowing accessory.
Make a narrow foundation chain.
Repeat the shell stitch rows until the scarf reaches approximately 60 inches (152 cm).
Add a simple edging.
The openwork pattern creates an elegant accessory suitable for spring or autumn.
Step 4: Make a decorative cushion cover
Crochet two rectangular or square panels.
Use the shell stitch pattern for the front.
Create a more solid back panel using single crochet or fabric.
Join the pieces around the edges.
Insert a cushion form.
The raised shells create beautiful texture for home decoration.
Step 5: Experiment with color changes
Try changing yarn colors every two or four rows.
This emphasizes the repeating shell structure.
You can alternate light and dark shades for a striped effect.
For a softer appearance, choose several colors from the same family.
Always weave in the yarn ends securely.
Step 6: Create matching handmade accessories
Once you become comfortable with the pattern, use it for coordinated projects.
A shell stitch scarf can be paired with a matching headband.
A decorative table runner can be combined with matching placemats.
A shell stitch blanket can be paired with coordinating cushion covers.
Using the same stitch pattern across multiple projects creates a cohesive handmade collection.
Beautiful Color Combinations for the Shell Stitch Pattern
Sage Green and Ivory: A soft, natural combination that emphasizes the delicate openwork and creates a calm, vintage-inspired appearance.
Dusty Rose and Cream: A romantic palette that works beautifully for scarves, blankets, and decorative home accessories.
Lavender and White: A gentle combination that gives the shell stitch a fresh, delicate appearance.
Navy Blue and Silver Gray: A sophisticated color pairing suitable for modern blankets and elegant accessories.
Mustard Yellow and Beige: A warm, retro-inspired combination that looks especially attractive in textured crochet.
Emerald Green and Soft Gold: A rich color palette that creates a luxurious appearance for decorative projects.
Helpful Tips for a Perfect Shell Stitch Pattern
Count your stitches carefully. Every shell should contain the correct number of double crochet stitches to maintain a consistent pattern.
Use a comfortable hook size. A hook that is too small may create stiff fabric, while a very large hook may produce loose, uneven shells.
Choose yarn with good stitch definition. Smooth yarn makes the fan-shaped motifs easier to see.
Keep your chain spaces relaxed. Even chain arches help maintain the openwork appearance.
Use stitch markers when necessary. Marking the beginning and end of rows helps prevent accidental increases or decreases.
Block your finished project. Gentle blocking improves the shape of the shells and makes the openwork more visible.
Frequently Asked Questions About the Shell Stitch Pattern
1. What is the crochet shell stitch?
The shell stitch is a decorative crochet technique that uses several stitches worked into the same stitch or space to create a fan-shaped motif.
2. Is the Shell Stitch Pattern suitable for beginners?
Yes. Beginners who understand chains, single crochet, and double crochet can learn this pattern with practice.
3. What yarn is best for shell stitch crochet?
Cotton, acrylic, wool, and blended yarns can all work well, depending on the intended project.
4. What crochet hook size should I use?
A 5.0 mm hook is a good starting point for worsted-weight yarn, but the ideal size depends on your yarn and tension.
5. How many stitches are in a crochet shell?
A shell commonly contains three, five, or seven double crochet stitches, depending on the design.
6. Can I make a blanket using the shell stitch?
Yes. The shell stitch is popular for blankets because it creates attractive texture and repeating decorative motifs.
7. Can I use multiple colors?
Absolutely. Changing colors between rows can highlight the repeating shell pattern.
8. Why are my crochet shells curling?
Curling may result from tight tension, incorrect stitch counts, or an unsuitable hook size.
9. How do I make the shells more defined?
Use smooth yarn, consistent tension, and carefully counted stitch groups.
10. Can I use the shell stitch for clothing?
Yes. Shell stitches are suitable for shawls, cardigans, tops, scarves, and other garments.
11. Is shell stitch crochet suitable for cotton yarn?
Yes. Cotton yarn provides excellent stitch definition and is especially suitable for decorative projects.
12. How do I make the pattern wider?
Increase the foundation chain according to the stitch multiple used in your chosen variation.
13. Can I add a decorative border?
Yes. Single crochet, picot, and scalloped shell borders are all attractive finishing options.
14. How do I wash shell stitch crochet?
Follow the yarn manufacturer’s care instructions. Gentle washing and flat drying are often suitable.
15. Is the Shell Stitch Pattern good for handmade gifts?
Yes. Shell stitch projects make lovely handmade gifts, including scarves, blankets, table runners, and decorative cushions.
Conclusion
The Shell Stitch Pattern is a timeless crochet technique that combines beautiful texture, delicate openwork, and versatile design possibilities. Its repeating fan-shaped motifs create an elegant appearance that can transform simple yarn into a sophisticated handmade project.
One of the greatest advantages of this stitch is its adaptability. By changing the yarn, hook size, colors, and finished dimensions, you can create everything from lightweight scarves to cozy blankets and decorative home accessories.
The combination of shell motifs and chain spaces gives the fabric a balanced appearance, with raised stitches providing texture and openwork sections adding lightness.
For beginners, the pattern offers an excellent opportunity to practice stitch counting, consistent tension, and decorative crochet techniques.
For experienced crocheters, it provides a beautiful foundation for experimenting with different colors, borders, and creative project ideas.
Whether you choose the soft sage-green appearance shown in the reference image or create your own color combination, the Shell Stitch Crochet Pattern is a rewarding technique that can become a favorite addition to your handmade crochet collection.