
The Snowman Ornament Pattern is an adorable handmade crochet project that brings the warmth of traditional Christmas decorations into your home. Featuring a soft rounded body, a cheerful smiling face, a cozy green winter hat, a bright red scarf, and a rustic hanging loop, this charming snowman is perfect for anyone who enjoys creating festive ornaments. Inspired by the handmade snowmen shown in the reference image, this tutorial explains how to crochet a similar three-dimensional snowman using basic amigurumi techniques. Whether you are decorating your Christmas tree, preparing handmade gifts, or creating a collection of seasonal ornaments, this project offers a wonderful opportunity to transform colorful yarn into a delightful holiday decoration.
One of the most attractive features of the Crochet Snowman Ornament Pattern is its combination of simple construction and charming decorative details. The snowman’s rounded cream-colored body creates a soft winter appearance, while the forest green hat and red scarf add traditional Christmas colors. Small black eyes, an orange carrot-shaped nose, rosy cheeks, and decorative green buttons complete the friendly expression. These details can be customized to create snowmen with different personalities, making every ornament slightly different. You can also experiment with white, ivory, burgundy, sage green, navy blue, and other winter-inspired colors to create a coordinated collection of handmade Christmas decorations.
Learning how to crochet a Snowman Ornament is an excellent way to practice essential crochet techniques while creating something festive and meaningful. This tutorial explains how to make a rounded amigurumi body, shape the head, crochet a winter hat, create a miniature scarf, embroider facial details, add decorative buttons, and attach a hanging loop. The pattern uses basic U.S. crochet terminology, including chain, single crochet, slip stitch, increases, and invisible decreases. These techniques make the project suitable for confident beginners who want to improve their amigurumi skills while creating an adorable Christmas decoration.
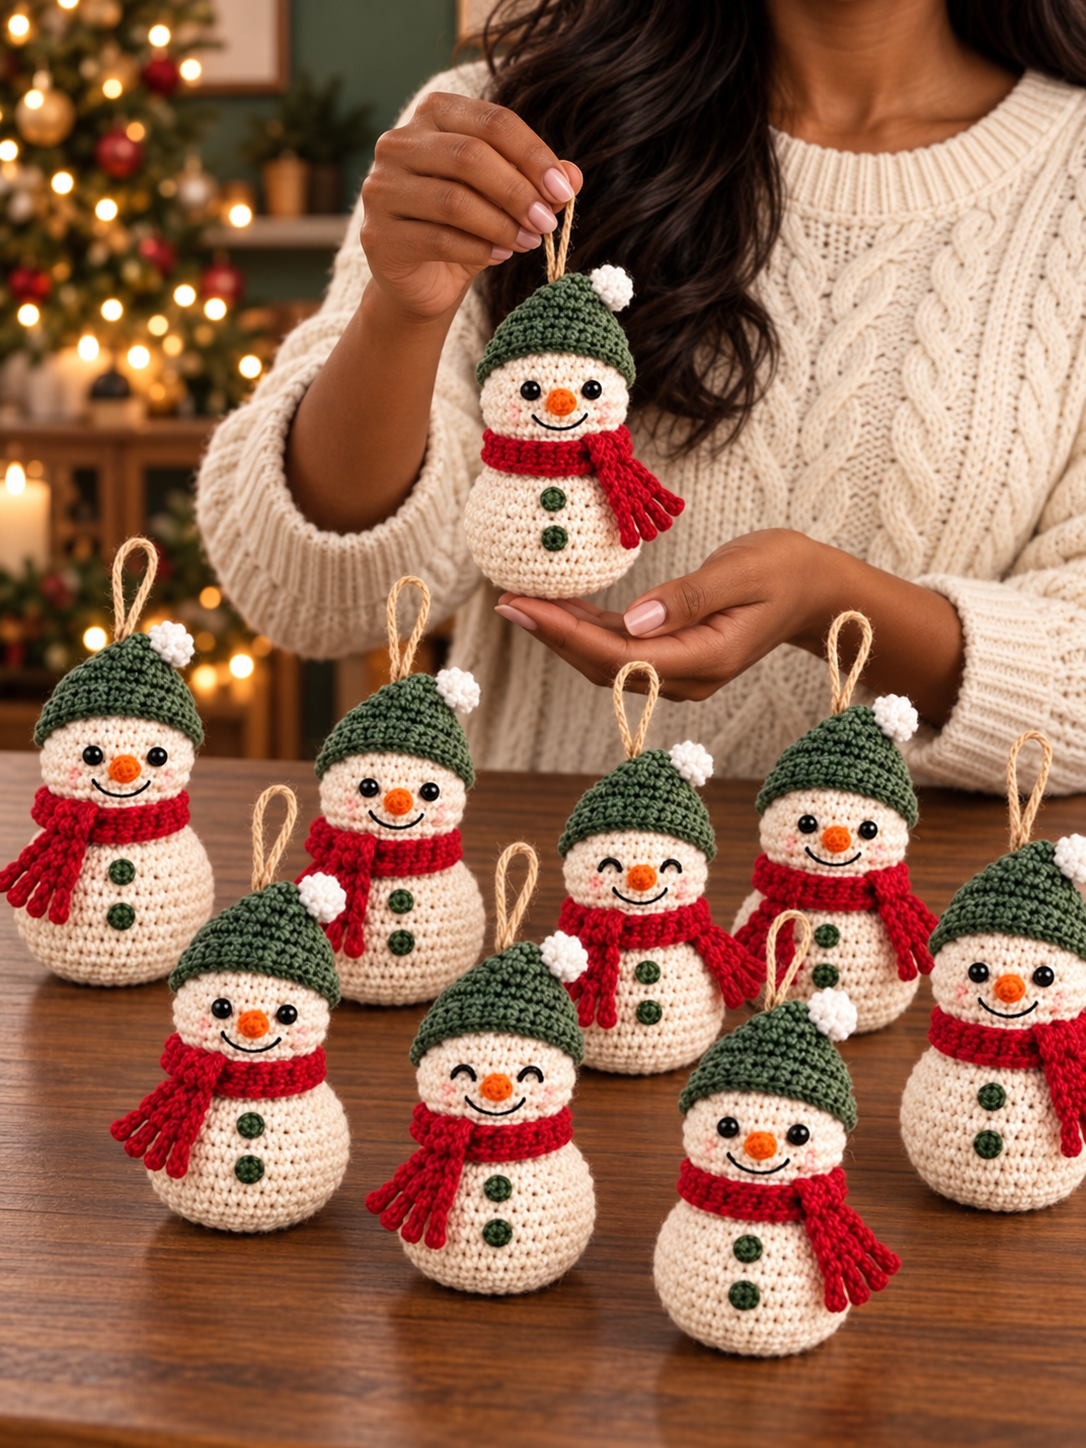
The finished Handmade Crochet Snowman Ornament in this tutorial measures approximately 4½–5½ inches (11.4–14 cm) tall, including the winter hat, and approximately 2½–3 inches (6.4–7.6 cm) wide at the rounded body. The design features a softly stuffed body with a smaller head, a fitted green hat, a removable-looking but securely attached red scarf, and a natural hanging loop. Its compact size makes it ideal for Christmas trees, holiday garlands, gift toppers, and decorative displays. With accurate stitch counts, consistent crochet tension, and careful finishing, you can create a charming snowman ornament that combines traditional holiday colors with the cozy appeal of handmade crochet.
DISCOVER MORE FREE PATTERNS HERE!
Materials, Yarn Selection, and Measurements for the Snowman Ornament Pattern
Before beginning your Snowman Ornament Pattern, gather the materials needed to complete the project. Choosing suitable yarn and a comfortable crochet hook is especially important because the thickness, softness, and stitch definition influence the appearance of the finished snowman.
Worsted weight cotton yarn is an excellent choice for amigurumi ornaments because it creates defined stitches and helps the finished snowman maintain its shape. Cotton yarn also provides a smooth texture that works beautifully for small decorative details.
Acrylic yarn is another suitable option. It is lightweight, affordable, and available in many festive colors, making it ideal for creating multiple snowman ornaments.
For a design inspired by the reference image, choose cream or ivory yarn for the body, forest green for the hat, bright red for the scarf, and orange for the carrot nose.
Materials needed:
- Approximately 35–50 yards (32–46 meters) of cream or ivory worsted weight yarn.
- Approximately 15–20 yards (14–18 meters) of forest green yarn.
- Approximately 10–15 yards (9–14 meters) of Christmas red yarn.
- Small amount of orange yarn for the nose.
- Small amount of dark green yarn for the decorative buttons.
- Black embroidery thread for the eyes and smile.
- Crochet hook size 3.0 mm.
- Polyester fiberfill stuffing.
- Yarn needle.
- Small scissors.
- Stitch markers.
- Measuring tape.
- Optional pink embroidery thread for rosy cheeks.
- Approximately 6–8 inches (15–20 cm) of cotton cord or natural jute twine for the hanging loop.
- Optional small white pom-pom for the winter hat.
- Optional removable fabric marker for positioning facial details.
The exact yarn requirement depends on the finished size, stitch tension, and decorative details.
For amigurumi projects, using a crochet hook smaller than the yarn label recommends helps create a firm fabric that prevents stuffing from showing between stitches.
Suggested finished measurements:
| Component | Approximate Measurement |
|---|---|
| Finished Ornament Height | 4½–5½ in (11.4–14 cm) |
| Finished Body Width | 2½–3 in (6.4–7.6 cm) |
| Head Diameter | Approximately 2 in (5.1 cm) |
| Body Height | Approximately 2½ in (6.4 cm) |
| Winter Hat Height | 1½–2 in (3.8–5.1 cm) |
| Scarf Length | 8–10 in (20–25 cm) |
| Hanging Loop Height | 2–3 in (5–7.6 cm) |
| Recommended Yarn Weight | Worsted Weight #4 |
| Recommended Crochet Hook | 3.0 mm |
| Skill Level | Confident Beginner |
These measurements are approximate. The finished ornament may vary depending on yarn thickness and individual crochet tension.
For larger snowmen, use thicker yarn and a larger crochet hook. For smaller ornaments, choose lightweight yarn and a smaller hook.
Crochet abbreviations – U.S. terminology:
| Abbreviation | Meaning |
|---|---|
| ch | Chain |
| sc | Single Crochet |
| sl st | Slip Stitch |
| st | Stitch |
| sts | Stitches |
| inc | Increase – 2 sc in the same stitch |
| dec | Invisible Decrease |
| BLO | Back Loop Only |
| FLO | Front Loop Only |
| rnd | Round |
| rep | Repeat |
| FO | Fasten Off |
| MR | Magic Ring |
Special stitch instructions:
Invisible Decrease: Insert the hook through the front loops of the next two stitches, yarn over, pull through both front loops, yarn over again, and pull through the remaining loops.
Magic Ring: Create an adjustable loop, crochet the required stitches into the loop, and pull the yarn tail to close the center.
Single Crochet Increase: Work two single crochet stitches into the same stitch.
The main snowman is worked in continuous spiral rounds unless otherwise indicated. Place a stitch marker in the first stitch of each round.
Suggested Christmas color combinations:
| Yarn Color | Suggested Use |
|---|---|
| Cream or Ivory | Snowman body and head |
| Forest Green | Winter hat |
| Christmas Red | Scarf |
| Orange | Carrot nose |
| Dark Green | Decorative buttons |
| Black | Embroidered facial details |
The traditional combination of cream, green, and red creates a cheerful Christmas appearance similar to the snowmen shown in the reference image.
Before beginning, check your yarn for tangles and uneven sections. Smooth yarn makes the crochet process easier and produces more consistent stitches.
Step-by-Step Snowman Ornament Pattern: Crocheting the Rounded Body
The first stage of the Snowman Ornament Pattern involves creating the rounded body.
The body is worked from the bottom upward using single crochet stitches and simple increases.
The lower section is wider than the upper section, creating a charming snowman silhouette.
Step 1: Create the magic ring.
Using cream or ivory yarn and a 3.0 mm crochet hook, make a magic ring.
Work 6 sc into the ring.
Pull the yarn tail gently to close the center.
Place a stitch marker in the first stitch.
You should have 6 stitches.
Step 2: Increase the body base.
Round 2: Work 2 sc in each stitch around. (12 sts)
Round 3: Repeat 1 sc, inc around. (18 sts)
Round 4: Repeat 2 sc, inc around. (24 sts)
Round 5: Repeat 3 sc, inc around. (30 sts)
Round 6: Repeat 4 sc, inc around. (36 sts)
The crocheted piece should begin forming a rounded base.
Step 3: Crochet the main body.
Rounds 7–12: Work 1 sc in each stitch around. (36 sts)
Maintain consistent tension.
The body should gradually develop a rounded cylindrical shape.
Avoid pulling the stitches too tightly.
Step 4: Shape the upper body.
Round 13: Repeat 4 sc, dec around. (30 sts)
Round 14: Work 1 sc in each stitch around. (30 sts)
Round 15: Repeat 3 sc, dec around. (24 sts)
Round 16: Work 1 sc in each stitch around. (24 sts)
The upper body should become slightly narrower.
Step 5: Add the stuffing.
Begin filling the body with polyester fiberfill.
Distribute the stuffing evenly.
Avoid overstuffing because excessive pressure can distort the stitches.
The body should feel firm but remain soft.
Step 6: Close the body.
Round 17: Repeat 2 sc, dec around. (18 sts)
Round 18: Repeat 1 sc, dec around. (12 sts)
Add a small amount of additional stuffing if necessary.
Round 19: Work 6 decreases around. (6 sts)
Fasten off, leaving a long yarn tail.
Use the yarn needle to close the remaining opening.
The completed Crochet Snowman Body should have a rounded lower section, a slightly narrower upper section, and a smooth stuffed appearance.
How to Crochet the Snowman’s Head, Winter Hat, and Carrot Nose
After completing the body, the next stage of the Snowman Ornament Pattern involves creating the head and decorative winter accessories.
The head is crocheted separately and sewn securely to the upper body.
A fitted green hat and small orange nose give the snowman its recognizable Christmas appearance.
Step 1: Begin the snowman head.
Using cream or ivory yarn, make a magic ring.
Round 1: Work 6 sc into the ring. (6 sts)
Round 2: Work 2 sc in each stitch around. (12 sts)
Round 3: Repeat 1 sc, inc around. (18 sts)
Round 4: Repeat 2 sc, inc around. (24 sts)
Step 2: Shape the head.
Rounds 5–9: Work 1 sc in each stitch around. (24 sts)
Round 10: Repeat 2 sc, dec around. (18 sts)
Round 11: Repeat 1 sc, dec around. (12 sts)
Begin stuffing the head lightly.
Round 12: Work 6 decreases around. (6 sts)
Fasten off, leaving a long yarn tail.
Close the opening securely.
Step 3: Attach the head to the body.
Position the head at the center of the upper body.
Use the long yarn tail and a yarn needle to sew the pieces together.
Work small stitches around the attachment area.
Check that the head remains centered.
Secure the yarn tail carefully.
Step 4: Crochet the winter hat.
Using forest green yarn, make a magic ring.
Round 1: Work 6 sc into the ring. (6 sts)
Round 2: Repeat 1 sc, inc around. (9 sts)
Round 3: Work 1 sc in each stitch around. (9 sts)
Round 4: Repeat 2 sc, inc around. (12 sts)
Round 5: Work 1 sc in each stitch around. (12 sts)
Round 6: Repeat 3 sc, inc around. (15 sts)
Round 7: Repeat 4 sc, inc around. (18 sts)
Round 8: Repeat 5 sc, inc around. (21 sts)
Round 9: Repeat 6 sc, inc around. (24 sts)
Rounds 10–12: Work 1 sc in each stitch around. (24 sts)
Fasten off, leaving a yarn tail for attachment.
Step 5: Add the hat details.
Place the hat over the upper portion of the snowman’s head.
Adjust the brim so the face remains visible.
Sew the hat securely in place.
Attach a small white crocheted pom-pom or yarn pom-pom near the pointed tip.
For a simple crocheted pom-pom, make 6 sc in a magic ring, work 2 sc in each stitch around, then decrease around to close the small stuffed ball.
Step 6: Crochet the carrot nose.
Using orange yarn, make a magic ring.
Round 1: Work 4 sc into the ring. (4 sts)
Round 2: Work 1 sc in each stitch around. (4 sts)
Round 3: Repeat 1 sc, inc twice. (6 sts)
Fasten off, leaving a long yarn tail.
Shape the small piece into a cone.
Sew it securely to the center of the snowman’s face.
The completed Crochet Snowman Head and Winter Hat should feature a rounded cream-colored face, a fitted green hat, and a small orange carrot nose.
Crochet Scarf, Facial Details, Decorative Buttons, and Professional Finishing Tips
One of the most charming features of the Snowman Ornament Pattern shown in the reference image is the combination of a bright red scarf, a cheerful embroidered smile, and small green buttons.
These decorative details transform a simple crocheted snowman into a festive Christmas character.
The scarf is made separately and wrapped around the neck after the head and body have been assembled.
Step 1: Crochet the red scarf.
Using Christmas red yarn, chain 36.
Work 1 sc in the second chain from the hook.
Continue working 1 sc in each remaining chain.
You should have 35 single crochet stitches.
Chain 1 and turn.
Work 1 sc in each stitch across.
Fasten off, leaving a short yarn tail.
Step 2: Add decorative scarf fringe.
Cut several short pieces of red yarn.
Fold each piece in half.
Use a crochet hook to attach the folded strands to the scarf ends.
Pull the loose ends through the folded loops.
Trim the fringe evenly.
Step 3: Attach the scarf.
Wrap the scarf around the snowman’s neck.
Cross the ends near the front.
Position the fringe so it hangs naturally.
Secure the scarf with a few hidden stitches.
Avoid pulling the scarf too tightly around the neck.
Step 4: Embroider the facial details.
Using black embroidery thread, create two small eyes above the carrot nose.
For a smiling expression, embroider a curved line beneath the nose.
Use small, even stitches.
Add tiny pink stitches to create rosy cheeks if desired.
For ornaments intended for young children, embroidered eyes are preferable to plastic safety eyes, which can detach.
Step 5: Add decorative green buttons.
Using dark green yarn, make two small circular appliqués.
For each button, create a magic ring and work 6 sc into the ring.
Pull the ring closed.
Fasten off, leaving a yarn tail.
Sew the buttons vertically along the front of the body.
Keep the spacing even.
Step 6: Create the hanging loop and finish the ornament.
Cut approximately 6–8 inches (15–20 cm) of cotton cord or natural jute twine.
Fold the cord in half.
Tie the ends securely.
Attach the loop to the top of the snowman’s hat.
Reinforce the attachment with additional stitches.
Check the ornament’s balance before hanging.
The completed Handmade Crochet Snowman Christmas Ornament should feature a rounded body, a cheerful face, a green winter hat, a red scarf, and a secure hanging loop.
Beautiful Color Combinations for a Snowman Ornament Pattern
A cream, red, and forest green Snowman Ornament creates a classic Christmas appearance inspired by the reference image. The traditional colors complement decorated Christmas trees, warm holiday lights, and festive garlands.
A white and navy blue Crochet Snowman offers a beautiful winter-inspired design. A snowy white body combined with a dark blue hat and scarf creates a charming seasonal ornament.
A cream and burgundy Snowman Ornament produces an elegant vintage appearance. Rich burgundy accessories add warmth and sophistication to traditional holiday decorations.
A white and sage green Crochet Snowman creates a soft farmhouse-inspired style. These gentle colors complement rustic Christmas trees, natural wooden ornaments, and neutral home accessories.
A pink and white Snowman Ornament offers a delicate and playful variation. Soft pink accessories create a cheerful alternative to traditional Christmas colors.
For a colorful Christmas collection, combine cream-colored bodies with hats and scarves in red, green, blue, pink, lavender, and mustard yellow. These bright shades create a coordinated group of handmade snowmen with different personalities.
Helpful Tips for Crocheting a Beautiful Snowman Ornament
Maintain consistent crochet tension throughout the project. Even stitches help create a smooth amigurumi body with a professional-looking appearance.
Use a stitch marker when working in continuous rounds. This makes it easier to count stitches and avoid accidental increases or decreases.
Choose a crochet hook slightly smaller than the yarn label recommends. A firm fabric helps prevent the stuffing from showing through the stitches.
Stuff the body and head evenly. Avoid overstuffing because excessive pressure can distort the shape.
Position the facial details before sewing them permanently. Careful placement helps create a balanced and cheerful expression.
Secure the hat, scarf, buttons, and hanging loop carefully. Proper finishing helps the ornament maintain its appearance during seasonal use and storage.
Frequently Asked Questions About the Snowman Ornament Pattern
1. Is the Snowman Ornament Pattern suitable for beginners?
Yes. This pattern is suitable for confident beginners who understand basic crochet stitches, increases, decreases, and simple amigurumi assembly.
2. What is a Crochet Snowman Ornament?
A Crochet Snowman Ornament is a small handmade Christmas decoration featuring a stuffed crocheted snowman with festive accessories.
3. What yarn is best for Snowman Ornaments?
Worsted weight cotton or acrylic yarn is suitable because it creates defined stitches and is available in many Christmas colors.
4. What crochet hook should I use?
A 3.0 mm crochet hook is recommended for the sample ornament, although the hook size may need adjustment depending on the yarn.
5. What size is the finished snowman?
The suggested finished size is approximately 4½–5½ inches tall and 2½–3 inches wide.
6. Can I make the Snowman Ornament larger?
Yes. Use thicker yarn and a larger crochet hook to create a bigger snowman.
7. Can I make a smaller Crochet Snowman?
Absolutely. Use lightweight yarn and a smaller hook to create a miniature version.
8. What crochet stitches are used in this pattern?
The pattern uses chain, single crochet, slip stitch, increases, and invisible decreases.
9. Can I use different colors for the hat and scarf?
Yes. Red, green, blue, pink, burgundy, lavender, and other colors can be used to create personalized snowman ornaments.
10. Can I embroider the eyes instead of using plastic eyes?
Yes. Embroidered eyes create a charming handmade appearance and avoid the detachable small parts associated with plastic eyes.
11. How do I make the carrot nose?
The carrot nose is crocheted separately using orange yarn and a few rounds of single crochet stitches.
12. Can I make the scarf removable?
Yes. The scarf can be tied around the neck without permanent stitching, although securing it is recommended for ornaments that will be handled frequently.
13. How long does it take to crochet a Snowman Ornament?
The time required depends on experience and decorative details. Many crocheters can complete a simple snowman in approximately two to four hours.
14. How should I clean a Crochet Snowman Ornament?
Gently spot clean the ornament when necessary. Follow the yarn manufacturer’s care instructions and allow the snowman to dry completely before storing.
15. Can I make Snowman Ornaments as handmade gifts?
Yes. Crochet Snowman Ornaments make thoughtful handmade gifts, stocking stuffers, gift toppers, Christmas tree decorations, and holiday keepsakes.
Conclusion
The Snowman Ornament Pattern is a charming handmade crochet project that combines traditional amigurumi techniques with the joyful spirit of Christmas. Its rounded body, cheerful smiling face, cozy winter hat, bright scarf, and decorative buttons create an adorable ornament suitable for many festive displays.
By following the instructions in this tutorial, you can create a lovely Handmade Crochet Snowman Ornament using basic crochet stitches, simple increases and decreases, careful measurements, and easy assembly techniques.
One of the greatest advantages of this pattern is its versatility. Traditional red and green designs, elegant burgundy variations, farmhouse-inspired sage green accessories, and colorful pastel combinations can all be created using the same basic construction.
The finished snowman can become a beautiful Christmas tree ornament, a festive garland accessory, a handmade gift topper, or a thoughtful holiday keepsake for someone special. Its small size makes it an excellent project for creating coordinated Christmas collections.
With accurate stitch counts, consistent crochet tension, even stuffing, secure assembly, and thoughtful decorative details, your Crochet Snowman Christmas Ornament will have a neat appearance and a charming three-dimensional structure.
Enjoy selecting your favorite Christmas yarn colors, experimenting with cheerful facial expressions, and bringing your own beautiful Snowman Ornament Pattern to life through the relaxing and rewarding art of crochet.