
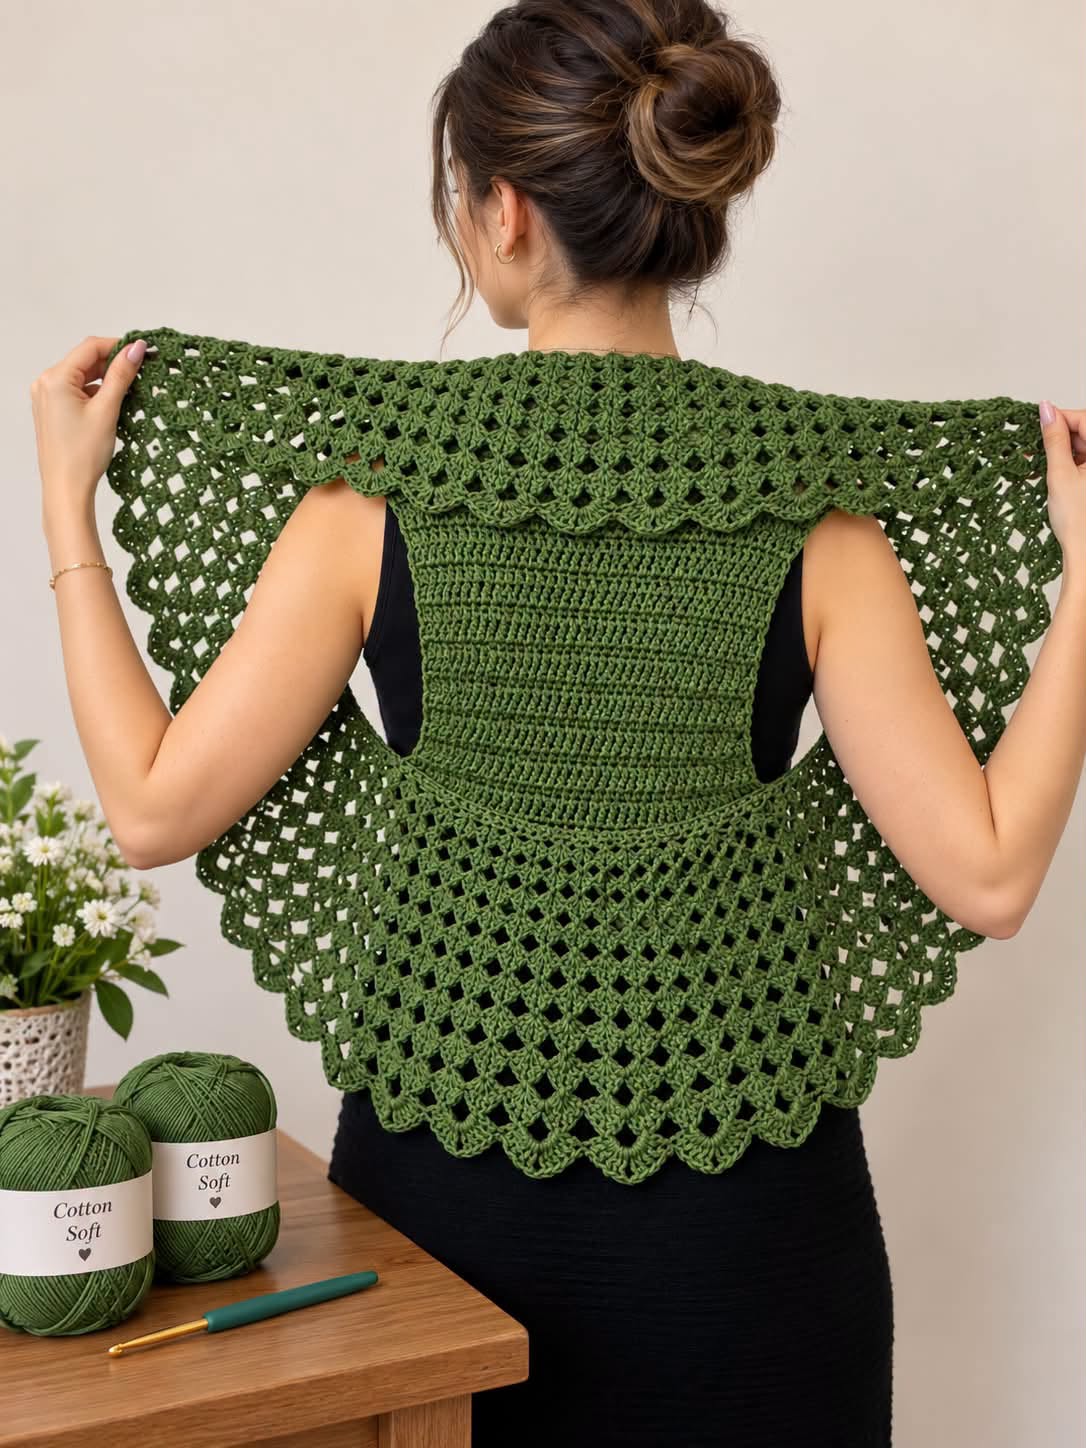
Top-Down Crochet Blouse Pattern is a beautiful way to create a lightweight, feminine garment with an elegant openwork structure and a comfortable customizable fit. Inspired by the green crochet piece shown in the reference image, this design combines a more solid central back panel with airy lace sections, decorative shell stitches, and scalloped edging. The result is a versatile blouse or open vest that can be layered over a tank top, dress, or simple shirt.
One of the greatest advantages of a top-down crochet blouse is that the garment can be adjusted while you work. Instead of making several completely separate pieces and discovering at the end that the fit is not quite right, you can regularly measure the developing fabric against your body. The shoulder width, armhole depth, body length, and decorative lower section can all be customized. This makes a top-down construction particularly useful when you want to adapt a handmade garment to different sizes.
The project shown has an attractive contrast between solid crochet fabric and open lace crochet. A structured rectangular section across the back provides coverage and stability, while progressively more open stitch patterns create movement around the shoulders and lower body. A decorative scalloped border completes the design. This tutorial uses U.S. crochet terminology and provides a practical construction method inspired by the visible features of the garment rather than claiming to reproduce an unseen original pattern stitch for stitch.
Materials, Measurements, Gauge, and Crochet Abbreviations
For this Top-Down Crochet Blouse Pattern, a smooth cotton or cotton-blend yarn is an excellent choice. Cotton provides crisp stitch definition, which is especially helpful for the mesh, shells, and decorative scallops. A lightweight DK/#3 yarn creates a garment that drapes nicely without becoming excessively heavy.
DISCOVER MORE FREE PATTERNS HERE!
For an average adult medium size, approximately 900–1,200 yards (825–1,100 m) of yarn is a reasonable starting estimate. Smaller sizes may require less, while larger sizes, longer versions, or garments with wider fronts may require considerably more. Always purchase a little extra yarn when possible.
Use approximately a 3.5–4.0 mm crochet hook, adjusting according to your yarn and natural tension. You will also need scissors, a yarn needle, stitch markers, measuring tape, and blocking pins. Stitch markers are especially useful for identifying shoulder points and the beginning of increases.
A useful starting gauge is approximately 17–19 double crochet stitches = 4 inches (10 cm) after blocking. Gauge is important for clothing. Crochet a sample using both the solid and lace sections before committing to the complete garment.
Suggested finished back widths are approximately 16–17 in (41–43 cm) for S, 18–19 in (46–48 cm) for M, 20–21 in (51–53 cm) for L, and 22–24 in (56–61 cm) for XL/2XL. These are guidelines rather than fixed measurements because preferred ease varies.
Measure the intended wearer across the upper back, around the bust, from shoulder to desired hem, and around the upper arm. For a relaxed open-front blouse, approximately 2–4 inches (5–10 cm) of positive ease can create comfortable movement.
The abbreviations used throughout this tutorial are: ch = chain, sl st = slip stitch, sc = single crochet, hdc = half double crochet, dc = double crochet, tr = treble crochet, sp = space, sk = skip, st/sts = stitch/stitches, and rep = repeat.
The primary solid section can be worked mainly in double crochet (dc). Double crochet provides enough coverage while remaining flexible and relatively lightweight.
For the open sections, use a simple mesh based on dc and chain spaces. For example, dc, ch 2, skip 2 sts, dc creates a clean open grid that can be expanded into larger decorative sections.
The shell border can be formed with groups of 5 dc in one stitch or chain space, anchored with sc between shells. More elaborate shells can incorporate chains or picots.
Before starting the actual garment, wash and block your gauge swatch exactly as you intend to care for the finished blouse. Cotton can relax after washing, so measuring an unwashed swatch may produce inaccurate sizing.
Starting at the Top and Building the Upper Back
Begin the top-down crochet blouse at the upper back. Rather than relying on one universal chain count, calculate your foundation from the desired finished shoulder width and your personal gauge.
For example, if your gauge is 18 dc per 4 inches (10 cm) and you need an 18-inch (46 cm) upper-back width, approximately 81 stitches would span that measurement. Adjust the count to accommodate your chosen lace repeat.
Row 1: Ch the required number plus the appropriate turning chains. Work 1 dc in each foundation chain across. Turn.
Row 2: Ch 2 or ch 3 according to your preferred turning method. Work 1 dc in each st across. Turn.
Continue working even rows of dc until the solid upper-back panel measures approximately 7–9 inches (18–23 cm) from the starting edge. Longer armholes may require additional depth.
The reference design shows a substantial solid central area surrounded by decorative lace. Maintaining this denser fabric through the center provides useful stability and creates an attractive visual contrast with the open sections.
When the upper-back panel reaches the desired armhole depth, begin transitioning into the lower lace. Do not abruptly change from dense dc to very large spaces. One or two transition rows create a cleaner appearance.
A simple transition row can be: *ch 3, dc in next st, ch 1, sk 1, dc in next st; rep from * across. Adjust the final repeat as necessary.
On the following row, begin increasing the openness: dc in dc, ch 2, dc in next dc, repeating across. This produces a lightweight grid below the structured panel.
To create a gently widening silhouette, place occasional increases near the sides. Instead of increasing every row, add an extra chain space every second or third row. Gradual increases create a more natural drape.
Continue the mesh until the lower lace section reaches approximately 8–12 inches (20–30 cm), or your preferred length. The openwork should fall loosely rather than pulling against the body.
For a cropped blouse, finish sooner. For a longer cardigan-style piece, continue additional repeats. Because the project is worked from the top down, length modification is straightforward.
Keep checking symmetry. Count chain spaces occasionally to confirm that both sides contain an equal number of repeats.
Adding the Shoulder, Side, and Decorative Lace Sections
The wide decorative shoulder section is one of the defining elements of this crochet lace blouse pattern. It creates the graceful draped appearance visible across the upper back and sides.
Return to the top foundation edge or designated shoulder stitches and join your yarn. Work outward using a combination of chains, double crochet, and shell stitches.
Begin with a relatively compact mesh. A useful repeat is dc in designated st, ch 2, skip 2 sts, dc in next st. Continue across the shoulder section.
As the lace extends outward, gradually increase the chain spaces or add additional mesh units. This creates the flared shape that drapes over the shoulder.
For a more decorative texture, alternate mesh rows with shell rows. A basic shell is 5 dc into one chain space, followed by sc into the next chain space.
The next row can return to mesh by working chains between the centers of the shells. This alternation produces the layered, textured effect commonly associated with decorative crochet shawls and blouse collars.
Continue until each side reaches the desired width. Depending on size and styling, the shoulder lace may extend approximately 8–14 inches (20–36 cm) beyond the solid central panel.
Repeat exactly on the opposite side. Matching row counts is essential. Write down the number of mesh and shell rows used on the first side before beginning the second.
The front portions can remain open, creating a crochet vest or open cardigan silhouette, or they can be extended farther toward the center for greater coverage.
To make wider fronts, simply continue adding lace repeats along each side. Try the garment on regularly and allow the fabric to fall naturally rather than stretching it into position.
For armholes, maintain enough open space beneath the shoulder section to move comfortably. An approximate armhole depth of 7–8 inches (18–20 cm) may suit smaller sizes, while 8–10 inches (20–25 cm) can work better for larger sizes.
Once the side sections have reached the lower edge of the central panel, incorporate them into the lower mesh construction whenever practical. This helps the garment appear continuous rather than assembled from unrelated sections.
The lower portion can then expand around the body using a repeating V-stitch such as (dc, ch 2, dc) in the same chain space.
Work each subsequent V-stitch into the ch-2 space of the V-stitch below. This creates clean vertical columns and an attractive diamond-like openwork texture.
Continue until the blouse reaches your desired length. Keep the final few rows consistent so the border can be attached evenly.
Scalloped Border, Finishing, Sizing, and Customization
The final border transforms a simple lace garment into an elegant handmade crochet blouse. Begin by working one stabilizing round or row around the outer edge.
A good foundation border is 1 sc in each stitch and approximately 2 sc around the side of each dc row, adjusting as necessary to keep the fabric flat.
If the edge begins to ripple dramatically, you have too many stitches. If it pulls inward or cups, add additional stitches.
For the first decorative row, work ch 3, skip approximately 2 sts, sc in next st repeatedly. These chain loops provide evenly spaced foundations for the scallops.
On the following row, work 5 dc or 7 dc into each chain loop, followed by a sc into the next anchoring point. Larger shells create a more dramatic border.
For a pointed lace appearance, try sc, hdc, dc, tr, ch 2, tr, dc, hdc, sc within a sufficiently large chain space. The central chain creates a delicate point.
Continue the same edging around the lower hem and outer side sections. If desired, use a slightly simpler border around the neckline so it remains comfortable against the skin.
Once the edging is complete, fasten off and weave all yarn tails securely into nearby stitches. Avoid simply cutting tails close to the fabric because wearable crochet experiences repeated movement.
Wash or dampen the finished blouse according to the yarn manufacturer’s care instructions. Carefully spread it on blocking mats and arrange the lace sections symmetrically.
Blocking is particularly important for openwork crochet garments. It opens the chain spaces, defines the shells, straightens the solid panel, and helps the decorative border lie evenly.
Allow the garment to dry completely before removing the pins. Do not judge the final drape before blocking; many lace patterns change significantly after this step.
For a fitted version, reduce the number of lower mesh increases. For a relaxed bohemian style, add more increases and make the lace panels wider.
You can also transform the project into a short shrug by reducing the lower body length, or into a longer vest by continuing the mesh well below the hips.
Suggested Size Guide
| Size | Bust | Approx. Back Width | Suggested Ease |
|---|---|---|---|
| S | 32–34 in / 81–86 cm | 16–17 in / 41–43 cm | 2–3 in |
| M | 36–38 in / 91–97 cm | 18–19 in / 46–48 cm | 2–4 in |
| L | 40–42 in / 102–107 cm | 20–21 in / 51–53 cm | 3–4 in |
| XL | 44–46 in / 112–117 cm | 22–23 in / 56–58 cm | 3–5 in |
| 2XL | 48–50 in / 122–127 cm | 23–24 in / 58–61 cm | 3–5 in |
Use these measurements as starting points. Gauge and actual body measurements should determine your final stitch counts.
Choosing Yarn and Colors
The olive green shown in the inspiration creates an earthy woodland crochet appearance. Similar shades such as forest green, moss, sage, or deep emerald would emphasize the botanical quality of the lace.
Cream, ivory, or beige can give the same design a romantic vintage appearance. Black creates a more dramatic evening garment, while dusty rose or lavender offers a softer feminine version.
Solid colors are particularly effective because they allow the different stitch textures to remain visible.
Gradient yarn can also work, although highly variegated yarn may visually compete with intricate lace.
Choose yarn with enough drape for the openwork to fall naturally. Extremely stiff yarn can make the side panels project outward instead of flowing over the body.
Most importantly, purchase enough yarn from the same dye lot whenever possible, particularly for a solid-color garment.
Frequently Asked Questions About the Top-Down Crochet Blouse Pattern
Is the Top-Down Crochet Blouse Pattern suitable for beginners?
It is best for an adventurous beginner or intermediate crocheter. You should already be comfortable with chains, single crochet, double crochet, increases, chain spaces, shells, and reading stitch repeats.
What yarn is best for this blouse?
A DK-weight cotton or cotton-blend yarn is an excellent option because it provides stitch definition, breathability, and attractive drape.
What hook size should I use?
Approximately 3.5–4.0 mm is a useful starting range for DK yarn, but always select the hook that gives you the required gauge.
Can I make this pattern larger?
Yes. Increase the initial upper-back width according to your gauge, make the armholes deeper, and add more lace repeats to the sides.
How do I make a smaller size?
Reduce the starting width while keeping the stitch multiple required by your lace pattern. Also shorten the armhole depth and reduce the number of side repeats.
Why is my lace border ruffling?
You probably have too many stitches or shells along the foundation edge. Remove some foundation stitches and redistribute the scallops.
Why does the lower section pull inward?
The mesh may need additional increases. Add an extra V-stitch or chain space periodically along both sides.
Can I make the central panel entirely in single crochet?
Yes, although single crochet produces a denser and potentially heavier fabric. Double crochet generally gives a softer garment with faster construction.
Can sleeves be added?
Yes. Join yarn around each armhole and work rounds of mesh or dc downward. Decrease gradually toward the wrist for fitted sleeves or maintain the stitch count for flowing sleeves.
Can I make it without the scalloped border?
Absolutely. Finish with several rows of sc or a simple picot edge for a cleaner appearance.
How long should the blouse be?
That depends on your preference. Measure from your shoulder to the desired hem and continue the top-down construction until you reach that measurement.
Does this project need blocking?
Blocking is strongly recommended because it helps define the lace crochet stitches, straighten the central panel, and improve the overall drape.
Conclusion
The Top-Down Crochet Blouse Pattern combines practical garment construction with decorative crochet techniques to create a piece that looks detailed without requiring complicated tailoring. The solid central back provides structure, while mesh stitches, V-stitches, shells, and scalloped crochet edging create the flowing lace appearance that gives this blouse its distinctive character.
Working from the top downward also provides valuable flexibility. Instead of depending entirely on predetermined stitch counts, you can use gauge, body measurements, and regular fitting to control the shoulder width, armhole depth, side coverage, and finished length. This approach makes the pattern adaptable for a wide range of sizes.
PATTERN VIDEO:
With breathable cotton yarn, carefully balanced lace repeats, secure finishing, and proper blocking, the finished Top-Down Crochet Blouse can become a versatile handmade layering piece for warmer days, transitional weather, or special outfits. The same basic construction can also be customized into a cropped shrug, longer vest, open cardigan, or romantic lace top simply by changing the length and width of the decorative sections.